A container is a virtual user space within your computer. Within the container, you can run software in isolation without interfering with the other software that already exists on your machine. In this book, we use a container to run a specific version of the R programming language, as well as other necessary packages. The container ensures that the worksheets function correctly, even if you have a different version of R installed on your computer—or even if you haven’t installed R at all!
Chapter 13 Setting up your computer
In this chapter, you’ll learn how to set up the software needed to follow along with this book on your own computer. Given that installation instructions can vary based on computer setup, we provide instructions for multiple operating systems (Ubuntu Linux, MacOS, and Windows). Although the instructions in this chapter will likely work on many systems, we have specifically verified that they work on a computer that:
-
runs Windows 10 Home, MacOS 13 Ventura, or Ubuntu 22.04,
-
uses a 64-bit CPU,
-
has a connection to the internet,
-
uses English as the default language.
Section 13.1 Chapter learning objectives
By the end of the chapter, readers will be able to do the following:
-
Download the worksheets that accompany this book.
-
Install the Docker virtualization engine.
-
Edit and run the worksheets using JupyterLab running inside a Docker container.
-
Install Git, JupyterLab Desktop, and R packages.
-
Edit and run the worksheets using JupyterLab Desktop.
Section 13.2 Obtaining the worksheets for this book
The worksheets containing exercises for this book are online at https://worksheets.datasciencebook.ca. The worksheets can be launched directly from that page using the Binder links in the rightmost column of the table. This is the easiest way to access the worksheets, but note that you will not be able to save your work and return to it again later. In order to save your progress, you will need to download the worksheets to your own computer and work on them locally. You can download the worksheets as a compressed zip file using the link at the top of the page. Once you unzip the downloaded file, you will have a folder containing all of the Jupyter notebook worksheets accompanying this book. See Chapter 11 for instructions on working with Jupyter notebooks.
Section 13.3 Working with Docker
Once you have downloaded the worksheets, you will next need to install and run the software required to work on Jupyter notebooks on your own computer. Doing this setup manually can be quite tricky, as it involves quite a few different software packages, not to mention getting the right versions of everything—the worksheets and autograder tests may not work unless all the versions are exactly right! To keep things simple, we instead recommend that you install Docker. Docker lets you run your Jupyter notebooks inside a pre-built container that comes with precisely the right versions of all software packages needed to run the worksheets that come with this book.
Note 13.3.1.
Subsection 13.3.1 Windows
Installation To install Docker on Windows, visit the online Docker documentation, and download the
Docker Desktop Installer.exe file. Double-click the file to open the installer and follow the instructions on the installation wizard, choosing WSL-2 instead of Hyper-V when prompted.
Note 13.3.2.
Occasionally, when you first run Docker on Windows, you will encounter an error message. Some common errors you may see:
-
If you need to update WSL, you can enter
cmd.exein the Start menu to run the command line. Typewsl --updateto update WSL. -
If the admin account on your computer is different to your user account, you must add the user to the "docker-users" group. Run Computer Management as an administrator and navigate to
Local UsersandGroups -> Groups -> docker-users. Right-click to add the user to the group. Log out and log back in for the changes to take effect. -
If you need to enable virtualization, you will need to edit your BIOS. Restart your computer, and enter the BIOS using the hotkey (usually Delete, Esc, and/or one of the F# keys). Look for an "Advanced" menu, and under your CPU settings, set the "Virtualization" option to "enabled". Then save the changes and reboot your machine. If you are not familiar with BIOS editing, you may want to find an expert to help you with this, as editing the BIOS can be dangerous. Detailed instructions for doing this are beyond the scope of this book.
Running JupyterLab Run Docker Desktop. Once it is running, you need to download and run the Docker image that we have made available for the worksheets (an image is like a "snapshot" of a computer with all the right packages pre-installed). You only need to do this step one time; the image will remain the next time you run Docker Desktop. In the Docker Desktop search bar, enter
ubcdsci/r-dsci-100, as this is the name of the image. You will see the ubcdsci/r-dsci-100 image in the list (Figure 13.3.3), and "latest" in the Tag drop down menu. We need to change "latest" to the right image version before proceeding. To find the right tag, open the Dockerfile in the worksheets repository, and look for the line FROM ubcdsci/r-dsci-100: followed by the tag consisting of a sequence of numbers and letters. Back in Docker Desktop, in the "Tag" drop down menu, click that tag to select the correct image version. Then click the "Pull" button to download the image.
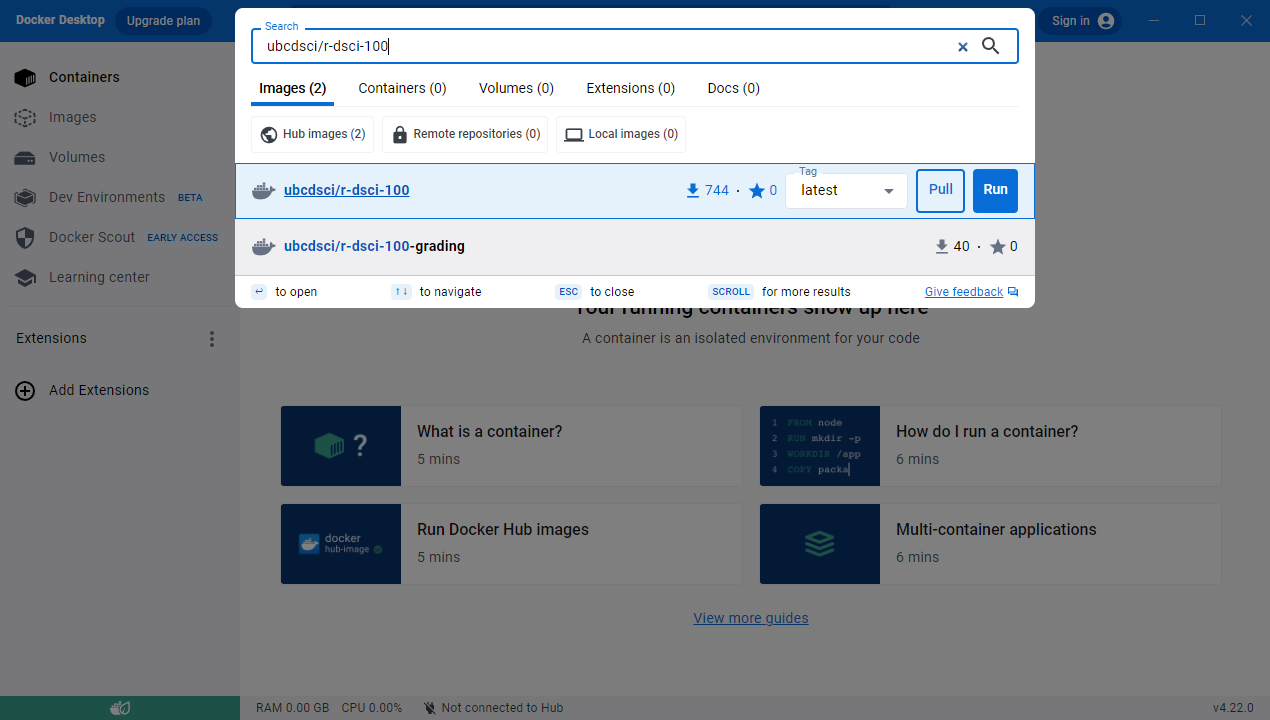
Once the image is done downloading, click the "Images" button on the left side of the Docker Desktop window (Figure 13.3.4). You will see the recently downloaded image listed there under the "Local" tab.
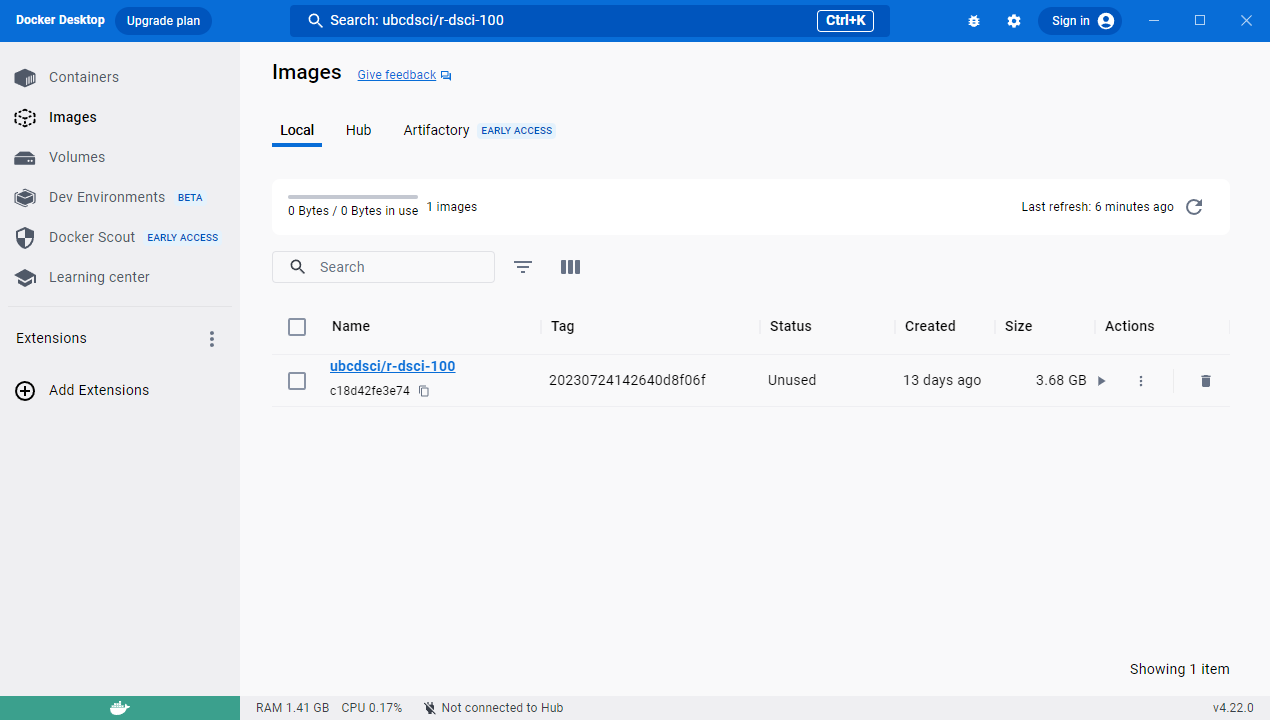
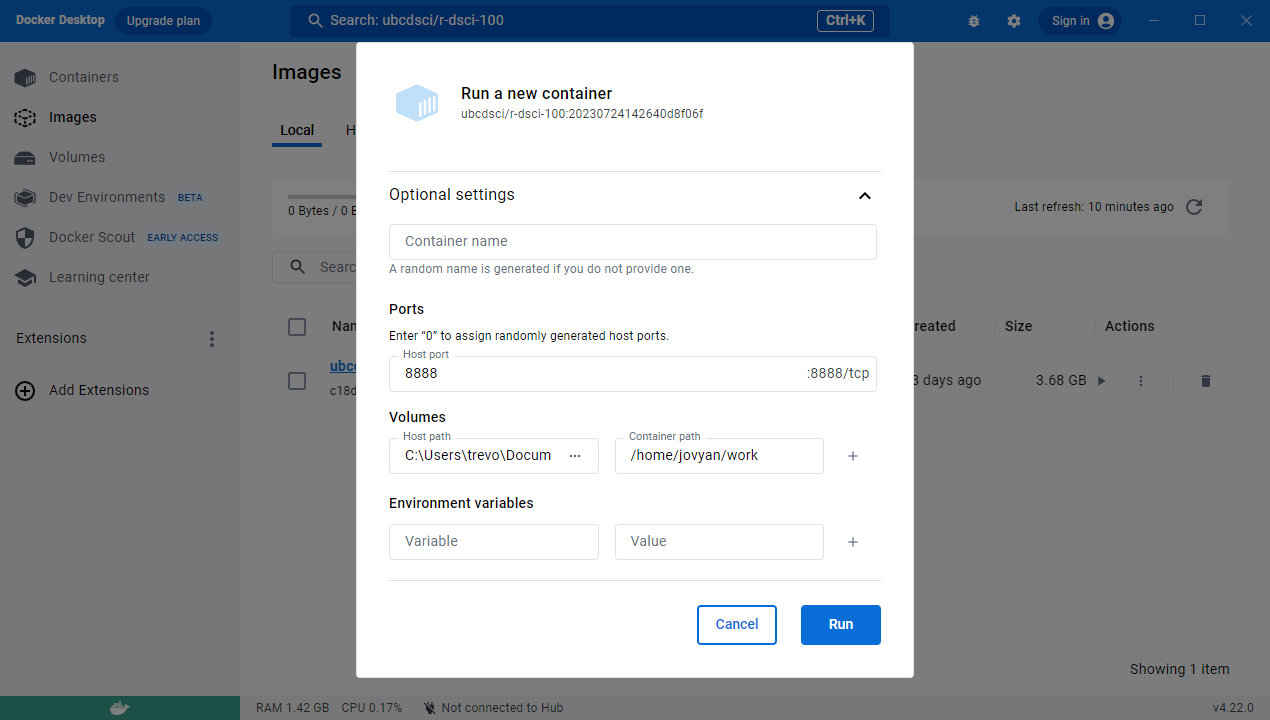
To start up a container using that image, click the play button beside the image. This will open the run configuration menu (Figure 13.3.5). Expand the "Optional settings" drop down menu. In the "Host port" textbox, enter
8888. In the "Volumes" section, click the "Host path" box and navigate to the folder where your Jupyter worksheets are stored. In the "Container path" text box, enter /home/jovyan/work. Then click the "Run" button to start the container.
After clicking the "Run" button, you will see a terminal. The terminal will then print some text as the Docker container starts. Once the text stops scrolling, find the URL in the terminal that starts with
http://127.0.0.1:8888 (highlighted by the red box in Figure 13.3.6), and paste it into your browser to start JupyterLab.
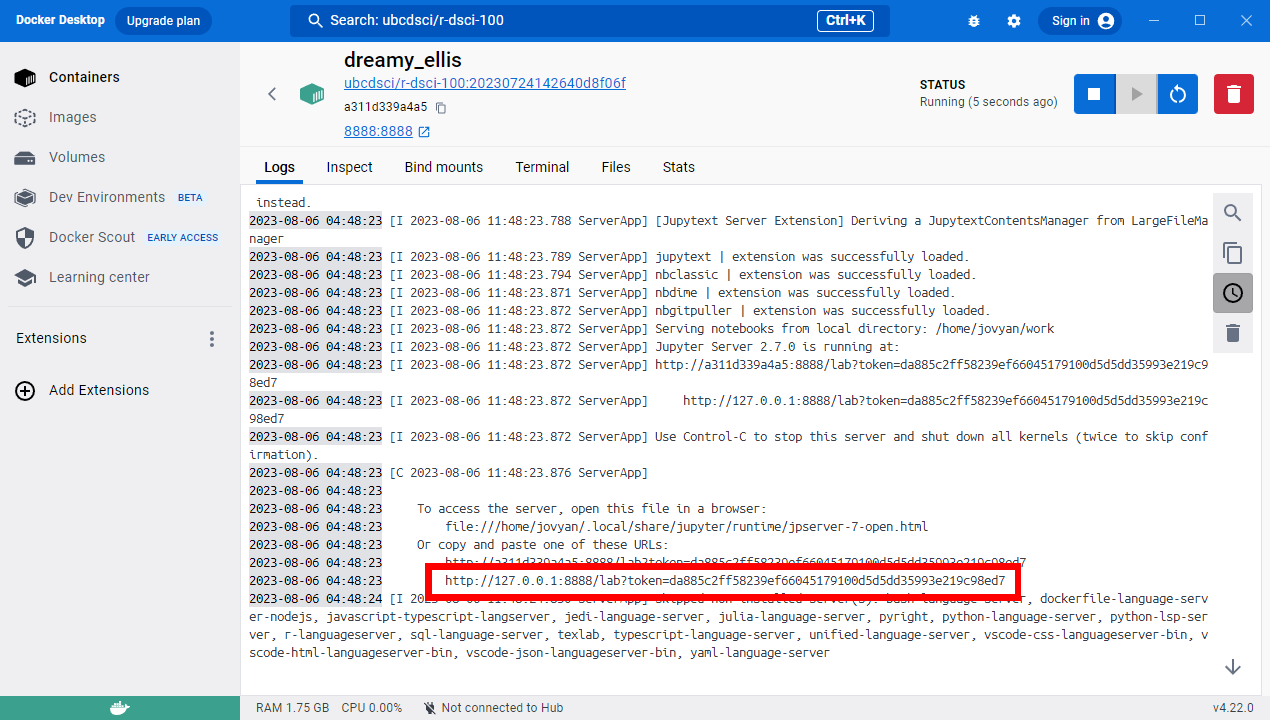
When you are done working, make sure to shut down and remove the container by clicking the red trash can symbol (in the top right corner of Figure 13.3.6). You will not be able to start the container again until you do so. More information on installing and running Docker on Windows, as well as troubleshooting tips, can be found in the online Docker documentation.
Subsection 13.3.2 MacOS
Installation To install Docker on MacOS, visit the online Docker documentation, and download the
Docker.dmg installation file that is appropriate for your computer. To know which installer is right for your machine, you need to know whether your computer has an Intel processor (older machines) or an Apple processor (newer machines); the Apple support page has information to help you determine which processor you have. Once downloaded, double-click the file to open the installer, then drag the Docker icon to the Applications folder. Double-click the icon in the Applications folder to start Docker. In the installation window, use the recommended settings.
Running JupyterLab Run Docker Desktop. Once it is running, follow the instructions above in the Windows section on Running JupyterLab (the user interface is the same). More information on installing and running Docker on MacOS, as well as troubleshooting tips, can be found in the online Docker documentation.
Subsection 13.3.3 Ubuntu
Installation To install Docker on Ubuntu, open the terminal and enter the following five commands.
sudo apt update
sudo apt install ca-certificates curl gnupg
curl -fsSL https://get.docker.com -o get-docker.sh
sudo chmod u+x get-docker.sh
sudo sh get-docker.sh
Running JupyterLab First, open the
Dockerfile in the worksheets repository, and look for the line FROM ubcdsci/r-dsci-100: followed by a tag consisting of a sequence of numbers and letters. Then in the terminal, navigate to the directory where you want to run JupyterLab, and run the following command, replacing TAG with the tag you found earlier.
docker run --rm -v $(pwd):/home/jovyan/work -p 8888:8888 ubcdsci/r-dsci-100:TAG jupyter lab
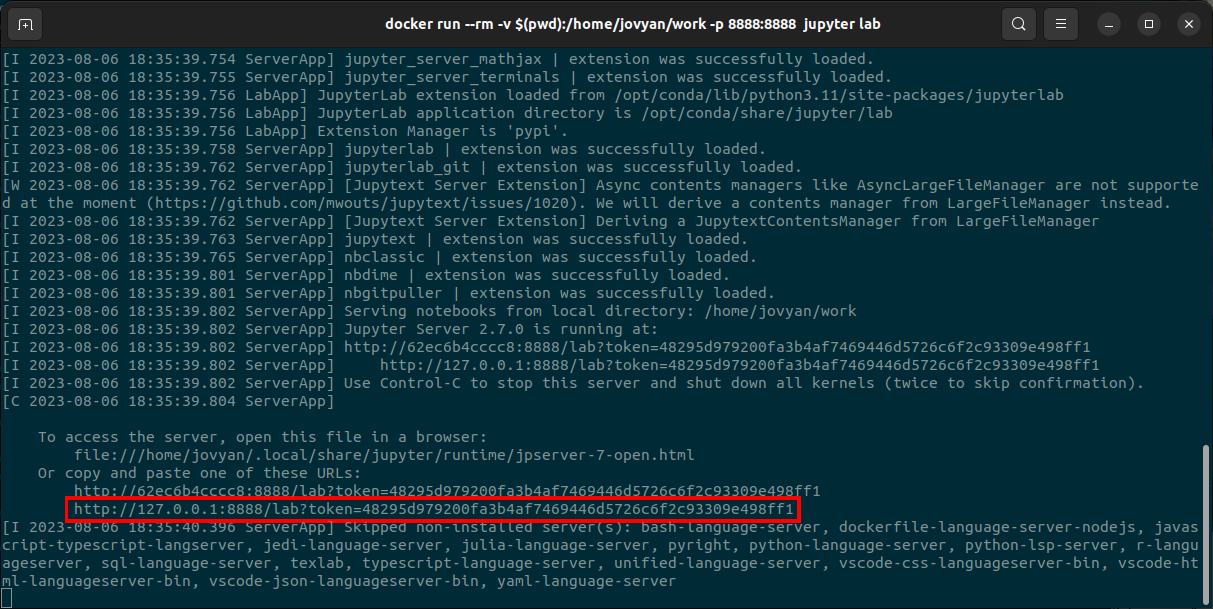
The terminal will then print some text as the Docker container starts. Once the text stops scrolling, find the URL in your terminal that starts with
http://127.0.0.1:8888 (highlighted by the red box in Figure 13.3.7), and paste it into your browser to start JupyterLab. More information on installing and running Docker on Ubuntu, as well as troubleshooting tips, can be found in the online Docker documentation.
Section 13.4 Working with JupyterLab Desktop
You can also run the worksheets accompanying this book on your computer using JupyterLab Desktop. The advantage of JupyterLab Desktop over Docker is that it can be easier to install; Docker can sometimes run into some fairly technical issues (especially on Windows computers) that require expert troubleshooting. The downside of JupyterLab Desktop is that there is a (very) small chance that you may not end up with the right versions of all the R packages needed for the worksheets. Docker, on the other hand, guarantees that the worksheets will work exactly as intended.
In this section, we will cover how to install JupyterLab Desktop, Git and the JupyterLab Git extension (for version control, as discussed in Chapter 12), and all of the R packages needed to run the code in this book.
Subsection 13.4.1 Windows
Installation First, we will install Git for version control. Go to the Git download page and download the Windows version of Git. Once the download has finished, run the installer and accept the default configuration for all pages. Next, visit the "Installation" section of the JupyterLab Desktop homepage. Download the
JupyterLab-Setup-Windows.exe installer file for Windows. Double-click the installer to run it, use the default settings. Run JupyterLab Desktop by clicking the icon on your desktop.
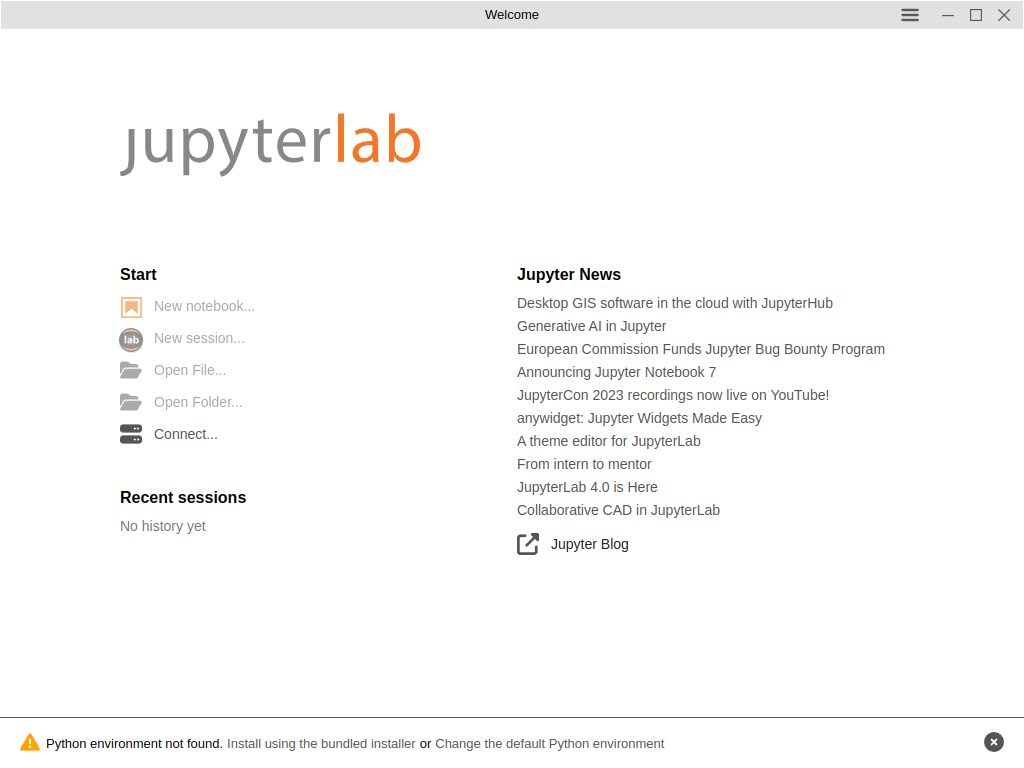
Configuring JupyterLab Desktop Next, in the JupyterLab Desktop graphical interface that appears (Figure 13.4.1), you will see text at the bottom saying "Python environment not found". Click "Install using the bundled installer" to set up the environment.
Next, we need to add the JupyterLab Git extension (so that we can use version control directly from within JupyterLab Desktop), the IRkernel (to enable the R programming language), and various R software packages. Click "New session..." in the JupyterLab Desktop user interface, then scroll to the bottom, and click "Terminal" under the "Other" heading (Figure 13.4.2).
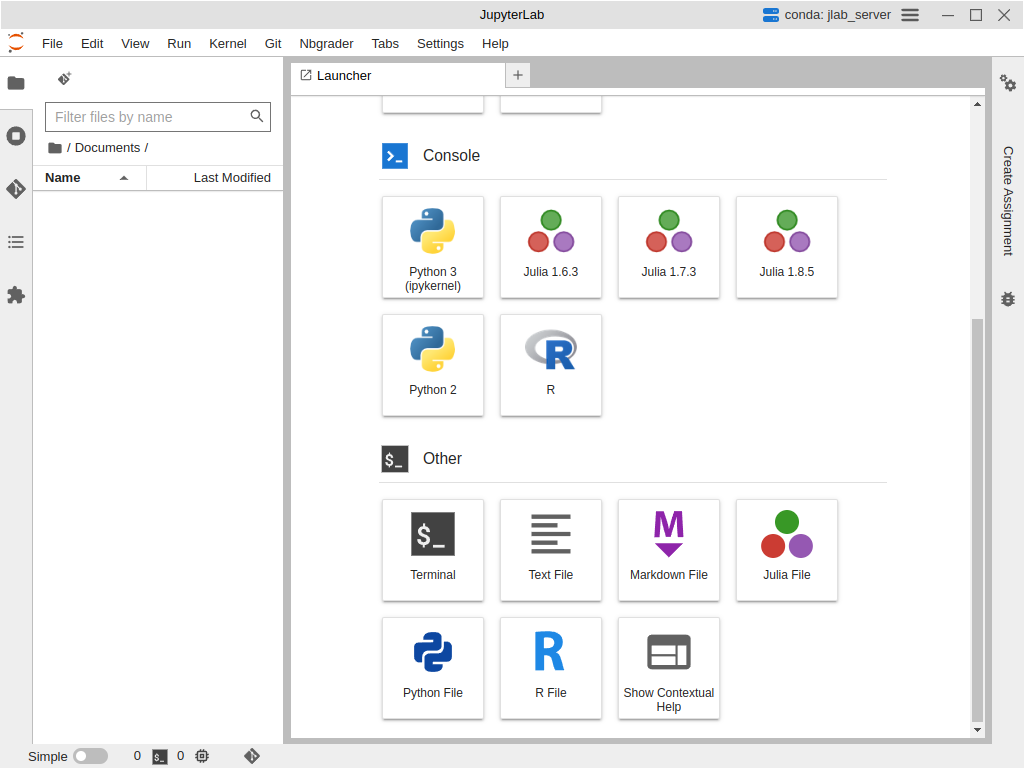
In this terminal, run the following commands:
pip install --upgrade jupyterlab-git
conda env update --file https://raw.githubusercontent.com/UBC-DSCI/data-science-a-first-intro-worksheets/main/environment.yml
The second command installs the specific R and package versions specified in the
environment.yml file found in the worksheets repository. We will always keep the versions in the environment.yml file updated so that they are compatible with the exercise worksheets that accompany the book. Once all of the software installation is complete, it is a good idea to restart JupyterLab Desktop entirely before you proceed to doing your data analysis. This will ensure all the software and settings you put in place are correctly set up and ready for use.
Subsection 13.4.2 MacOS
Installation First, we will install Git for version control. Open the terminal (how-to video) and type the following command:
xcode-select --install
Next, visit the "Installation" section of the JupyterLab Desktop homepage. Download the
JupyterLab-Setup-MacOS-x64.dmg or JupyterLab-Setup-MacOS-arm64.dmg installer file. To know which installer is right for your machine, you need to know whether your computer has an Intel processor (older machines) or an Apple processor (newer machines); the Apple support page has information to help you determine which processor you have. Once downloaded, double-click the file to open the installer, then drag the JupyterLab Desktop icon to the Applications folder. Double-click the icon in the Applications folder to start JupyterLab Desktop.
Configuring JupyterLab Desktop From this point onward, with JupyterLab Desktop running, follow the instructions in the Windows section on Configuring JupyterLab Desktop to set up the environment, install the JupyterLab Git extension, and install the various R software packages needed for the worksheets.
Subsection 13.4.3 Ubuntu
Installation First, we will install Git for version control. Open the terminal and type the following commands:
sudo apt update
sudo apt install git
Next, visit the "Installation" section of the JupyterLab Desktop homepage. Download the
JupyterLab-Setup-Debian.deb installer file for Ubuntu/Debian. Open a terminal, navigate to where the installer file was downloaded, and run the command
sudo dpkg -i JupyterLab-Setup-Debian.deb
Run JupyterLab Desktop using the command
jlab
Configuring JupyterLab Desktop From this point onward, with JupyterLab Desktop running, follow the instructions in the Windows section on Configuring JupyterLab Desktop to set up the environment, install the JupyterLab Git extension, and install the various R software packages needed for the worksheets.

