Technically you don’t have to use a repository hosting service. You can, for example, version control a project that is stored only in a folder on your computer—never sharing it on a repository hosting service. But using a repository hosting service provides a few big benefits, including managing collaborator access permissions, tools to discuss and track bugs, and the ability to have external collaborators contribute work, not to mention the safety of having your work backed up in the cloud. Since most repository hosting services now offer free accounts, there are not many situations in which you wouldn’t want to use one for your project.
Chapter 12 Collaboration with version control
You mostly collaborate with yourself, and me-from-two-months-ago never responds to email.―Mark T. Holder
Section 12.1 Overview
This chapter will introduce the concept of using version control systems to track changes to a project over its lifespan, to share and edit code in a collaborative team, and to distribute the finished project to its intended audience. This chapter will also introduce how to use the two most common version control tools: Git for local version control, and GitHub for remote version control. We will focus on the most common version control operations used day-to-day in a standard data science project. There are many user interfaces for Git; in this chapter we will cover the Jupyter Git interface.
Section 12.2 Chapter learning objectives
By the end of the chapter, readers will be able to do the following:
-
Describe what version control is and why data analysis projects can benefit from it.
-
Create a remote version control repository on GitHub.
-
Use Jupyter’s Git version control tools for project versioning and collaboration:
-
Clone a remote version control repository to create a local repository.
-
Commit changes to a local version control repository.
-
Push local changes to a remote version control repository.
-
Pull changes from a remote version control repository to a local version control repository.
-
Resolve merge conflicts.
-
-
Give collaborators access to a remote GitHub repository.
-
Communicate with collaborators using GitHub issues.
-
Use best practices when collaborating on a project with others.
Section 12.3 What is version control, and why should I use it?
Data analysis projects often require iteration and revision to move from an initial idea to a finished product ready for the intended audience. Without deliberate and conscious effort towards tracking changes made to the analysis, projects tend to become messy. This mess can have serious, negative repercussions on an analysis project, including results that your code cannot reproduce, temporary files with snippets of ideas that are forgotten or not easy to find, mind-boggling file names that make it unclear which is the current working version of the file (e.g.,
document_final_draft_final.txt, to_hand_in_final_v2.txt, etc.), and more.
Additionally, the iterative nature of data analysis projects means that most of the time, the final version of the analysis that is shared with the audience is only a fraction of what was explored during the development of that analysis. Changes in data visualizations and modeling approaches, as well as some negative results, are often not observable from reviewing only the final, polished analysis. The lack of observability of these parts of the analysis development can lead to others repeating things that did not work well, instead of seeing what did not work well, and using that as a springboard to new, more fruitful approaches.
Finally, data analyses are typically completed by a team of people rather than a single person. This means that files need to be shared across multiple computers, and multiple people often end up editing the project simultaneously. In such a situation, determining who has the latest version of the project—and how to resolve conflicting edits—can be a real challenge.
Version control helps solve these challenges. Version control is the process of keeping a record of changes to documents, including when the changes were made and who made them, throughout the history of their development. It also provides the means both to view earlier versions of the project and to revert changes. Version control is most commonly used in software development, but can be used for any electronic files for any type of project, including data analyses. Being able to record and view the history of a data analysis project is important for understanding how and why decisions to use one method or another were made, among other things. Version control also facilitates collaboration via tools to share edits with others and resolve conflicting edits. But even if you’re working on a project alone, you should still use version control. It helps you keep track of what you’ve done, when you did it, and what you’re planning to do next!
To version control a project, you generally need two things: a version control system and a repository hosting service. The version control system is the software responsible for tracking changes, sharing changes you make with others, obtaining changes from others, and resolving conflicting edits. The repository hosting service is responsible for storing a copy of the version-controlled project online (a repository), where you and your collaborators can access it remotely, discuss issues and bugs, and distribute your final product. For both of these items, there is a wide variety of choices. In this textbook we’ll use Git for version control, and GitHub for repository hosting, because both are currently the most widely used platforms. In the additional resources section at the end of the chapter, we list many of the common version control systems and repository hosting services in use today.
Note 12.3.1.
Section 12.4 Version control repositories
Typically, when we put a data analysis project under version control, we create two copies of the repository (Figure 12.4.1). One copy we use as our primary workspace where we create, edit, and delete files. This copy is commonly referred to as the local repository. The local repository most commonly exists on our computer or laptop, but can also exist within a workspace on a server (e.g., JupyterHub). The other copy is typically stored in a repository hosting service (e.g., GitHub), where we can easily share it with our collaborators. This copy is commonly referred to as the remote repository.
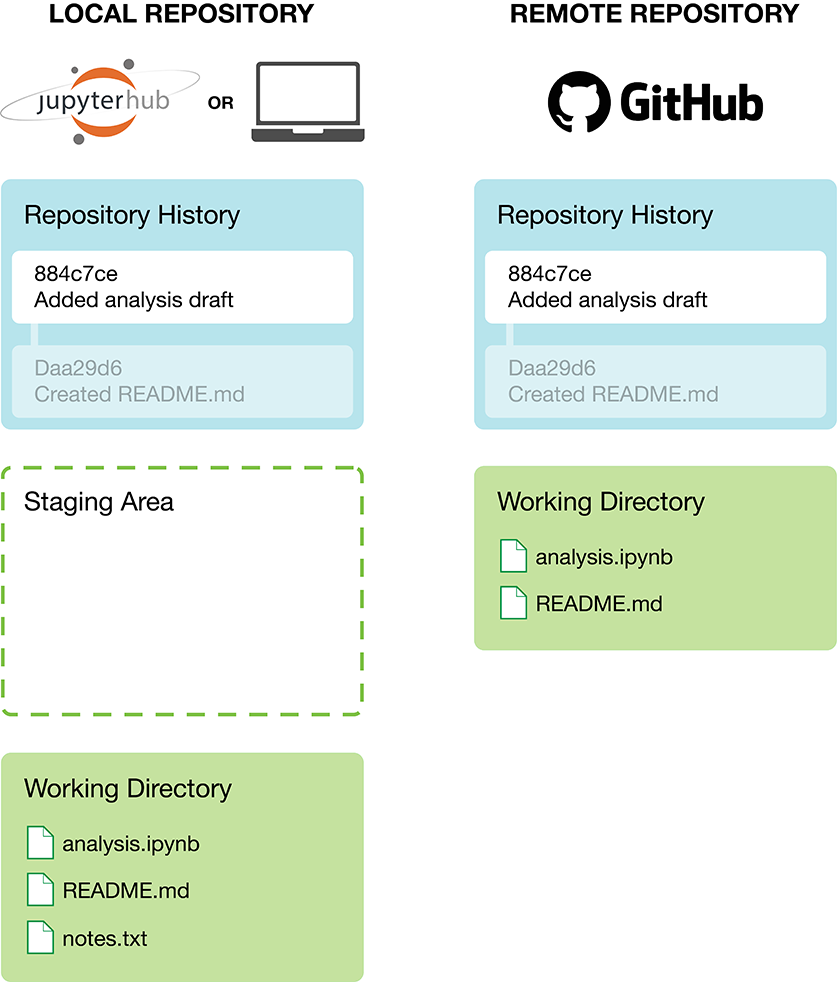
Both copies of the repository have a working directory where you can create, store, edit, and delete files (e.g.,
analysis.ipynb in Figure 12.4.1). Both copies of the repository also maintain a full project history (Figure 12.4.1). This history is a record of all versions of the project files that have been created. The repository history is not automatically generated; Git must be explicitly told when to record a version of the project. These records are called commits. They are a snapshot of the file contents as well as metadata about the repository at the time the record was created (who made the commit, when it was made, etc.). In the local and remote repositories shown in Figure 12.4.1, there are two commits represented as rectangles inside the "Repository History" sections. The white rectangle represents the most recent commit, while faded rectangles represent previous commits. Each commit can be identified by a human-readable message, which you write when you make a commit, and a commit hash that Git automatically adds for you.
The purpose of the message is to contain a brief, rich description of what work was done since the last commit. Messages act as a very useful narrative of the changes to a project over its lifespan. If you ever want to view or revert to an earlier version of the project, the message can help you identify which commit to view or revert to. In Figure 12.4.1, you can see two such messages, one for each commit:
Created README.md and Added analysis draft.
The hash is a string of characters consisting of about 40 letters and numbers. The purpose of the hash is to serve as a unique identifier for the commit, and is used by Git to index project history. Although hashes are quite long—imagine having to type out 40 precise characters to view an old project version!—Git is able to work with shorter versions of hashes. In Figure 12.4.1, you can see two of these shortened hashes, one for each commit:
Daa29d6 and 884c7ce.
Section 12.5 Version control workflows
When you work in a local version-controlled repository, there are generally three additional steps you must take as part of your regular workflow. In addition to just working on files—creating, editing, and deleting files as you normally would—you must:
-
Tell Git when to make a commit of your own changes in the local repository.
-
Tell Git when to send your new commits to the remote GitHub repository.
-
Tell Git when to retrieve any new changes (that others made) from the remote GitHub repository.
In this section we will discuss all three of these steps in detail.
Subsection 12.5.1 Committing changes to a local repository
When working on files in your local version control repository (e.g., using Jupyter) and saving your work, these changes will only initially exist in the working directory of the local repository (Figure 12.5.1).
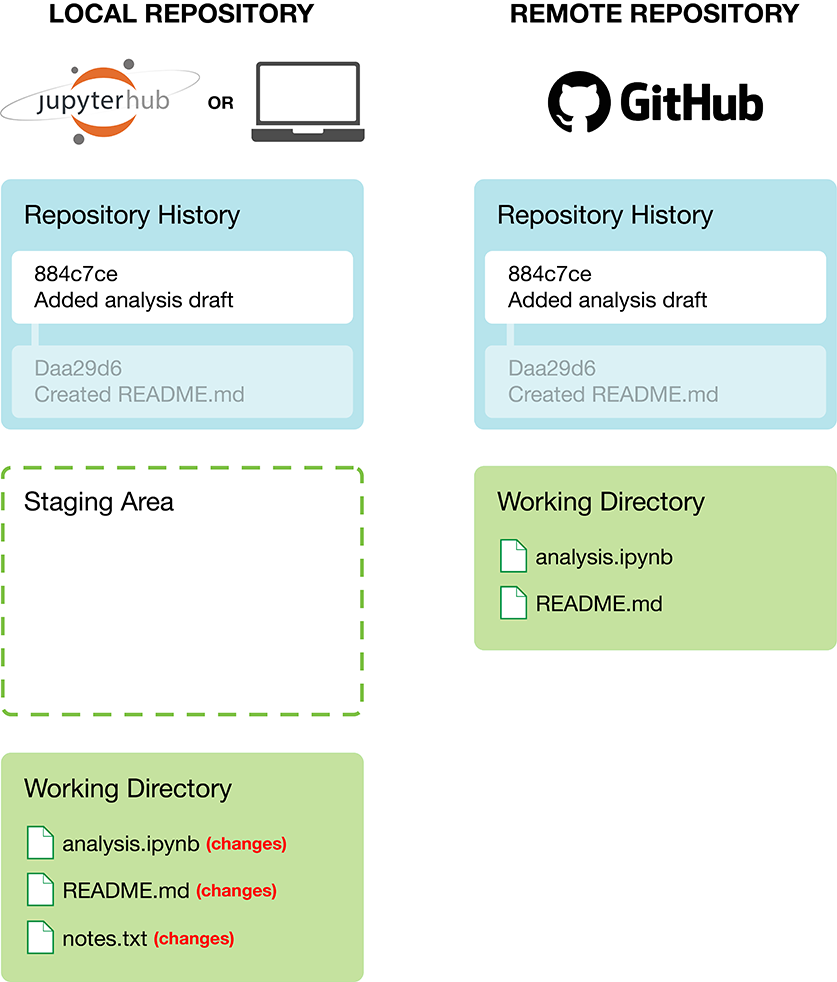
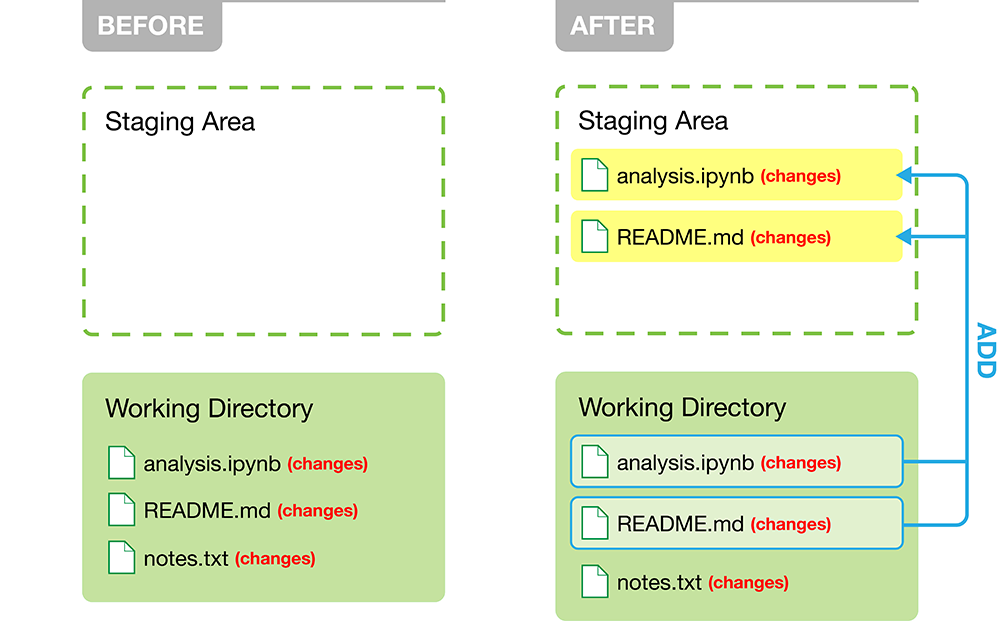
Once you reach a point that you want Git to keep a record of the current version of your work, you need to commit (i.e., snapshot) your changes. A prerequisite to this is telling Git which files should be included in that snapshot. We call this step adding the files to the staging area. Note that the staging area is not a real physical location on your computer; it is instead a conceptual placeholder for these files until they are committed. The benefit of the Git version control system using a staging area is that you can choose to commit changes in only certain files. For example, in Figure 12.5.2, we add only the two files that are important to the analysis project (
analysis.ipynb and README.md) and not our personal scratch notes for the project (notes.txt).
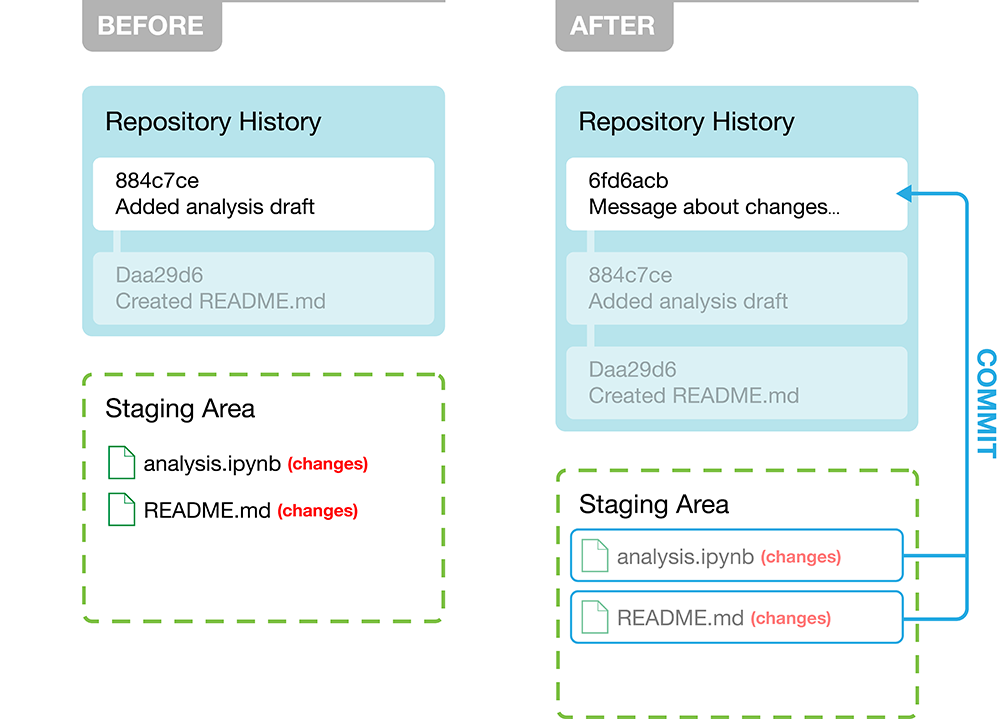
Once the files we wish to commit have been added to the staging area, we can then commit those files to the repository history (Figure 12.5.3). When we do this, we are required to include a helpful commit message to tell collaborators (which often includes future you!) about the changes that were made. In Figure 12.5.3, the message is
Message about changes...; in your work you should make sure to replace this with an informative message about what changed. It is also important to note here that these changes are only being committed to the local repository’s history. The remote repository on GitHub has not changed, and collaborators are not yet able to see your new changes.
Subsection 12.5.2 Pushing changes to a remote repository
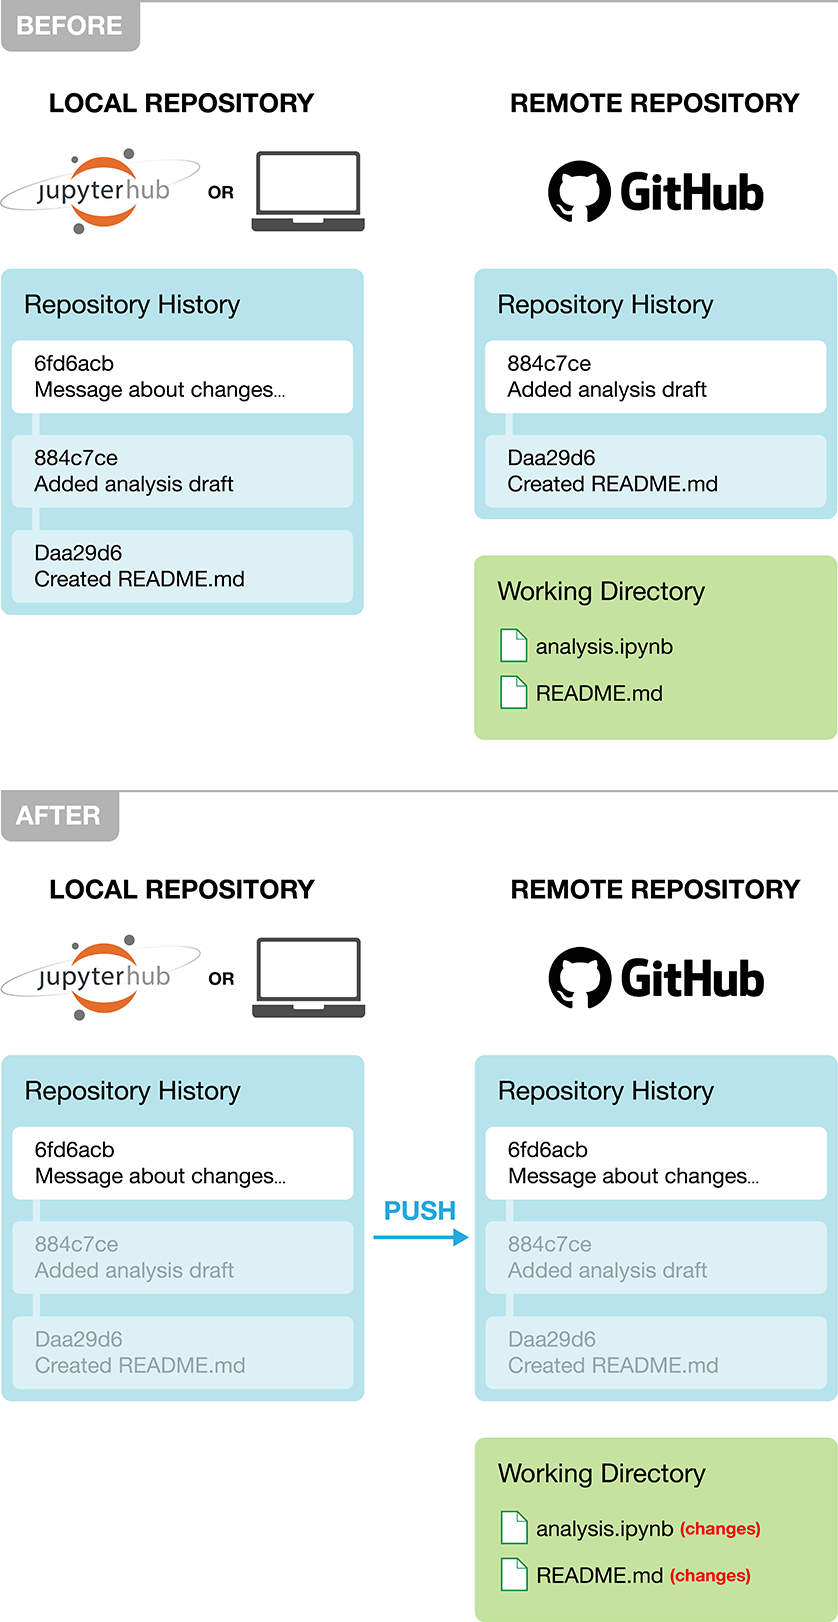
Once you have made one or more commits that you want to share with your collaborators, you need to push (i.e., send) those commits back to GitHub (Figure 12.5.4). This updates the history in the remote repository (i.e., GitHub) to match what you have in your local repository. Now when collaborators interact with the remote repository, they will be able to see the changes you made. And you can also take comfort in the fact that your work is now backed up in the cloud!
Subsection 12.5.3 Pulling changes from a remote repository
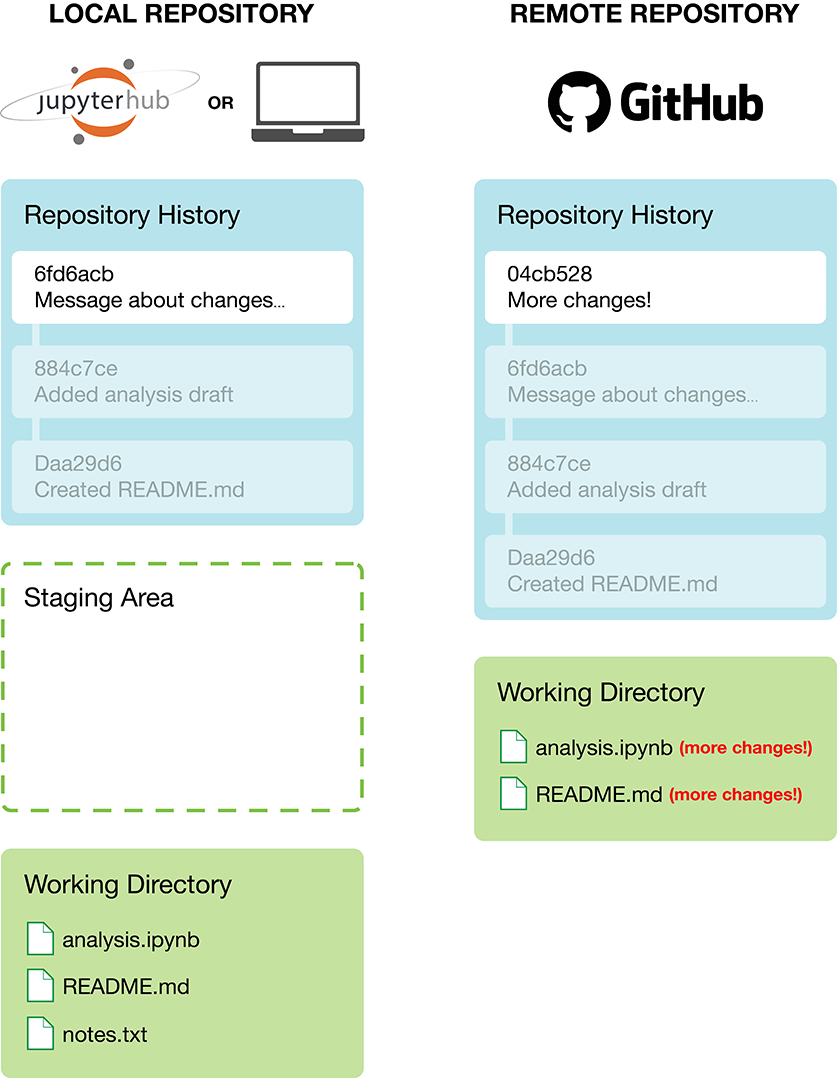
If you are working on a project with collaborators, they will also be making changes to files (e.g., to the analysis code in a Jupyter notebook and the project’s README file), committing them to their own local repository, and pushing their commits to the remote GitHub repository to share them with you. When they push their changes, those changes will only initially exist in the remote GitHub repository and not in your local repository (Figure 12.5.5).
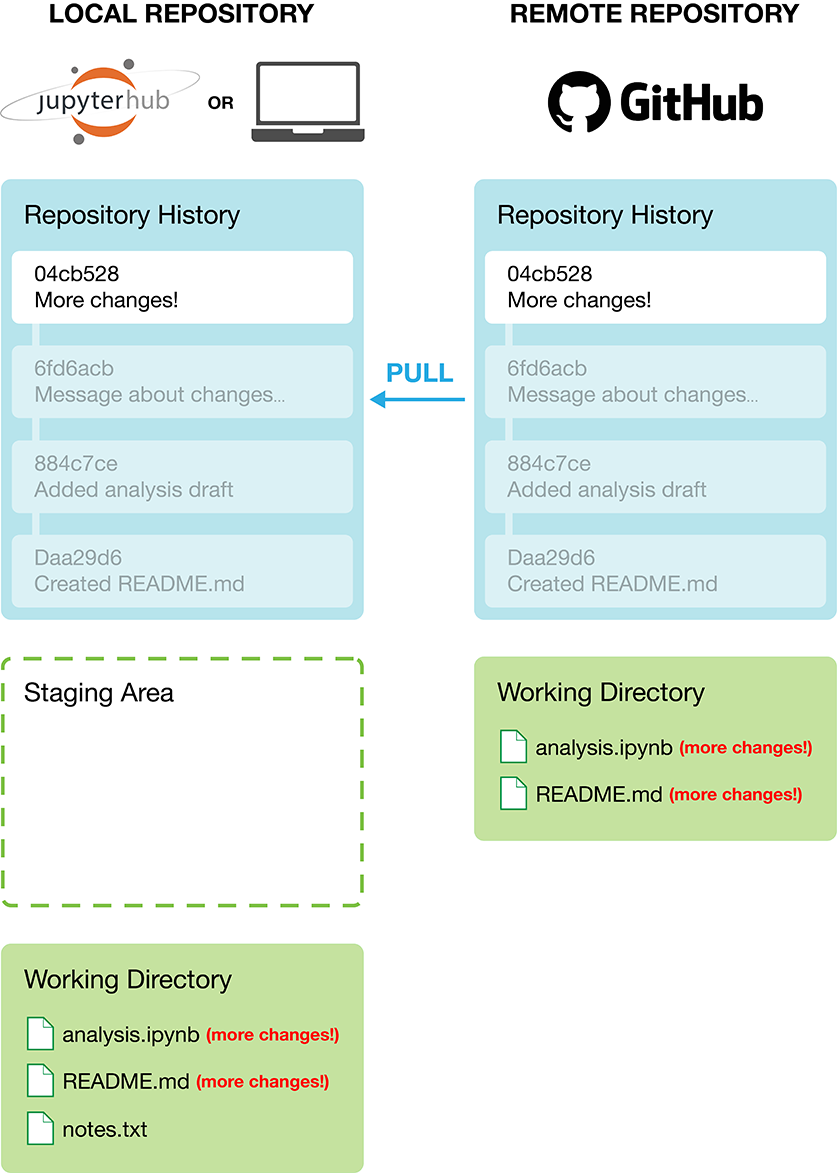
To obtain the new changes from the remote repository on GitHub, you will need to pull those changes to your own local repository. By pulling changes, you synchronize your local repository to what is present on GitHub (Figure 12.5.6). Additionally, until you pull changes from the remote repository, you will not be able to push any more changes yourself (though you will still be able to work and make commits in your own local repository).
Section 12.6 Working with remote repositories using GitHub
Now that you have been introduced to some of the key general concepts and workflows of Git version control, we will walk through the practical steps. There are several different ways to start using version control with a new project. For simplicity and ease of setup, we recommend creating a remote repository first. This section covers how to both create and edit a remote repository on GitHub. Once you have a remote repository set up, we recommend cloning (or copying) that repository to create a local repository in which you primarily work. You can clone the repository either on your own computer or in a workspace on a server (e.g., a JupyterHub server). Section 12.7 below will cover this second step in detail.
Subsection 12.6.1 Creating a remote repository on GitHub
Before you can create remote repositories on GitHub, you will need a GitHub account; you can sign up for a free account at
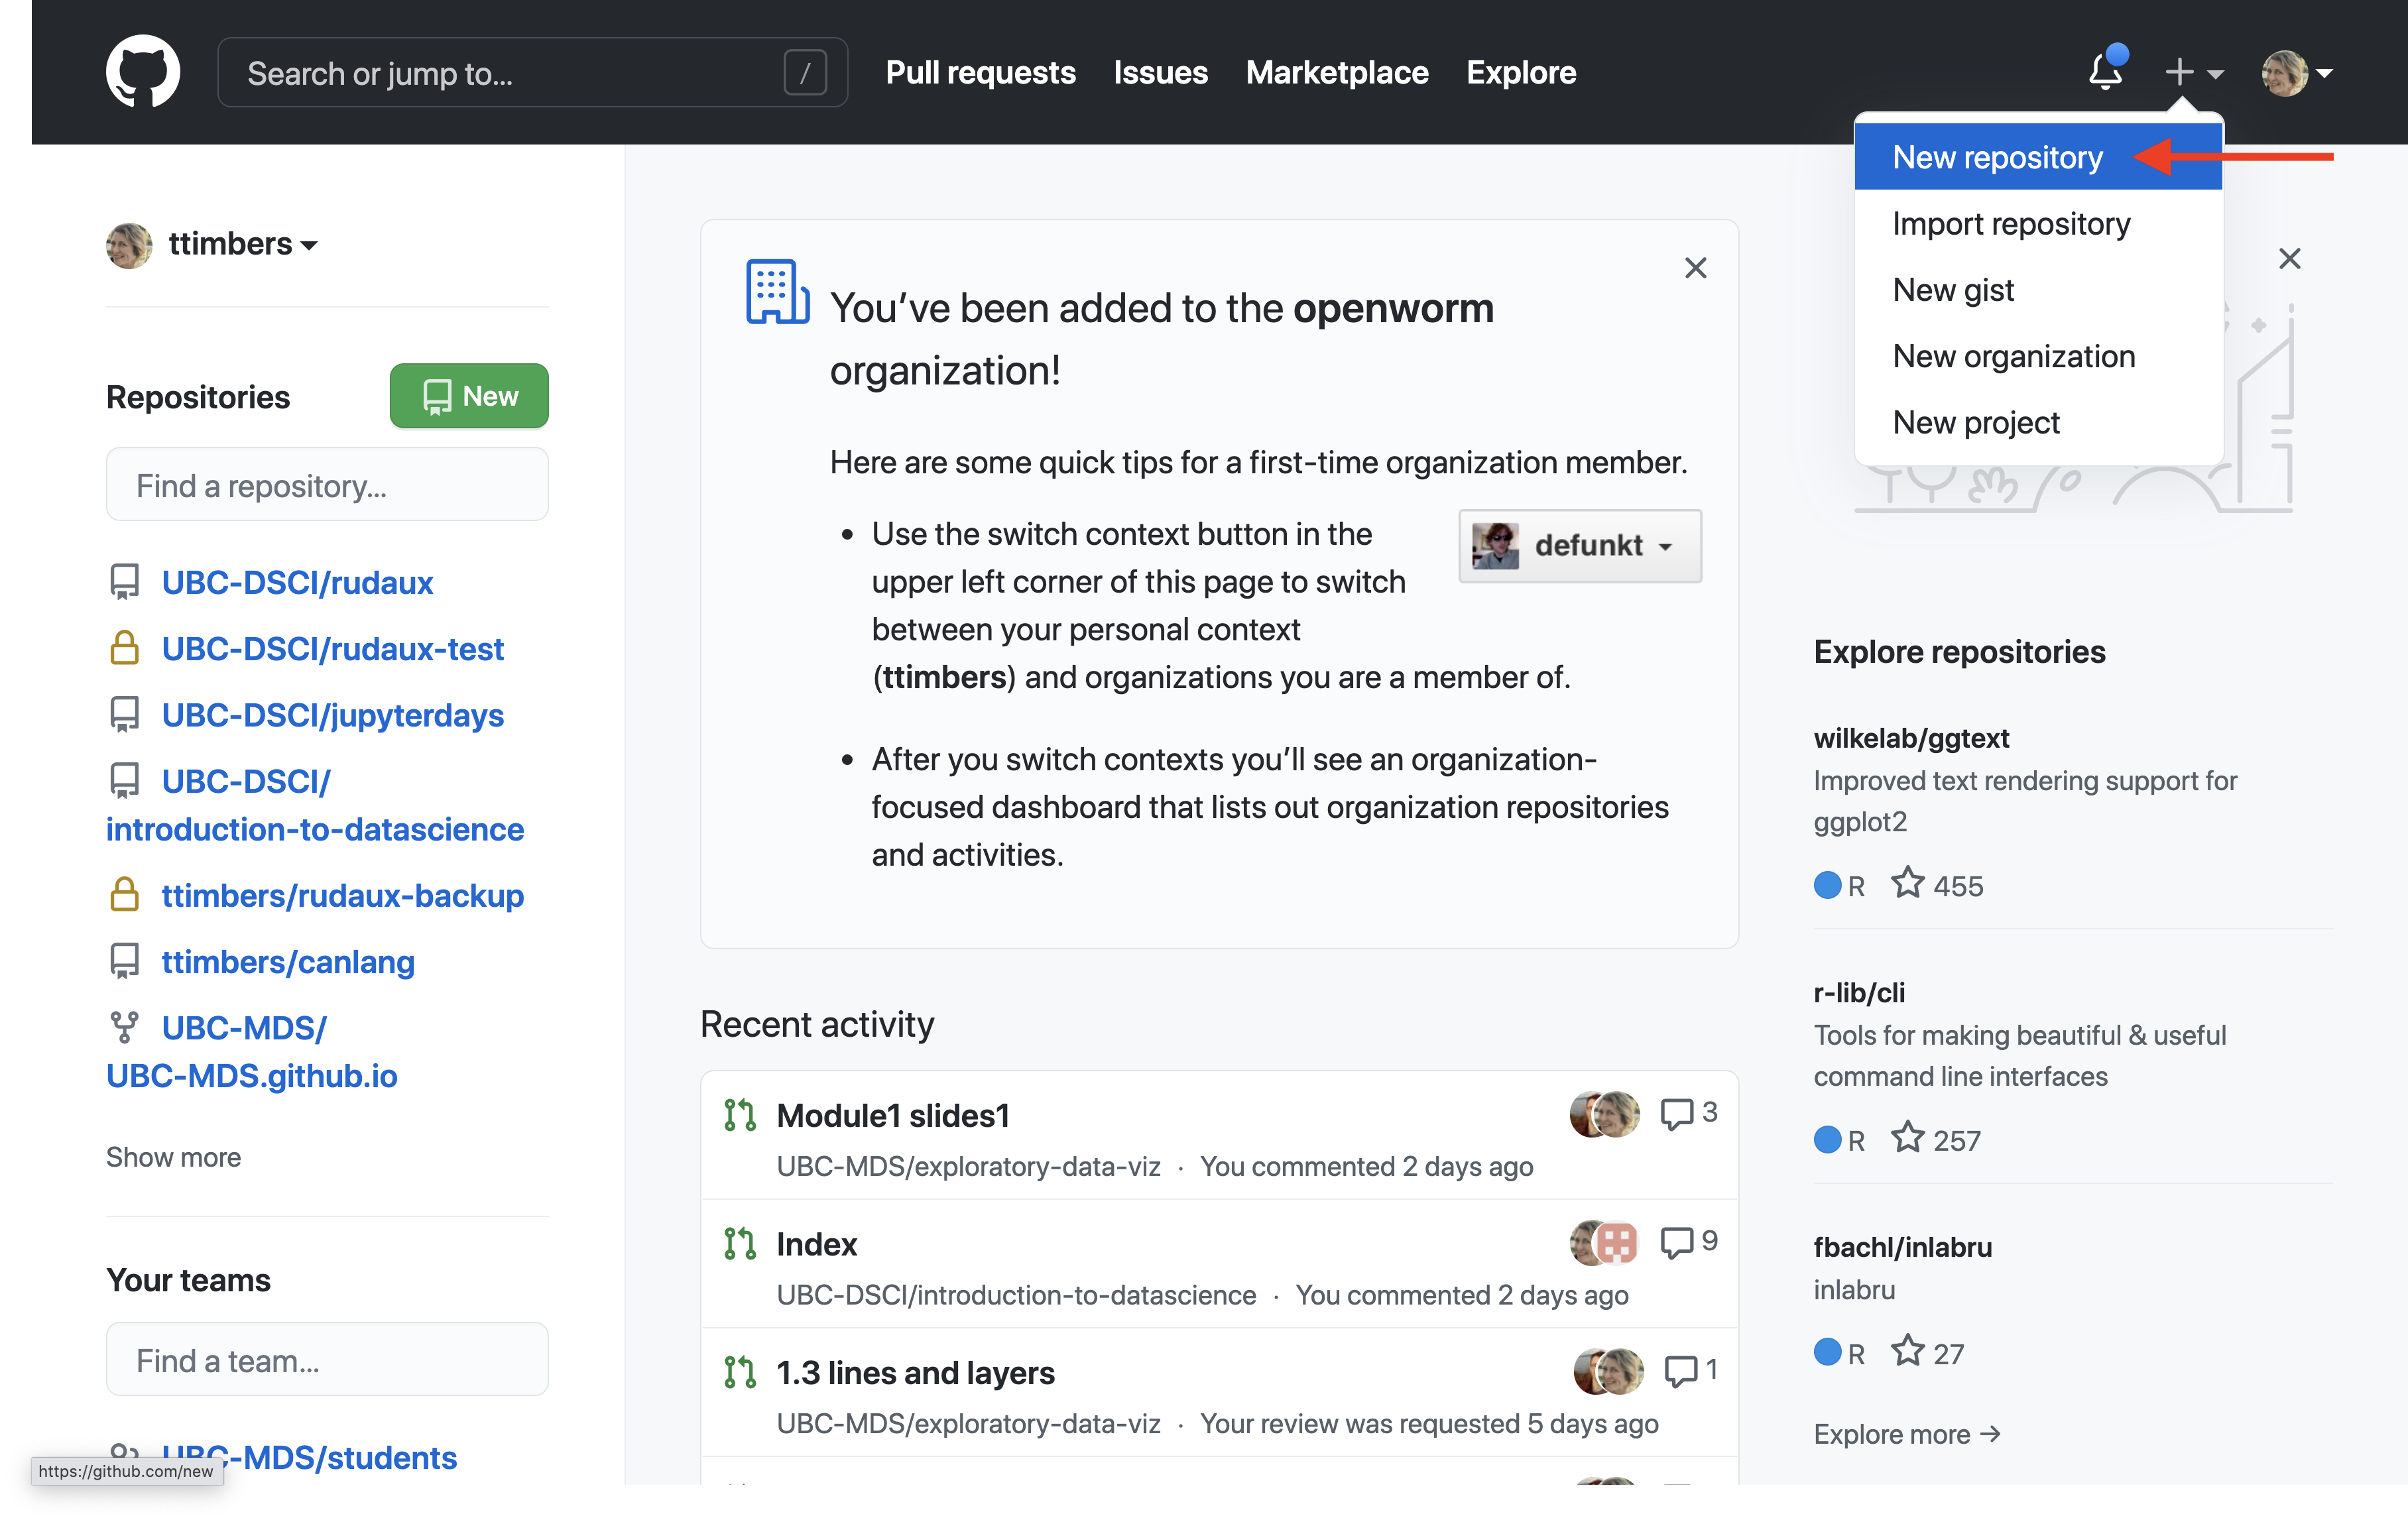
github.com. Once you have logged into your account, you can create a new repository to host your project by clicking on the "+" icon in the upper right-hand corner, and then on "New Repository," as shown in Figure 12.6.1.
Repositories can be set up with a variety of configurations, including a name, optional description, and the inclusion (or not) of several template files. One of the most important configuration items to choose is the visibility to the outside world, either public or private. Public repositories can be viewed by anyone. Private repositories can be viewed by only you. Both public and private repositories are only editable by you, but you can change that by giving access to other collaborators.
To get started with a public repository having a template
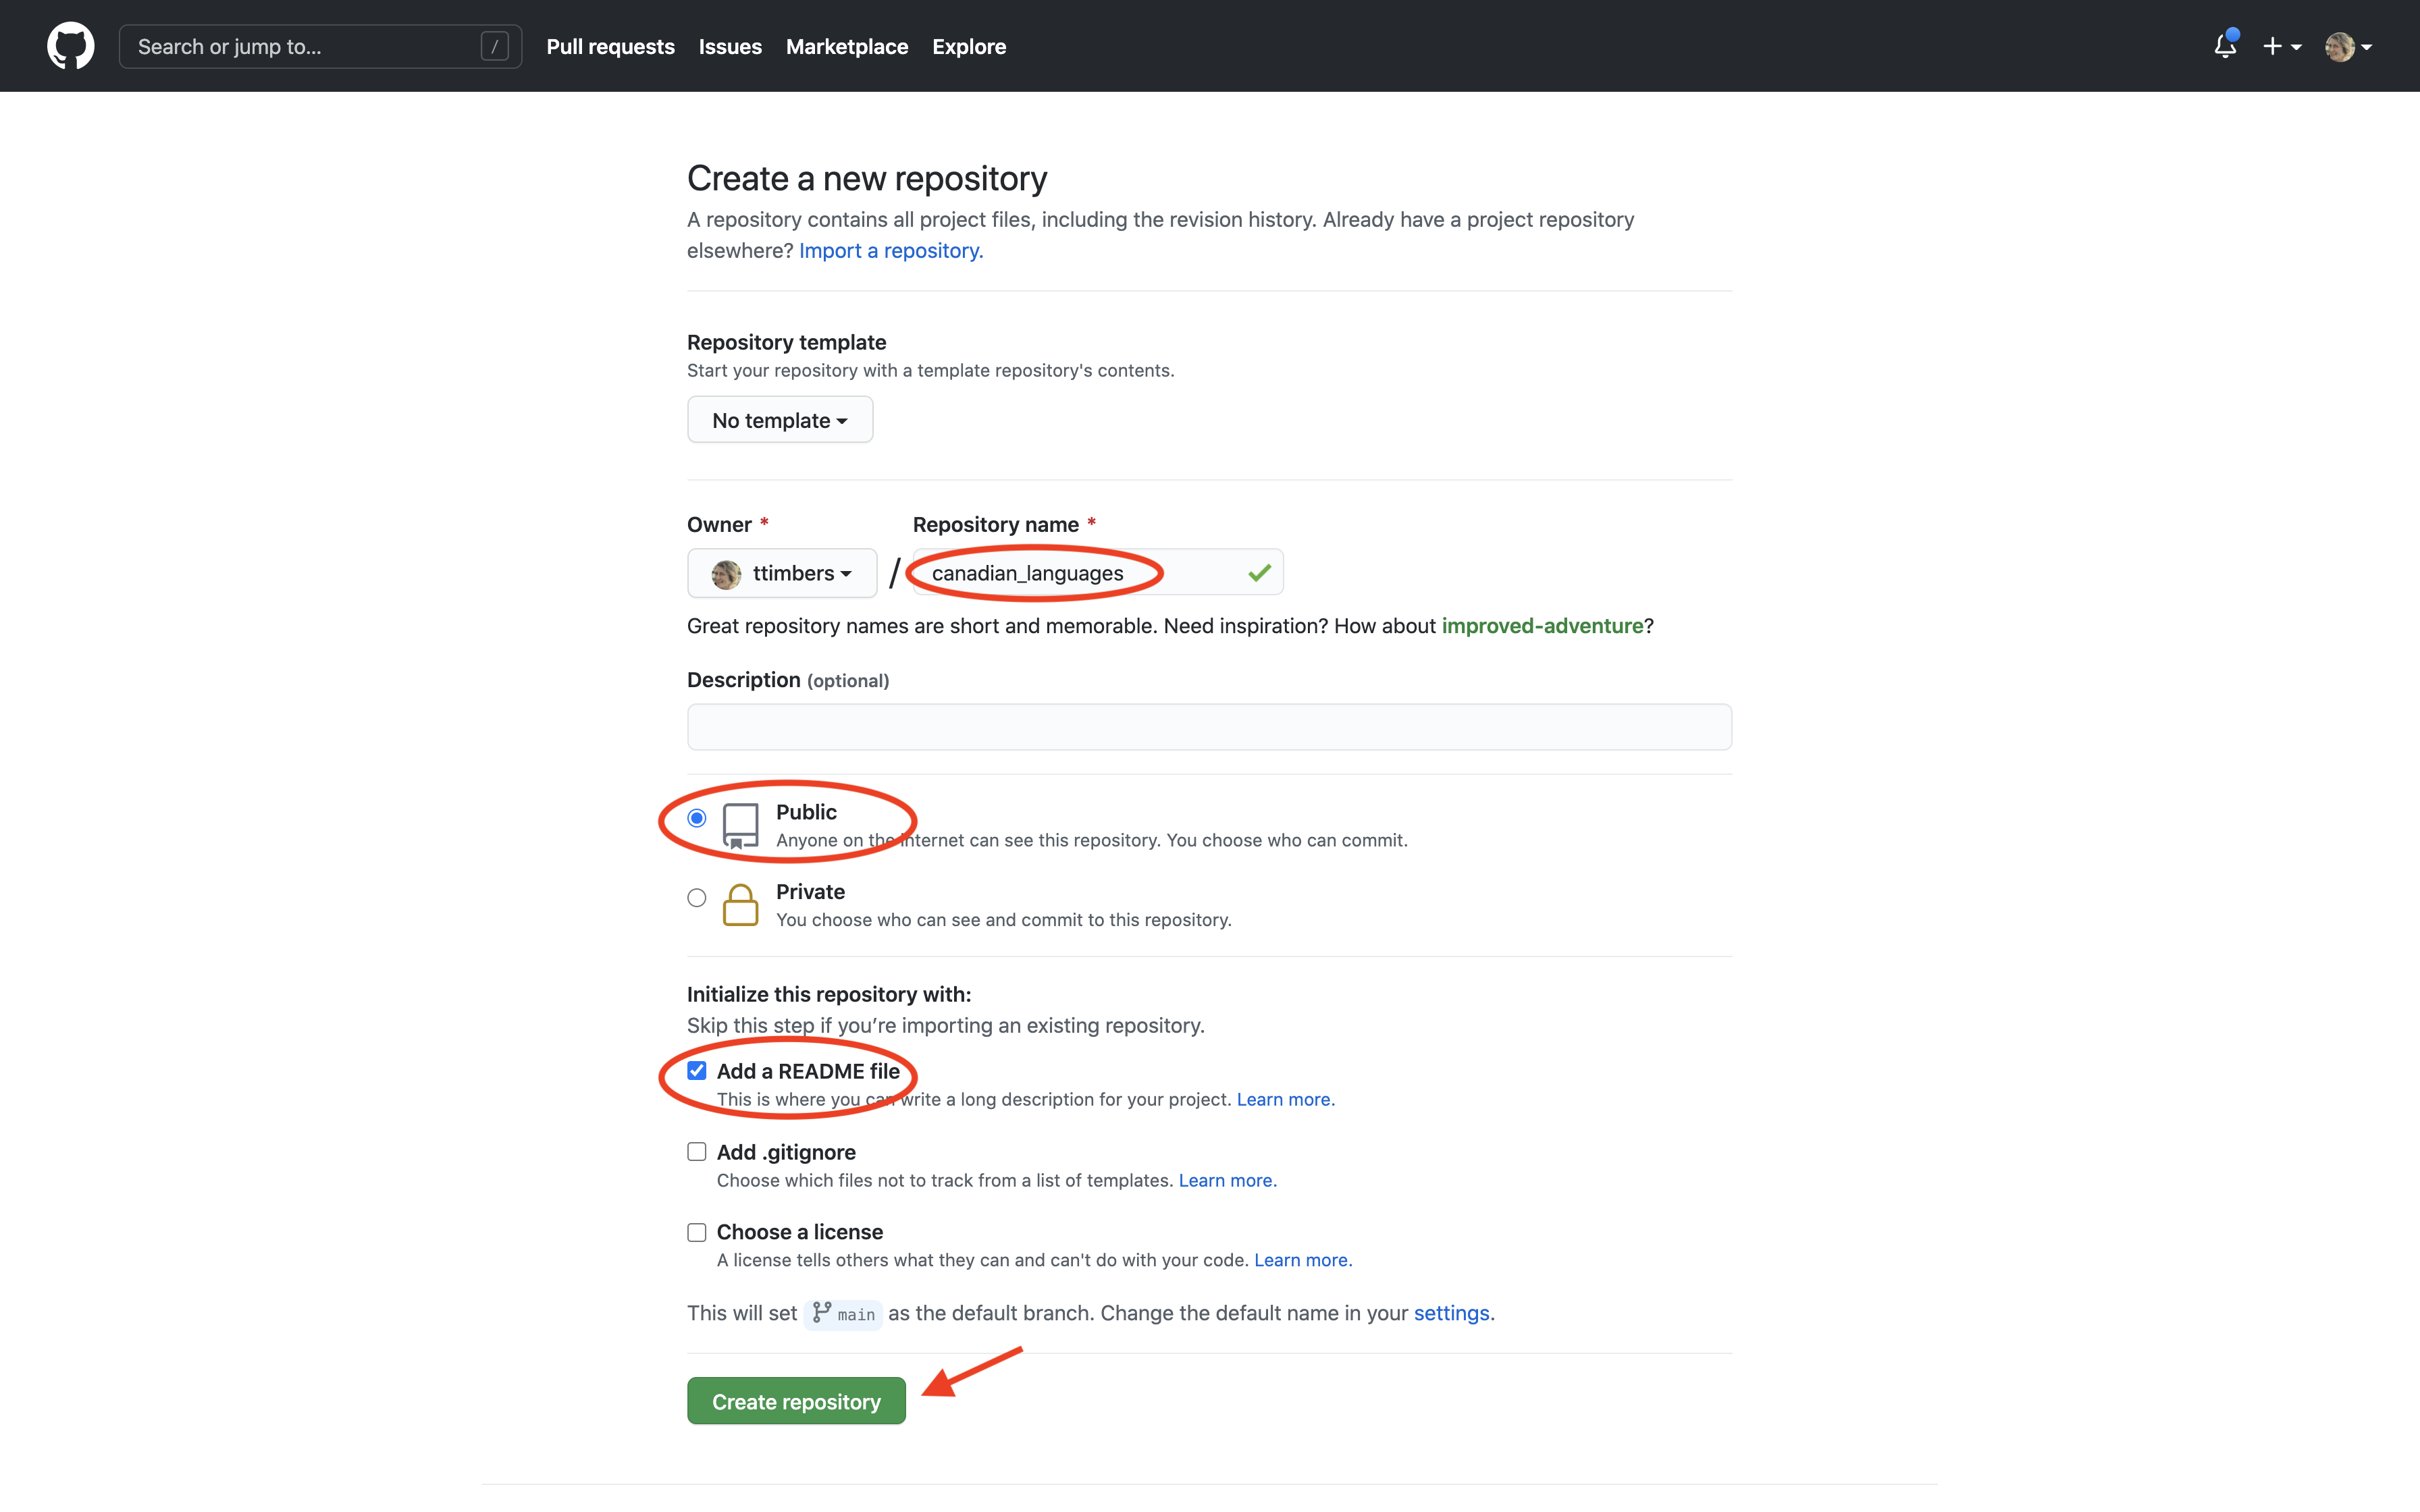
README.md file, take the following steps shown in Figure 12.6.2:
-
Enter the name of your project repository. In the example below, we use
canadian_languages. Most repositories follow a similar naming convention involving only lowercase letter words separated by either underscores or hyphens. -
Choose an option for the privacy of your repository.
-
Select "Add a README file." This creates a template
README.mdfile in your repository’s root folder. -
When you are happy with your repository name and configuration, click on the green "Create Repository" button.
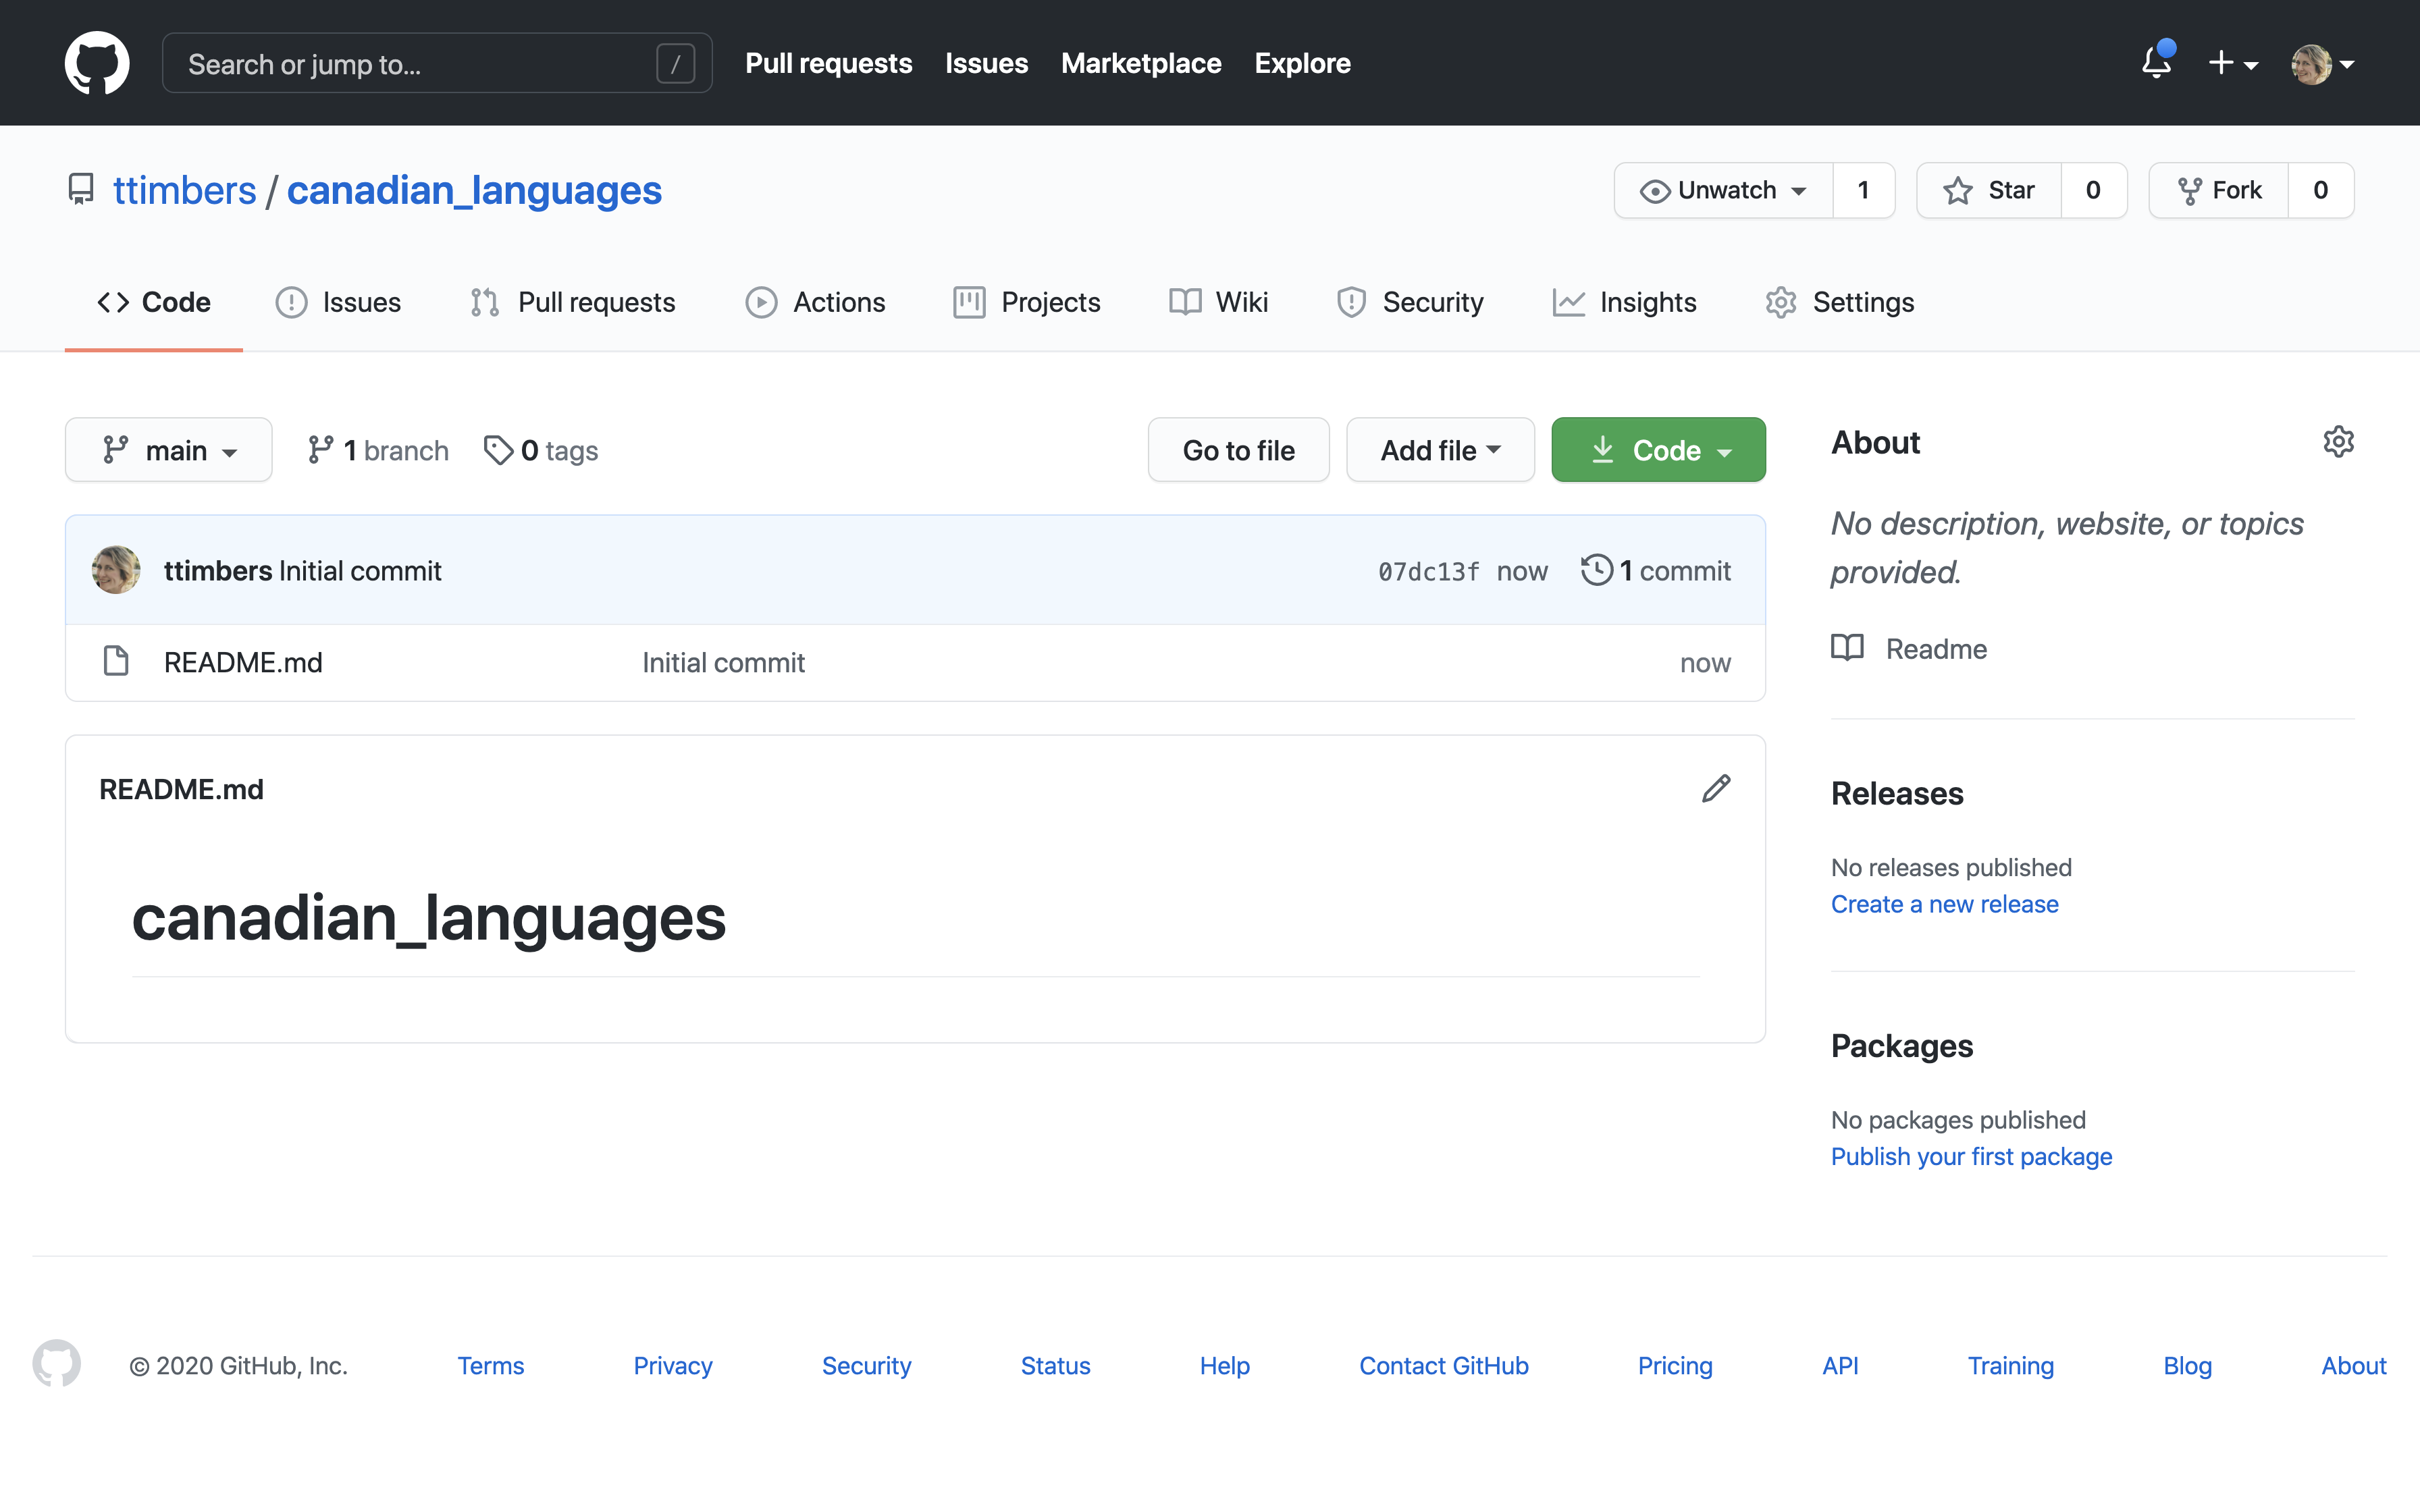
A newly created public repository with a
README.md template file should look something like what is shown in Figure 12.6.3.
Subsection 12.6.2 Editing files on GitHub with the pen tool
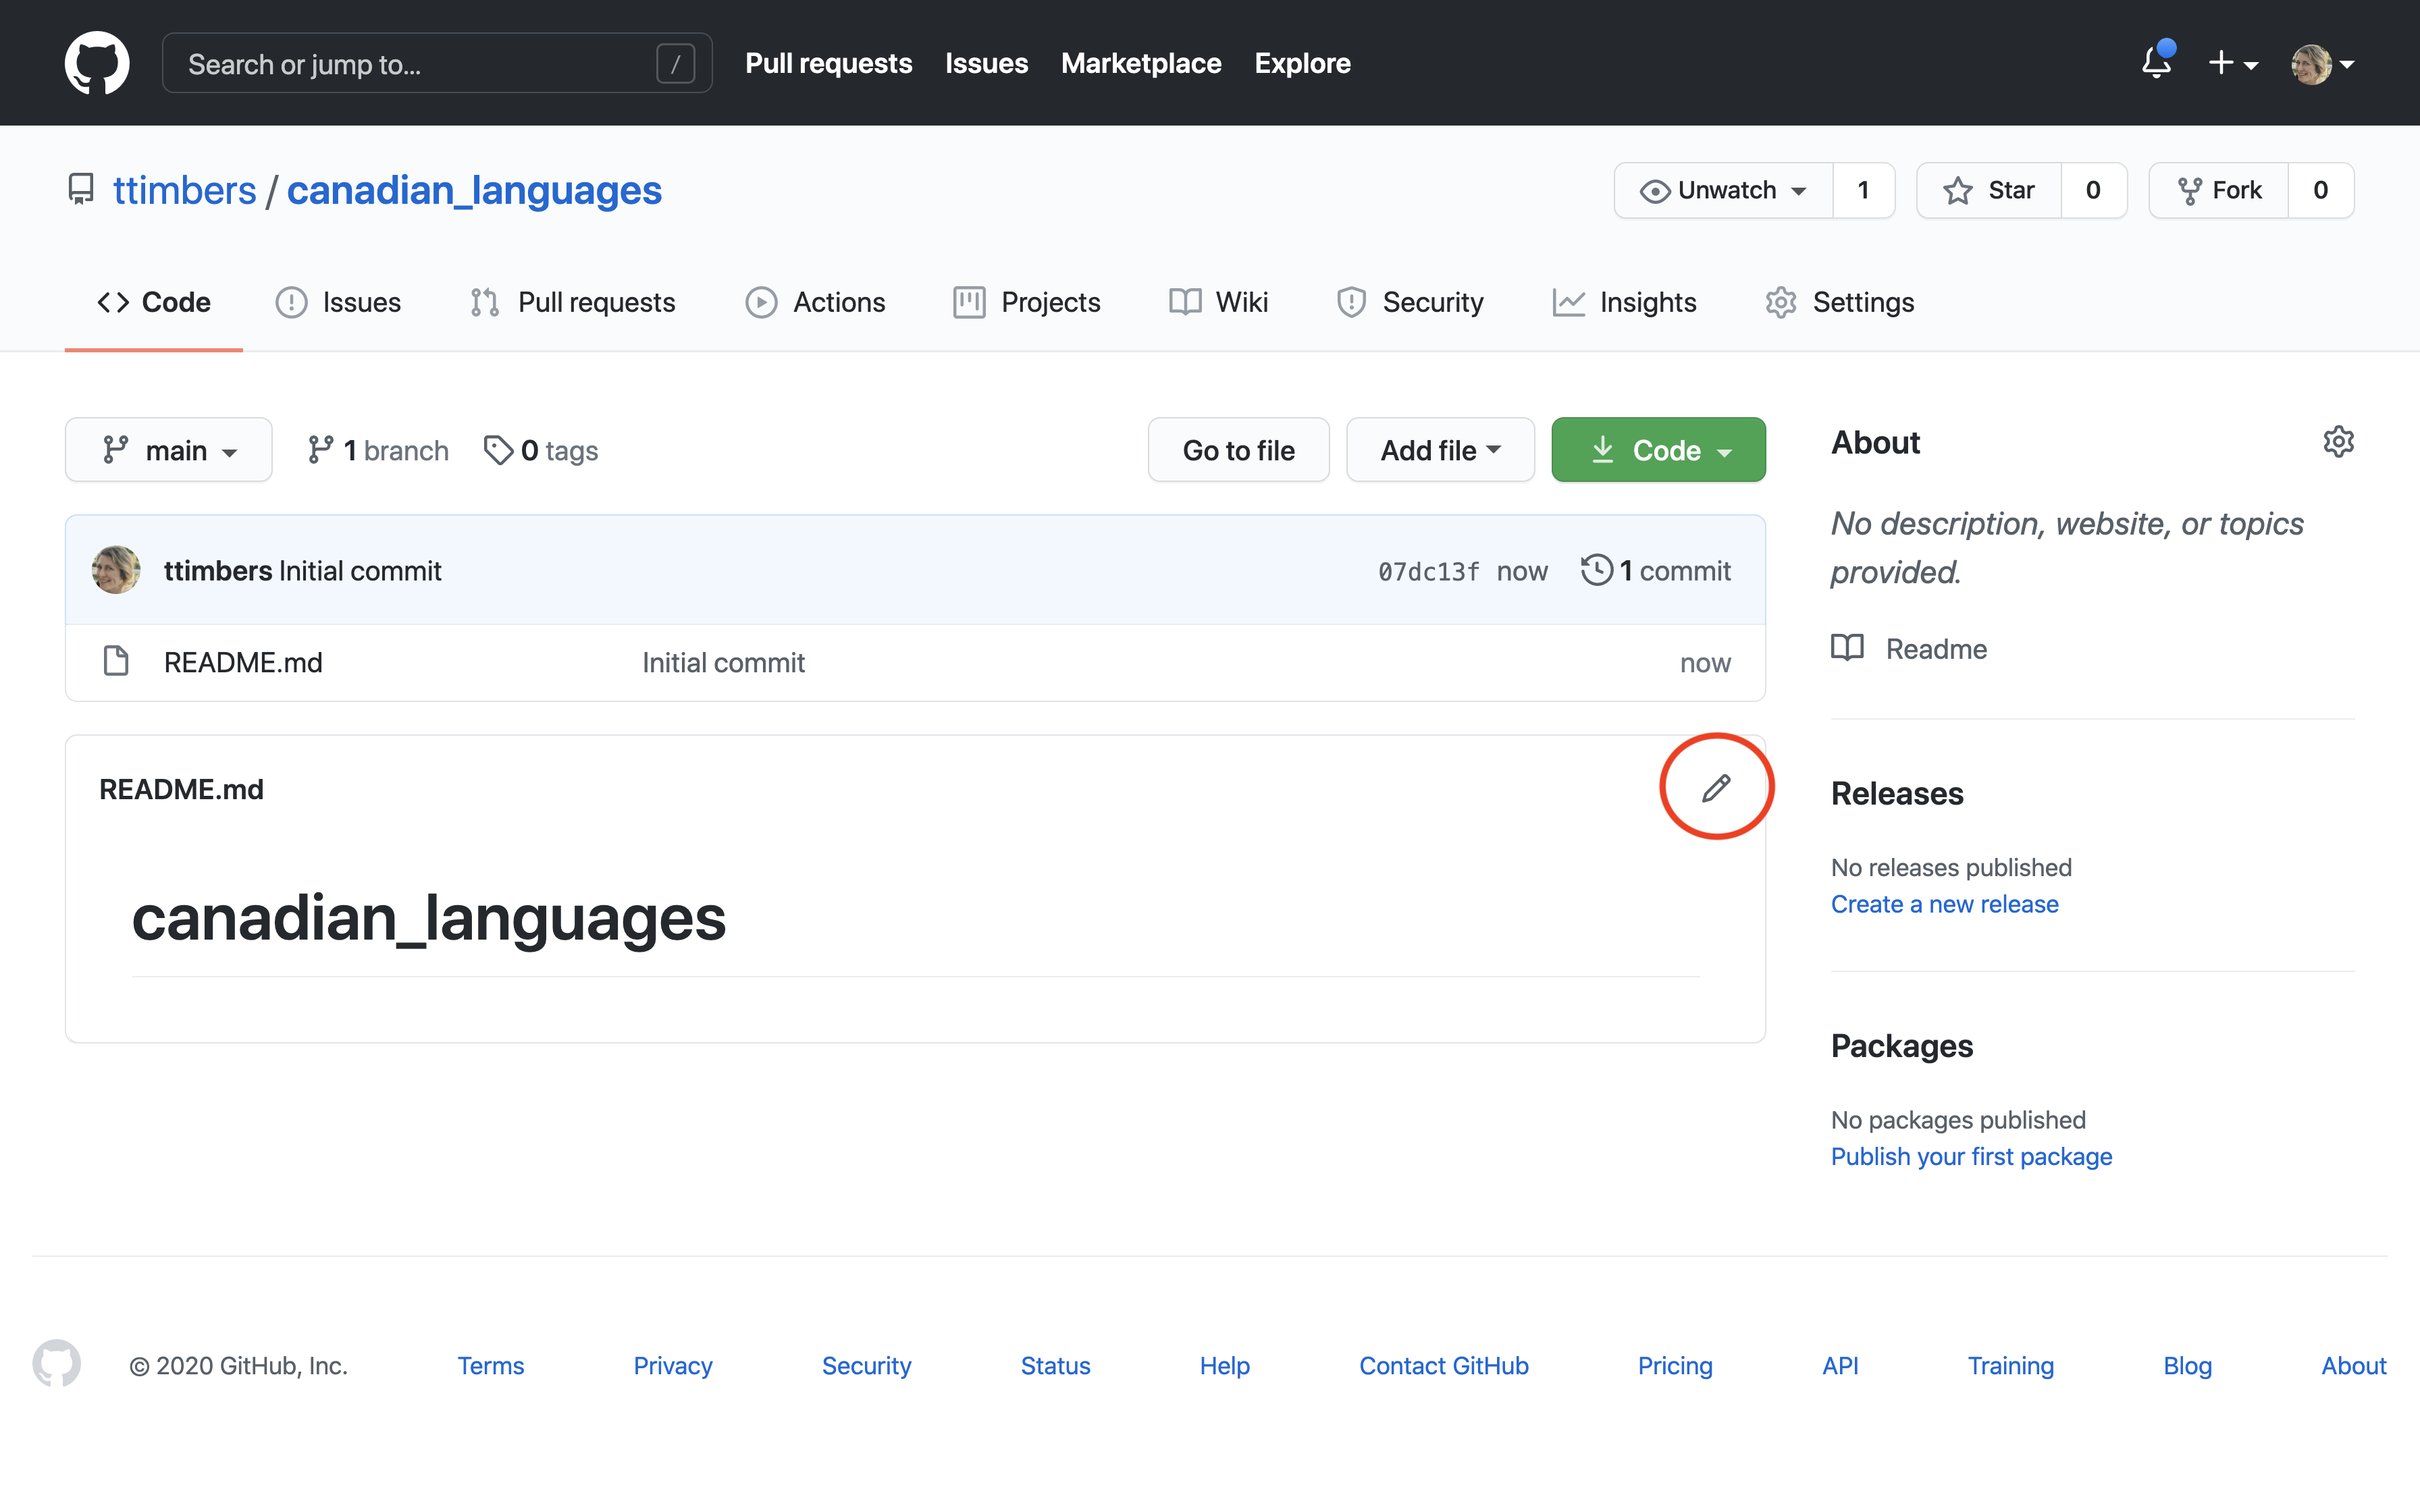
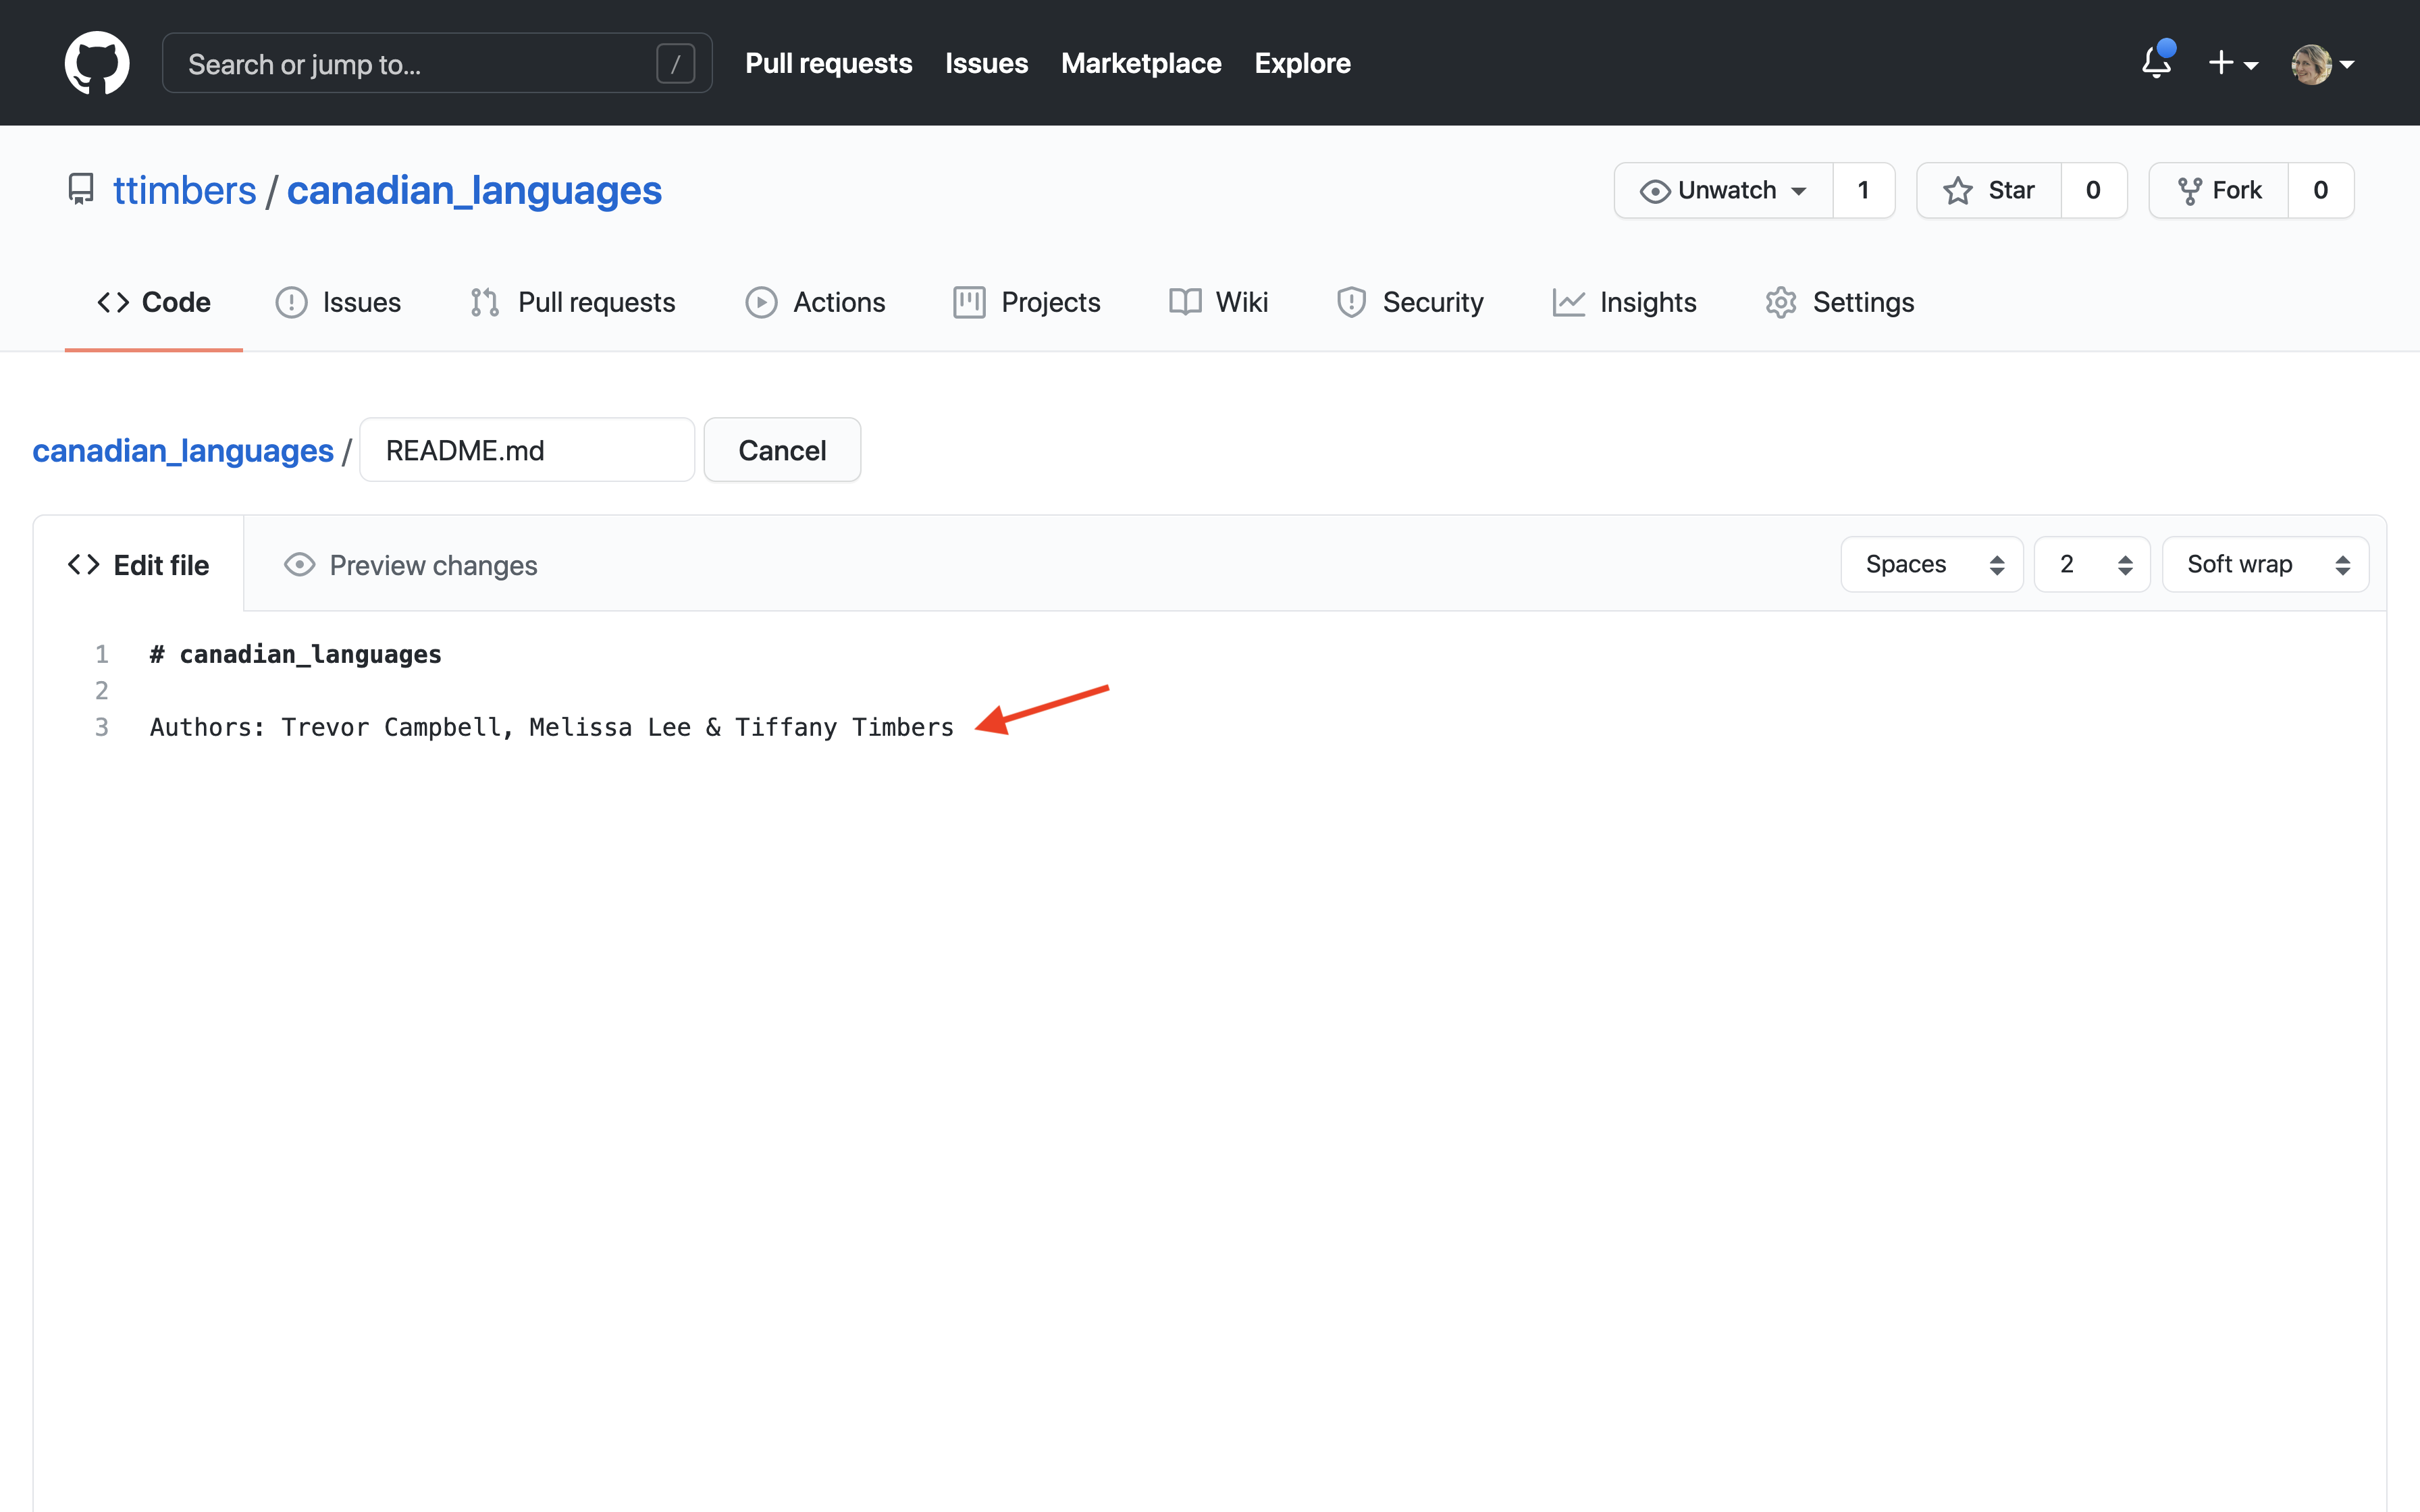
The pen tool can be used to edit existing plain text files. When you click on the pen tool, the file will be opened in a text box where you can use your keyboard to make changes (Figure 12.6.4 and Figure 12.6.5).
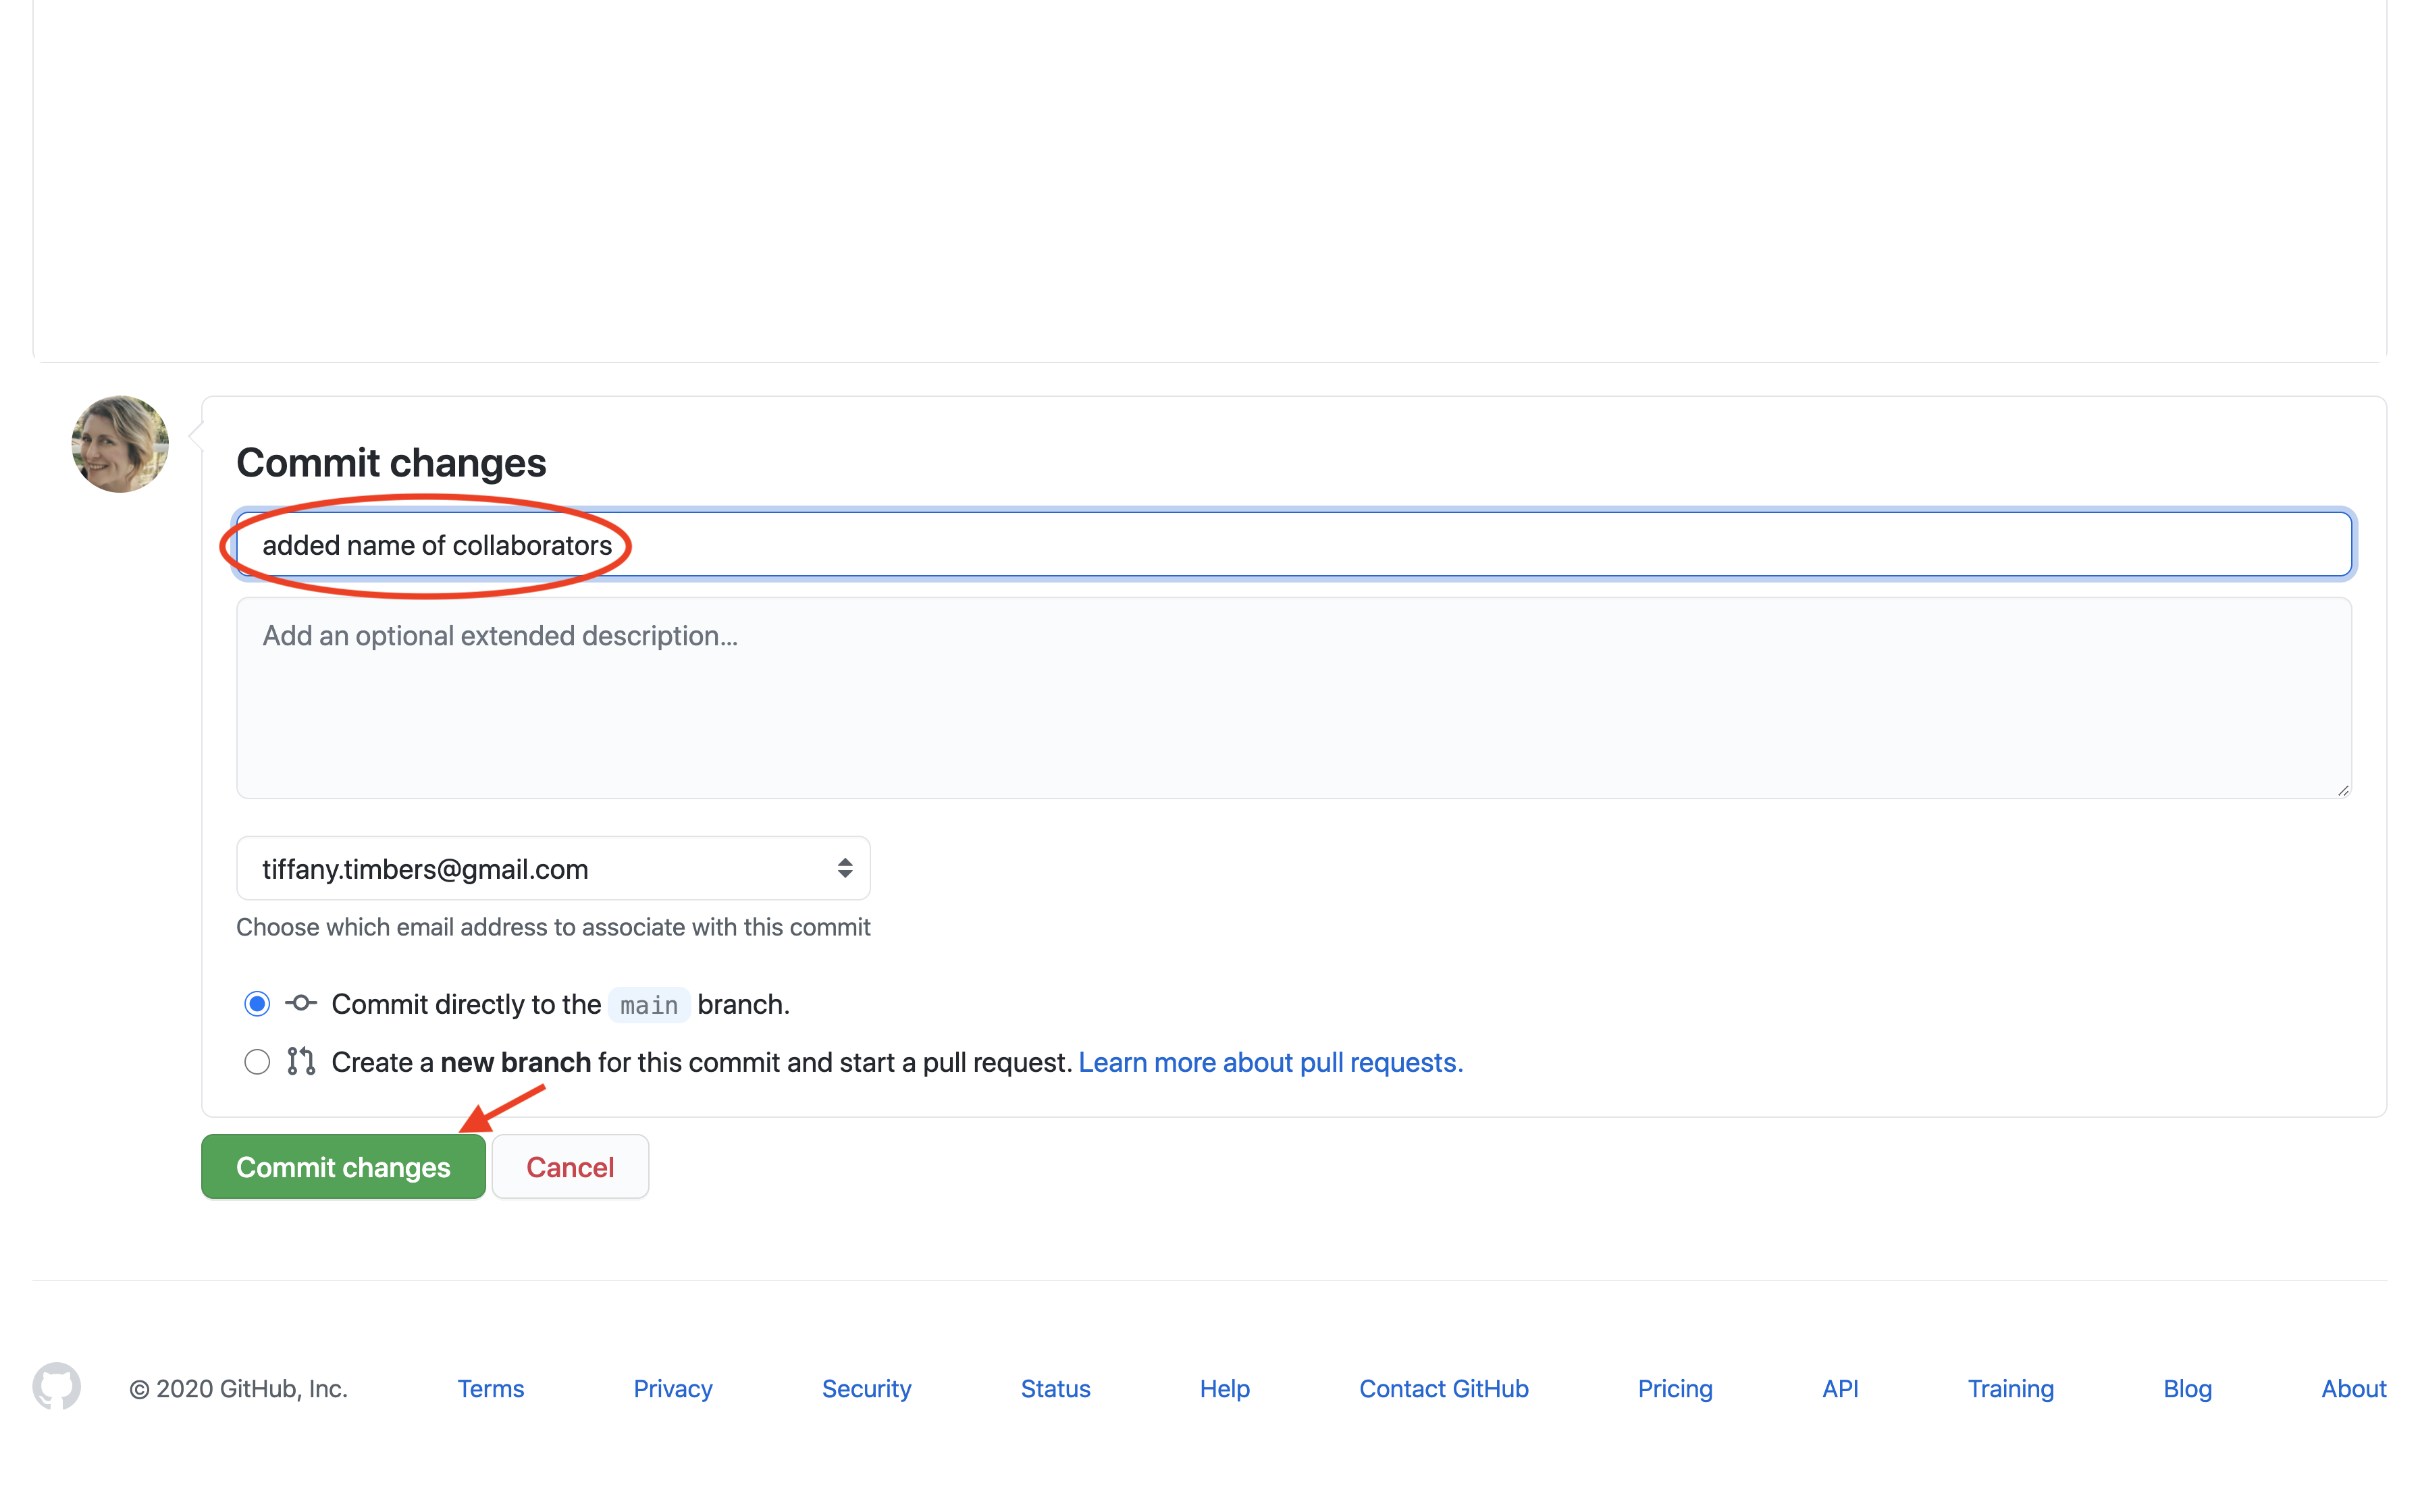
After you are done with your edits, they can be "saved" by committing your changes. When you commit a file in a repository, the version control system takes a snapshot of what the file looks like. As you continue working on the project, over time you will possibly make many commits to a single file; this generates a useful version history for that file. On GitHub, if you click the green "Commit changes" button, it will save the file and then make a commit (Figure 12.6.6).
Recall from Subsection 12.5.1 that you normally have to add files to the staging area before committing them. Why don’t we have to do that when we work directly on GitHub? Behind the scenes, when you click the green "Commit changes" button, GitHub is adding that one file to the staging area prior to committing it. But note that on GitHub you are limited to committing changes to only one file at a time. When you work in your own local repository, you can commit changes to multiple files simultaneously. This is especially useful when one "improvement" to the project involves modifying multiple files. You can also do things like run code when working in a local repository, which you cannot do on GitHub. In general, editing on GitHub is reserved for small edits to plain text files.
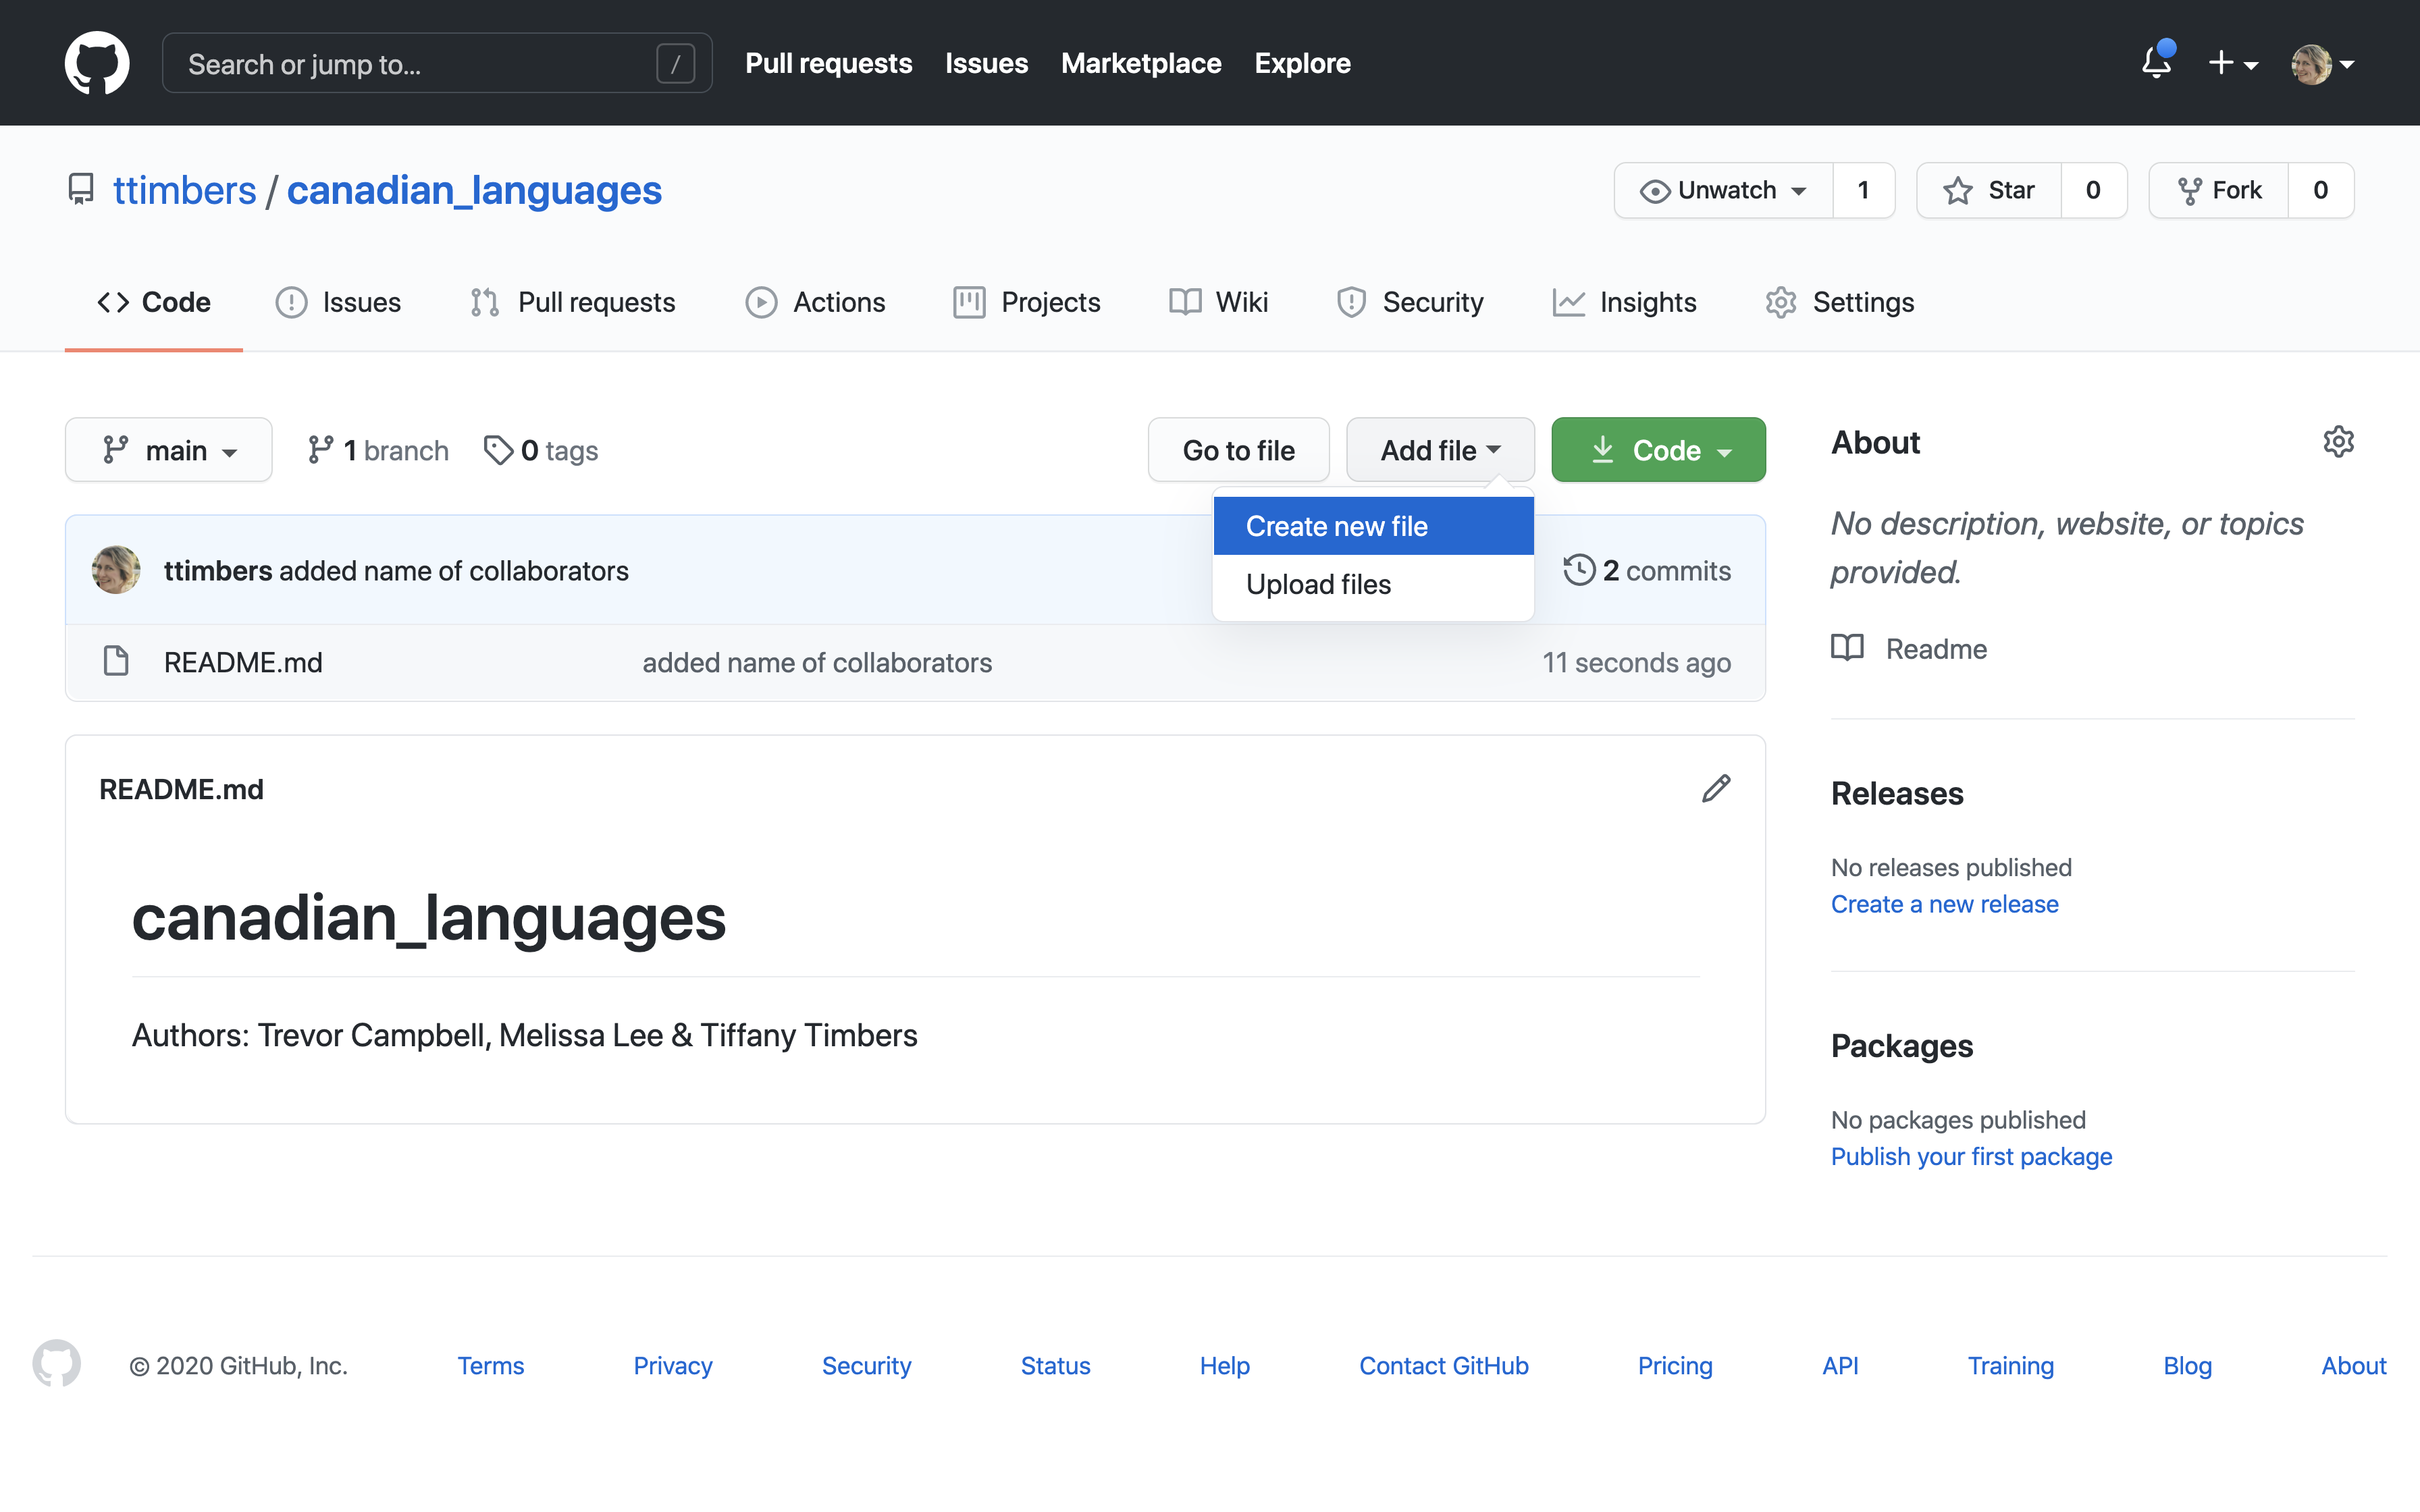
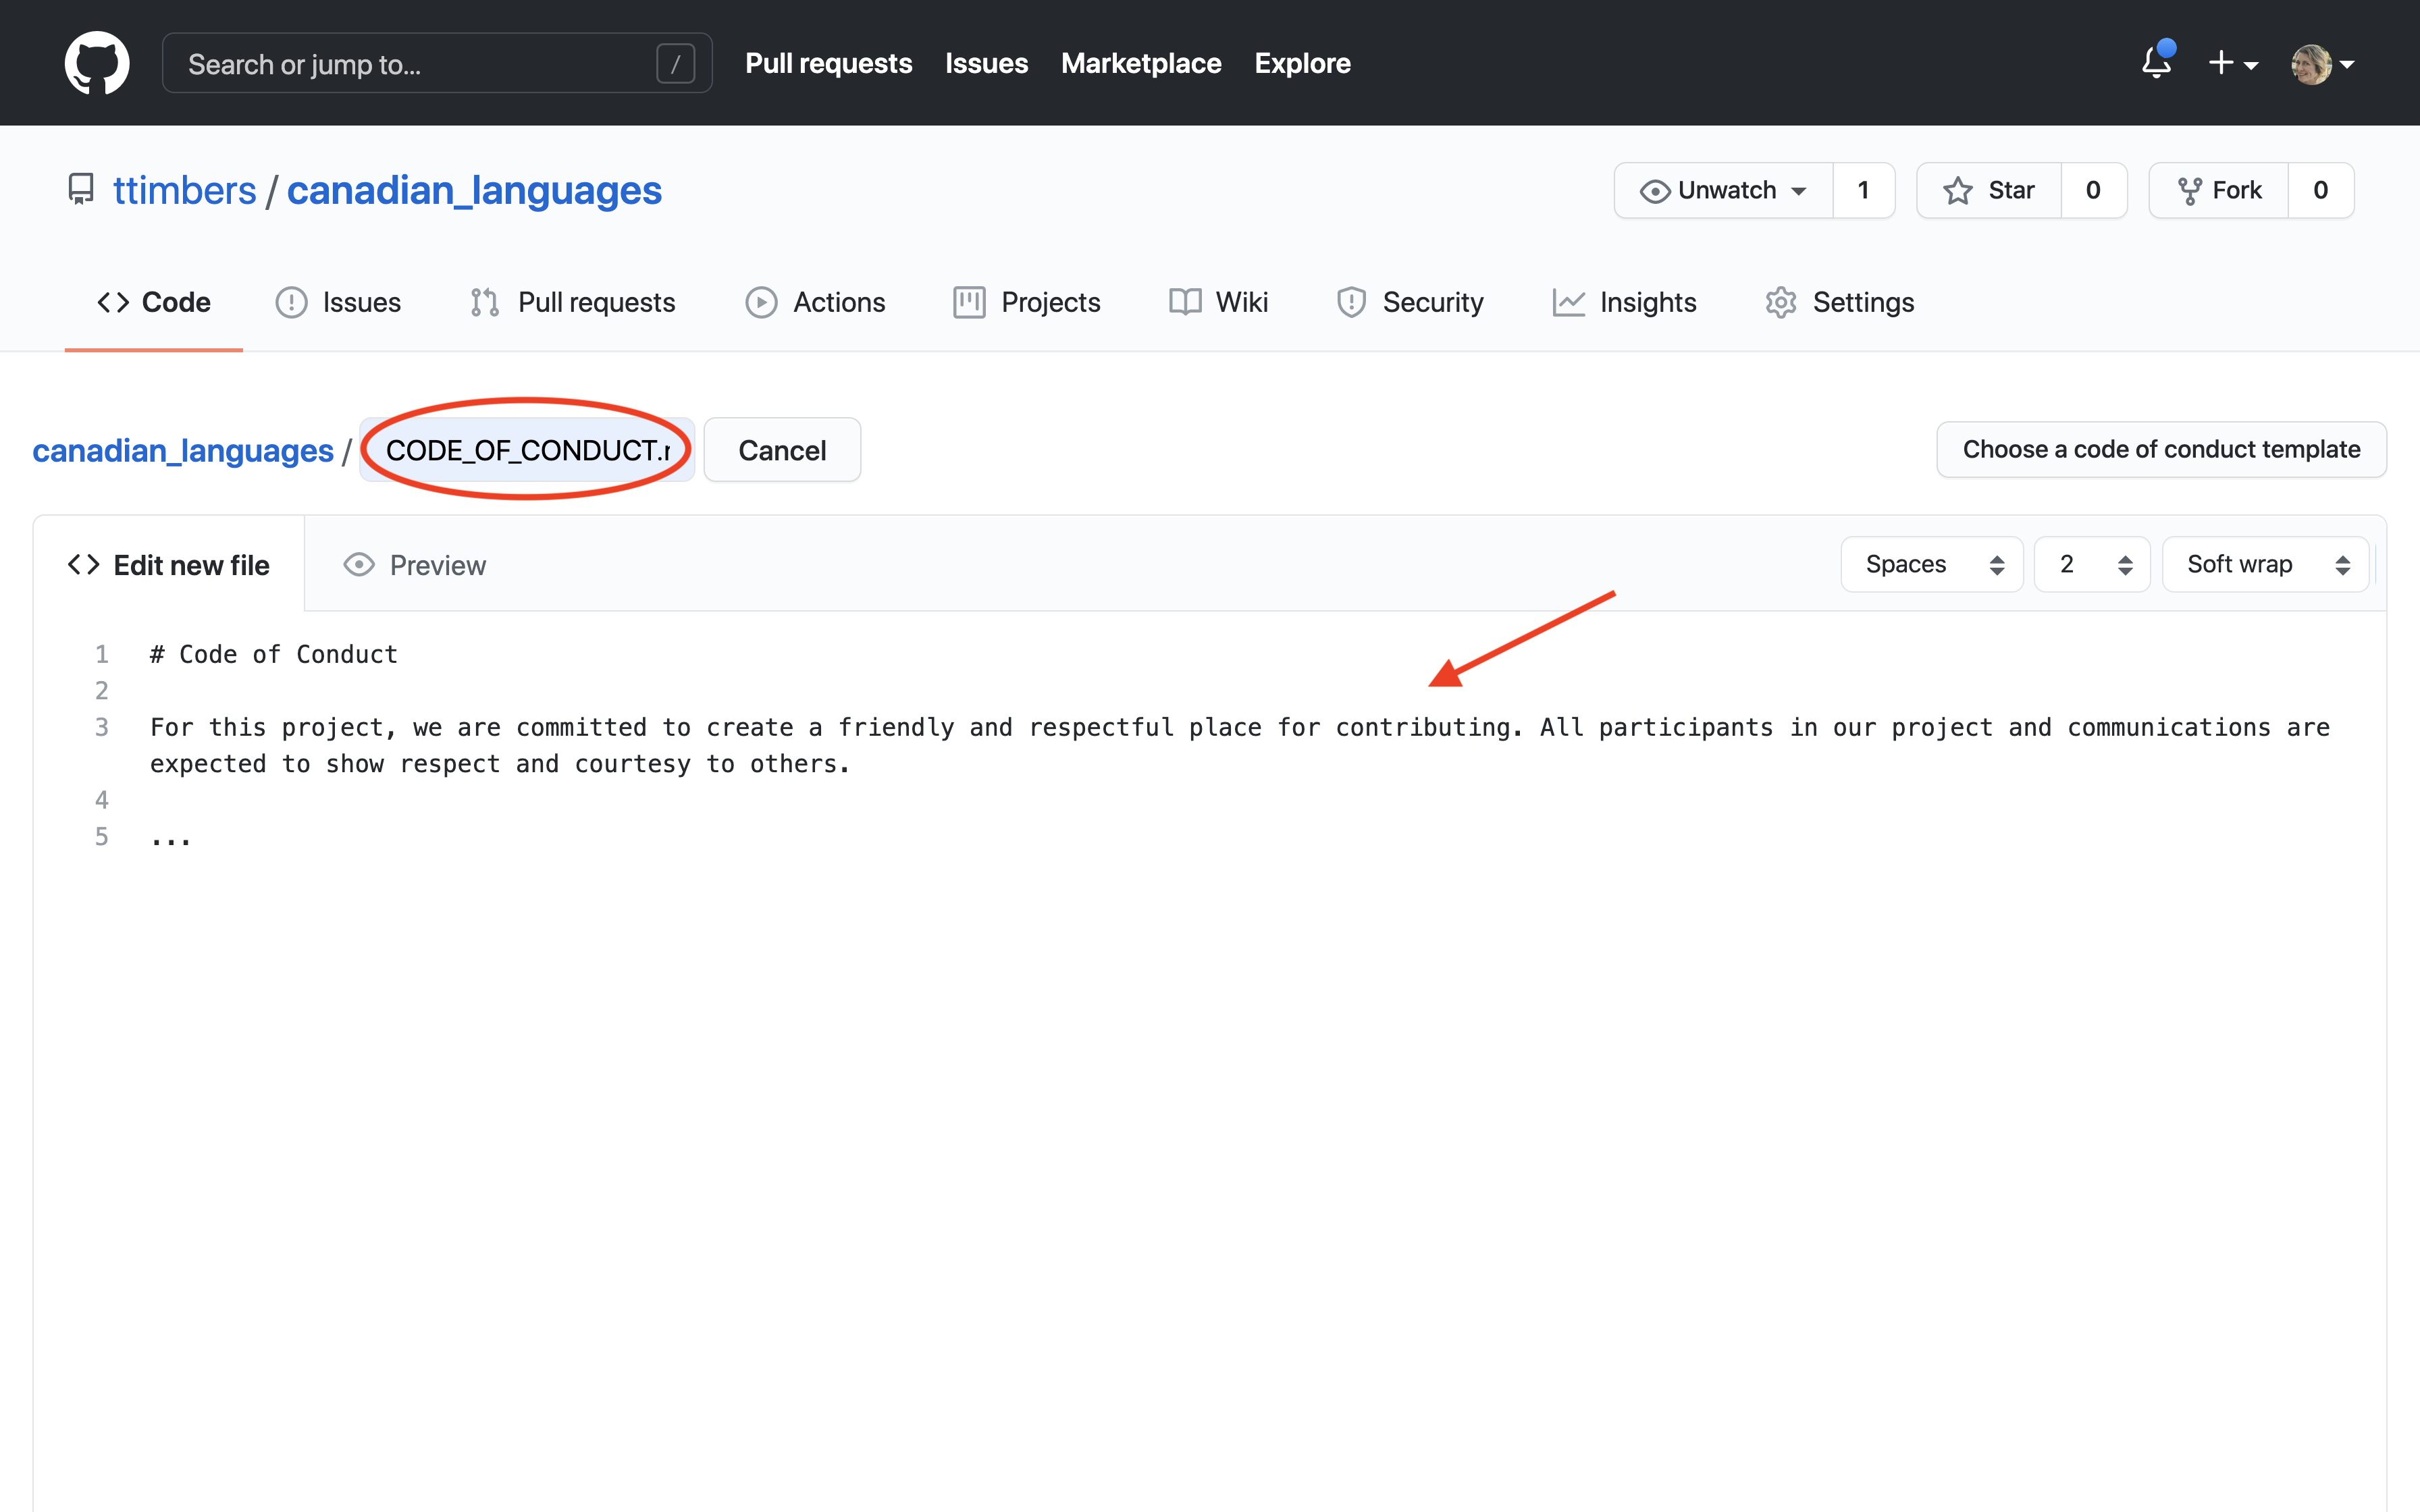
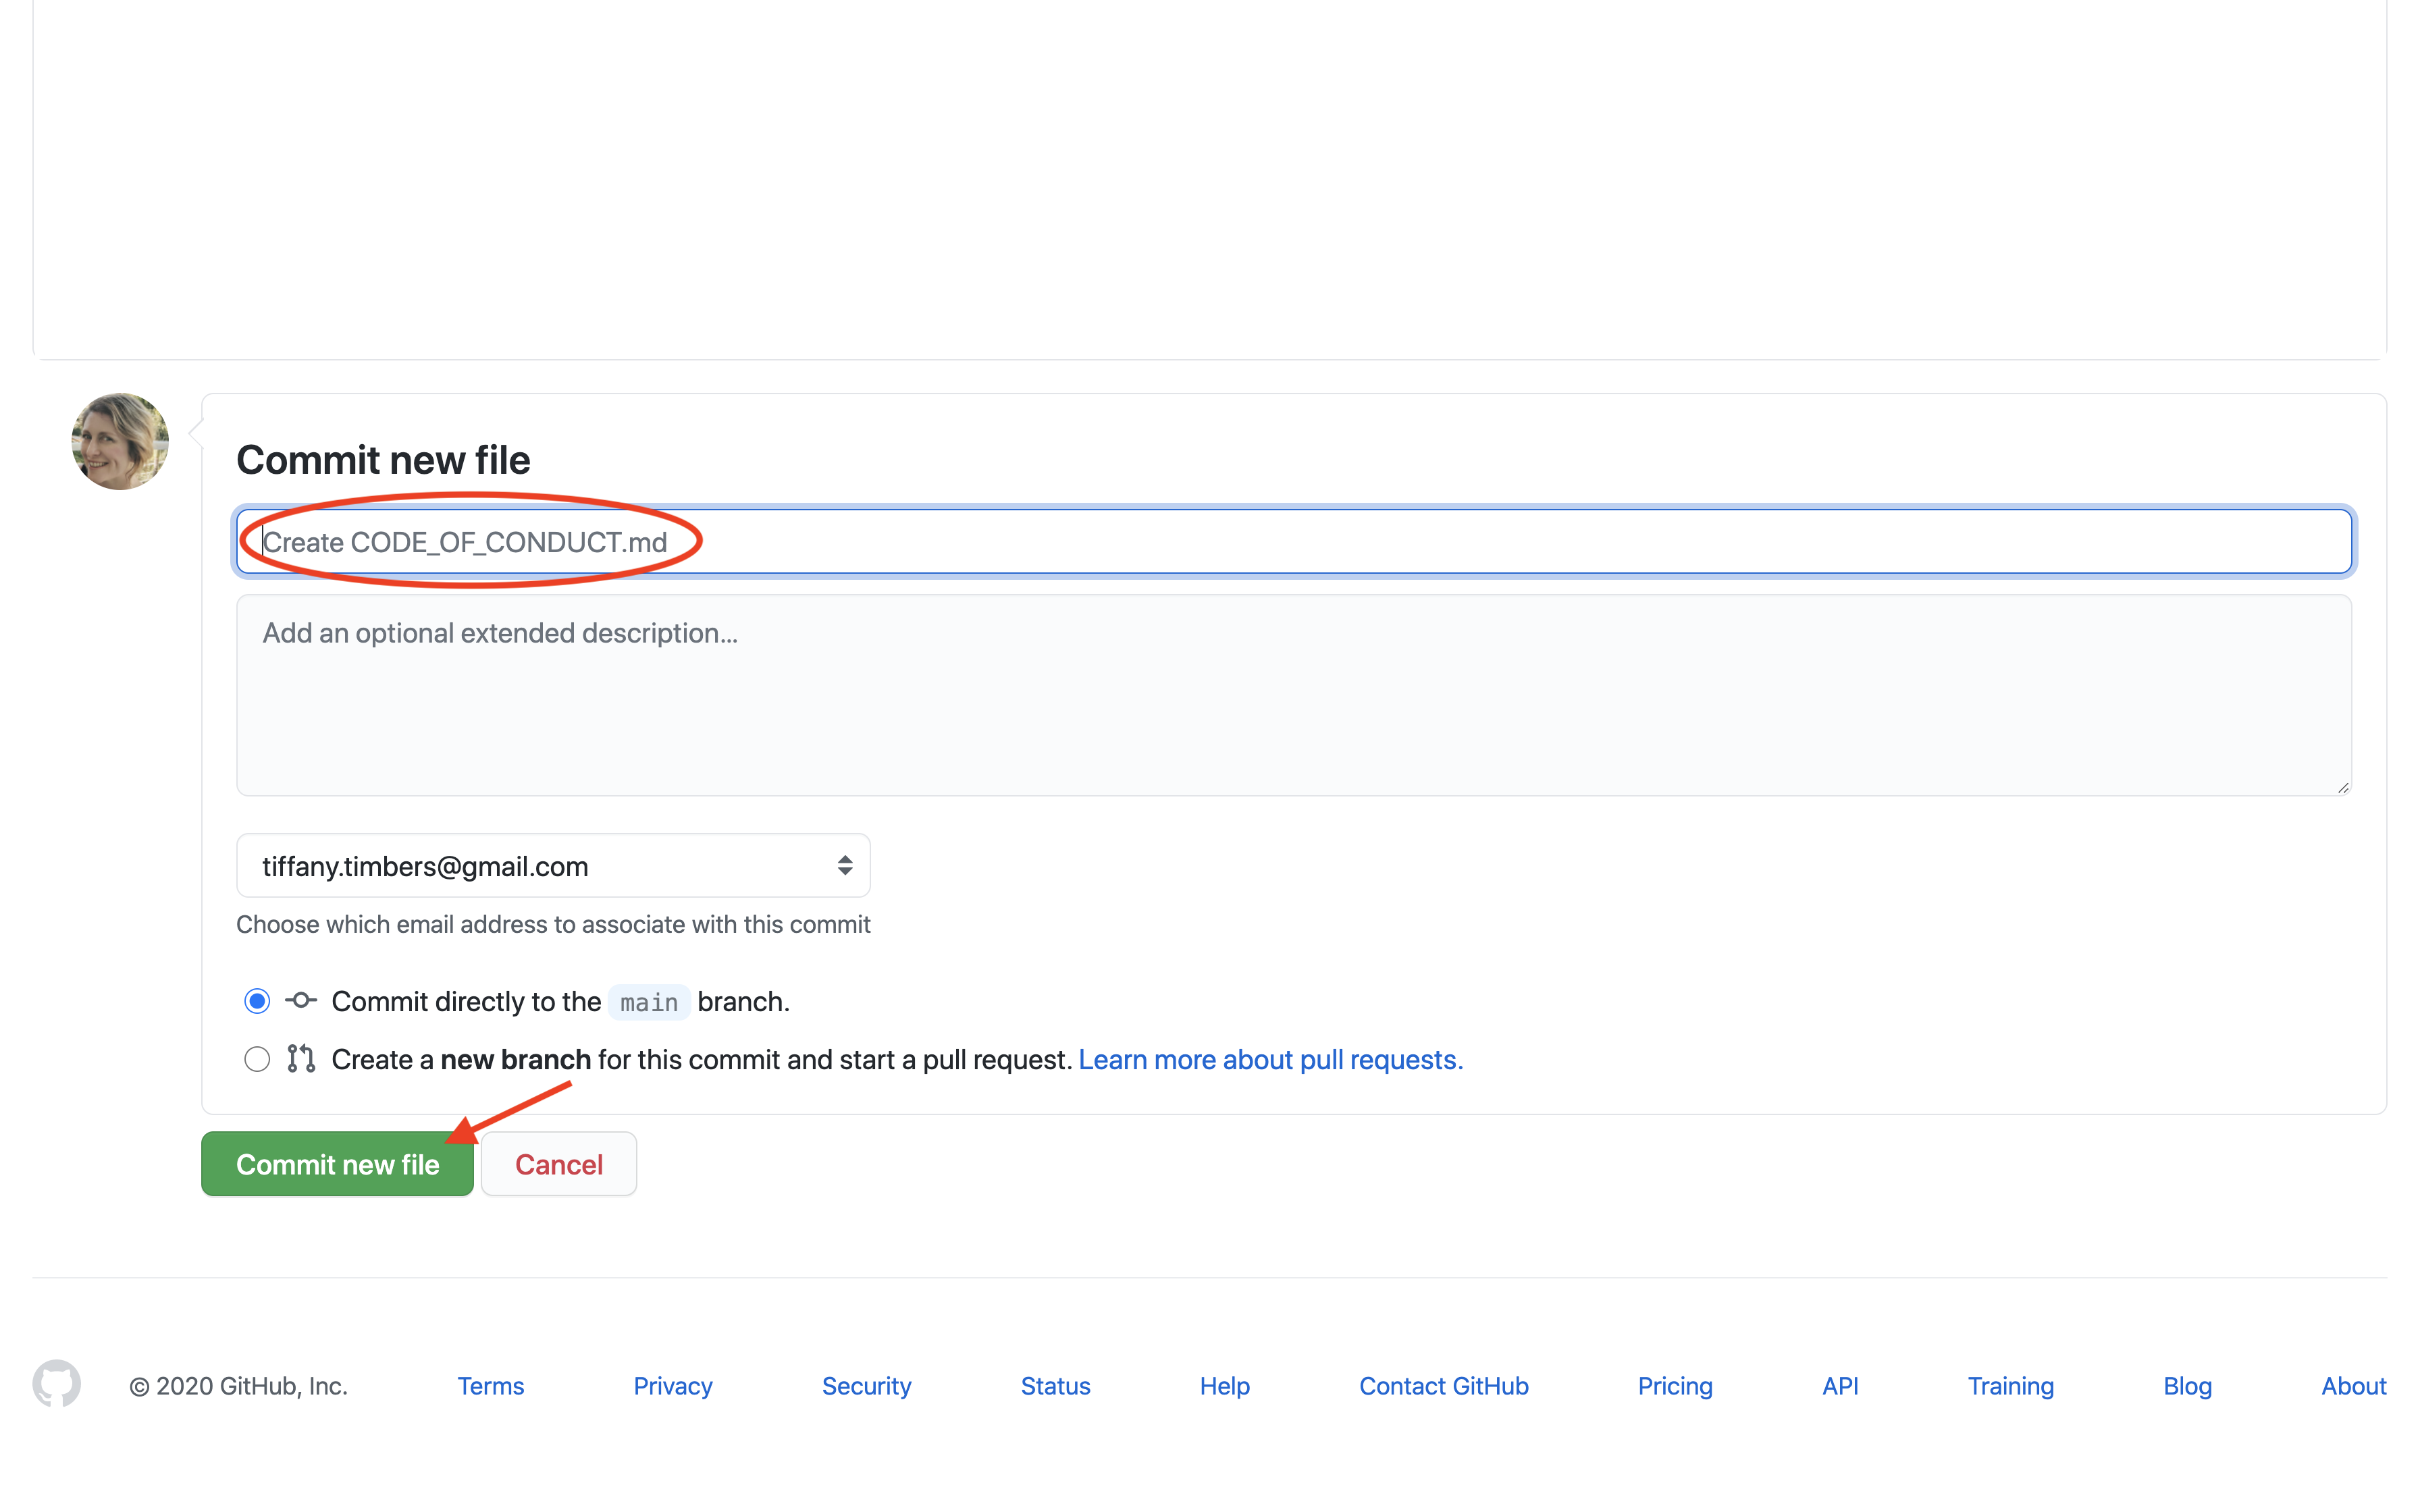
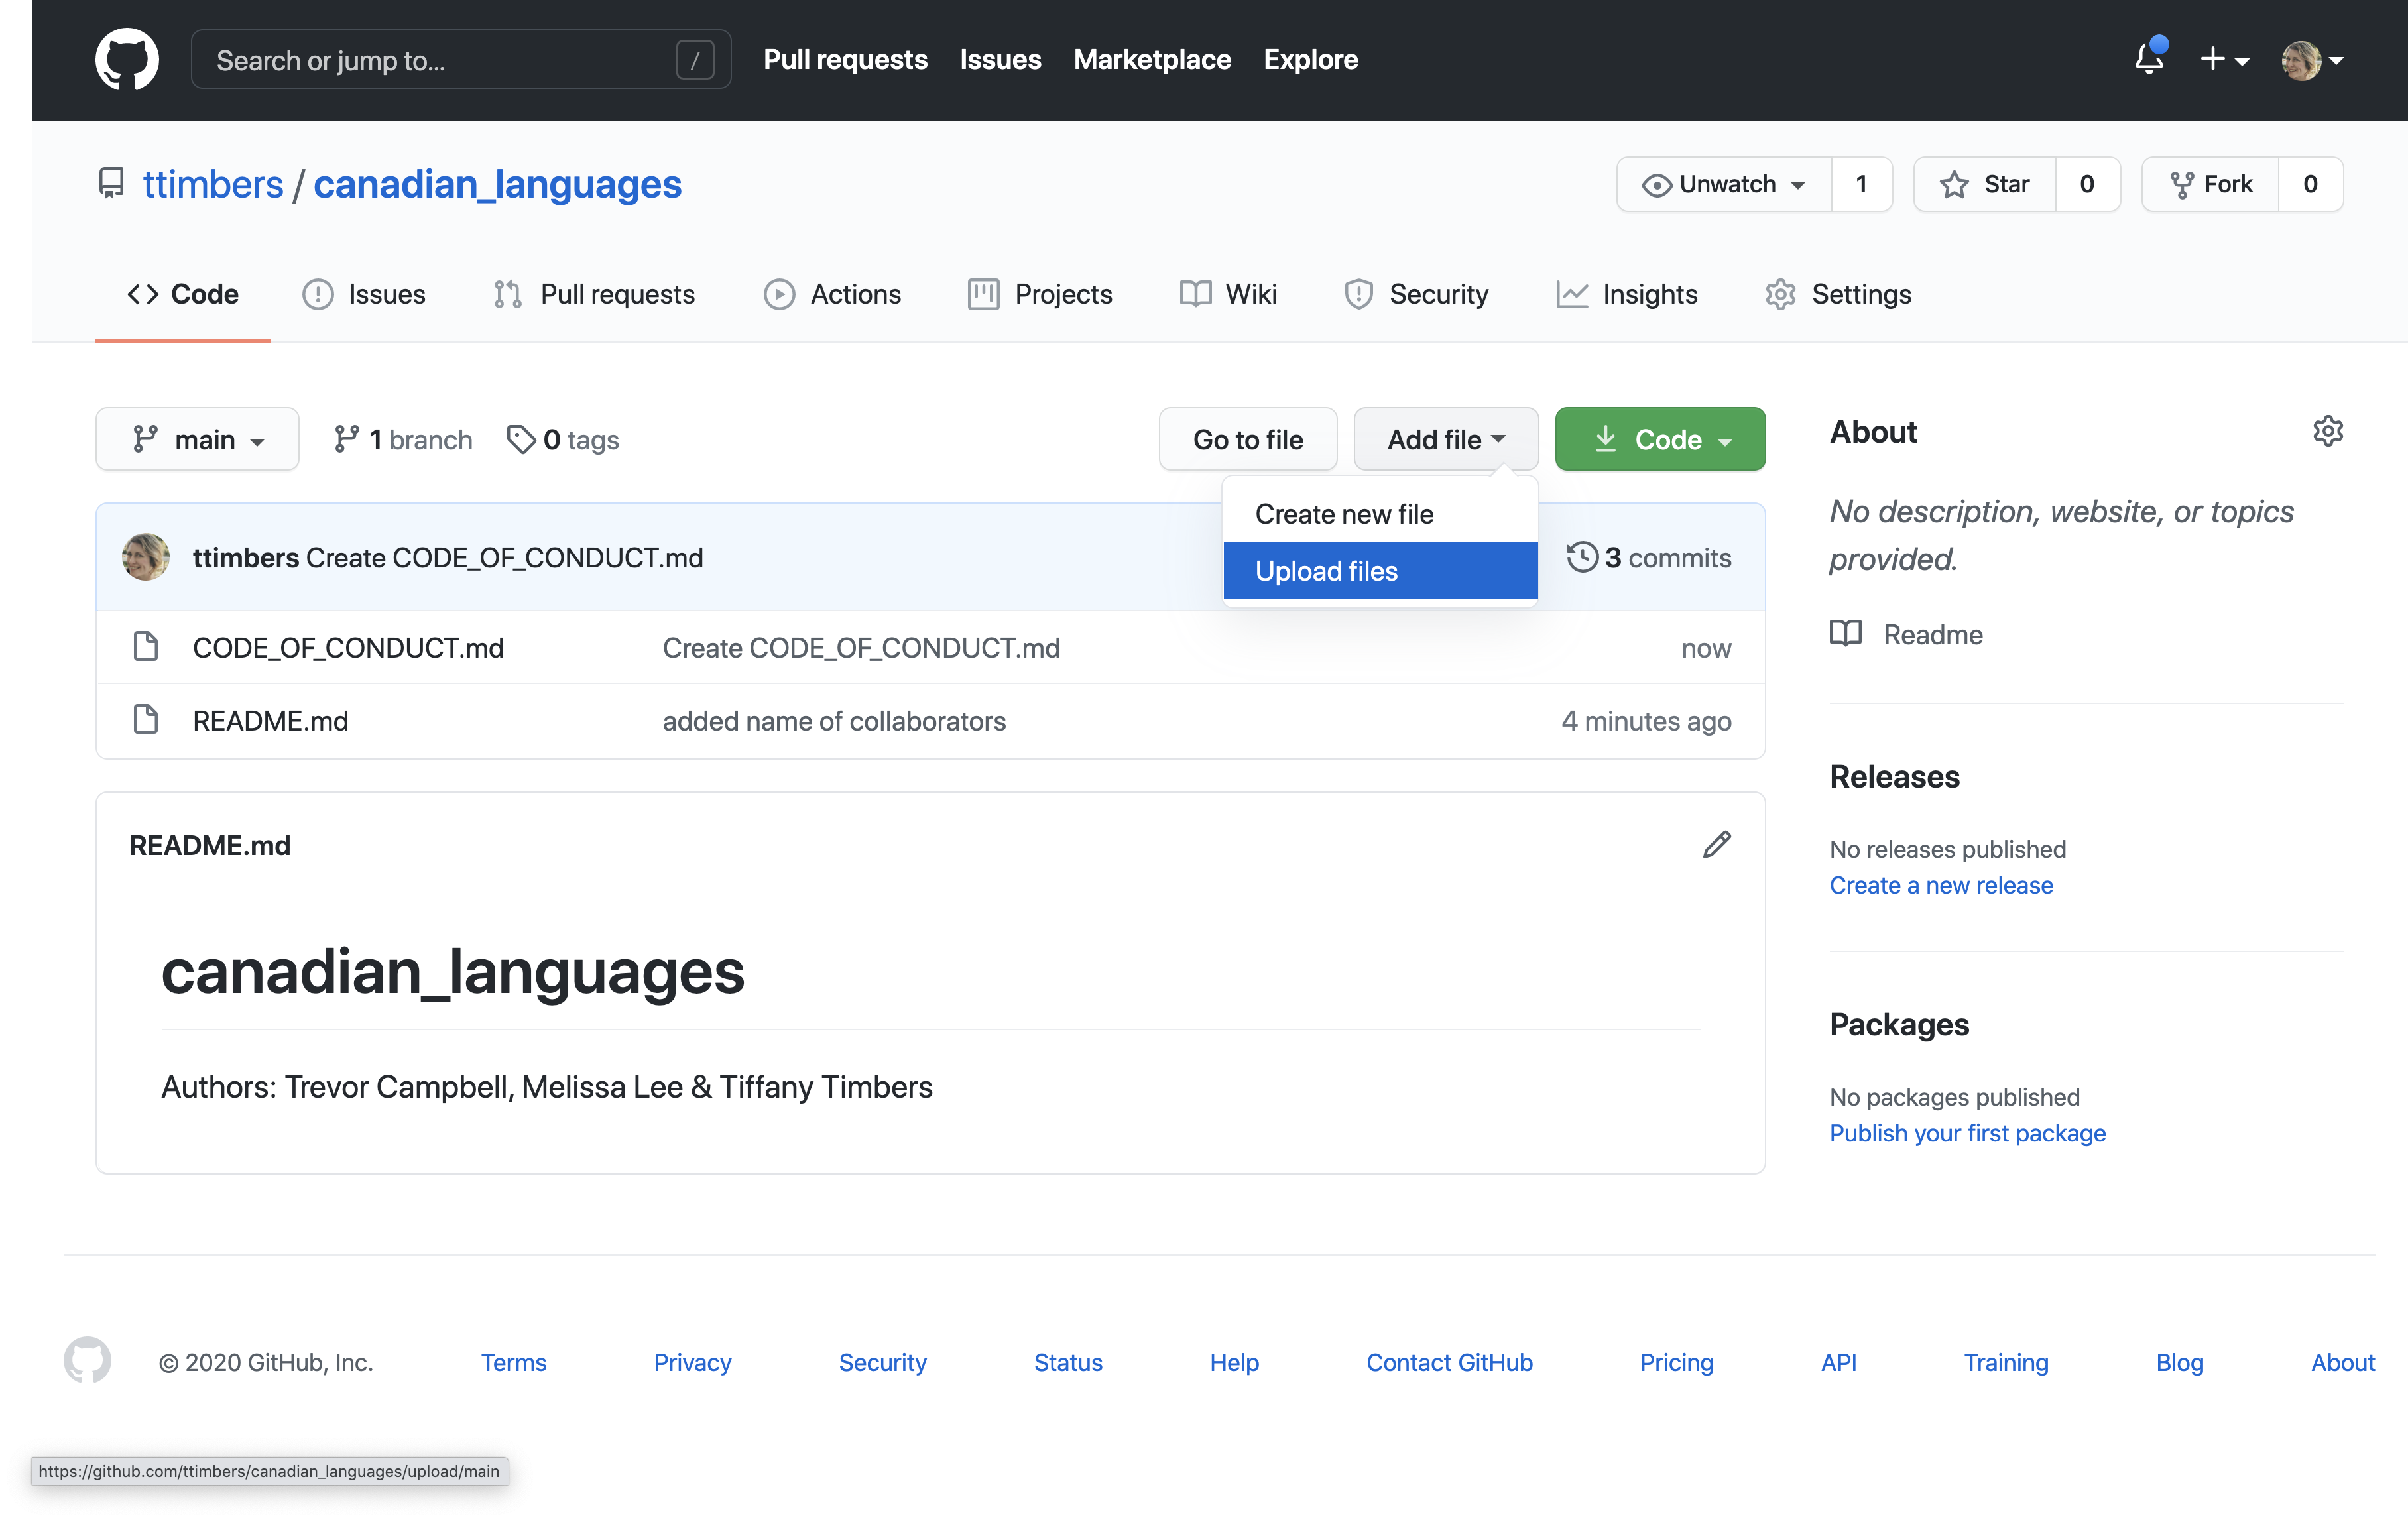
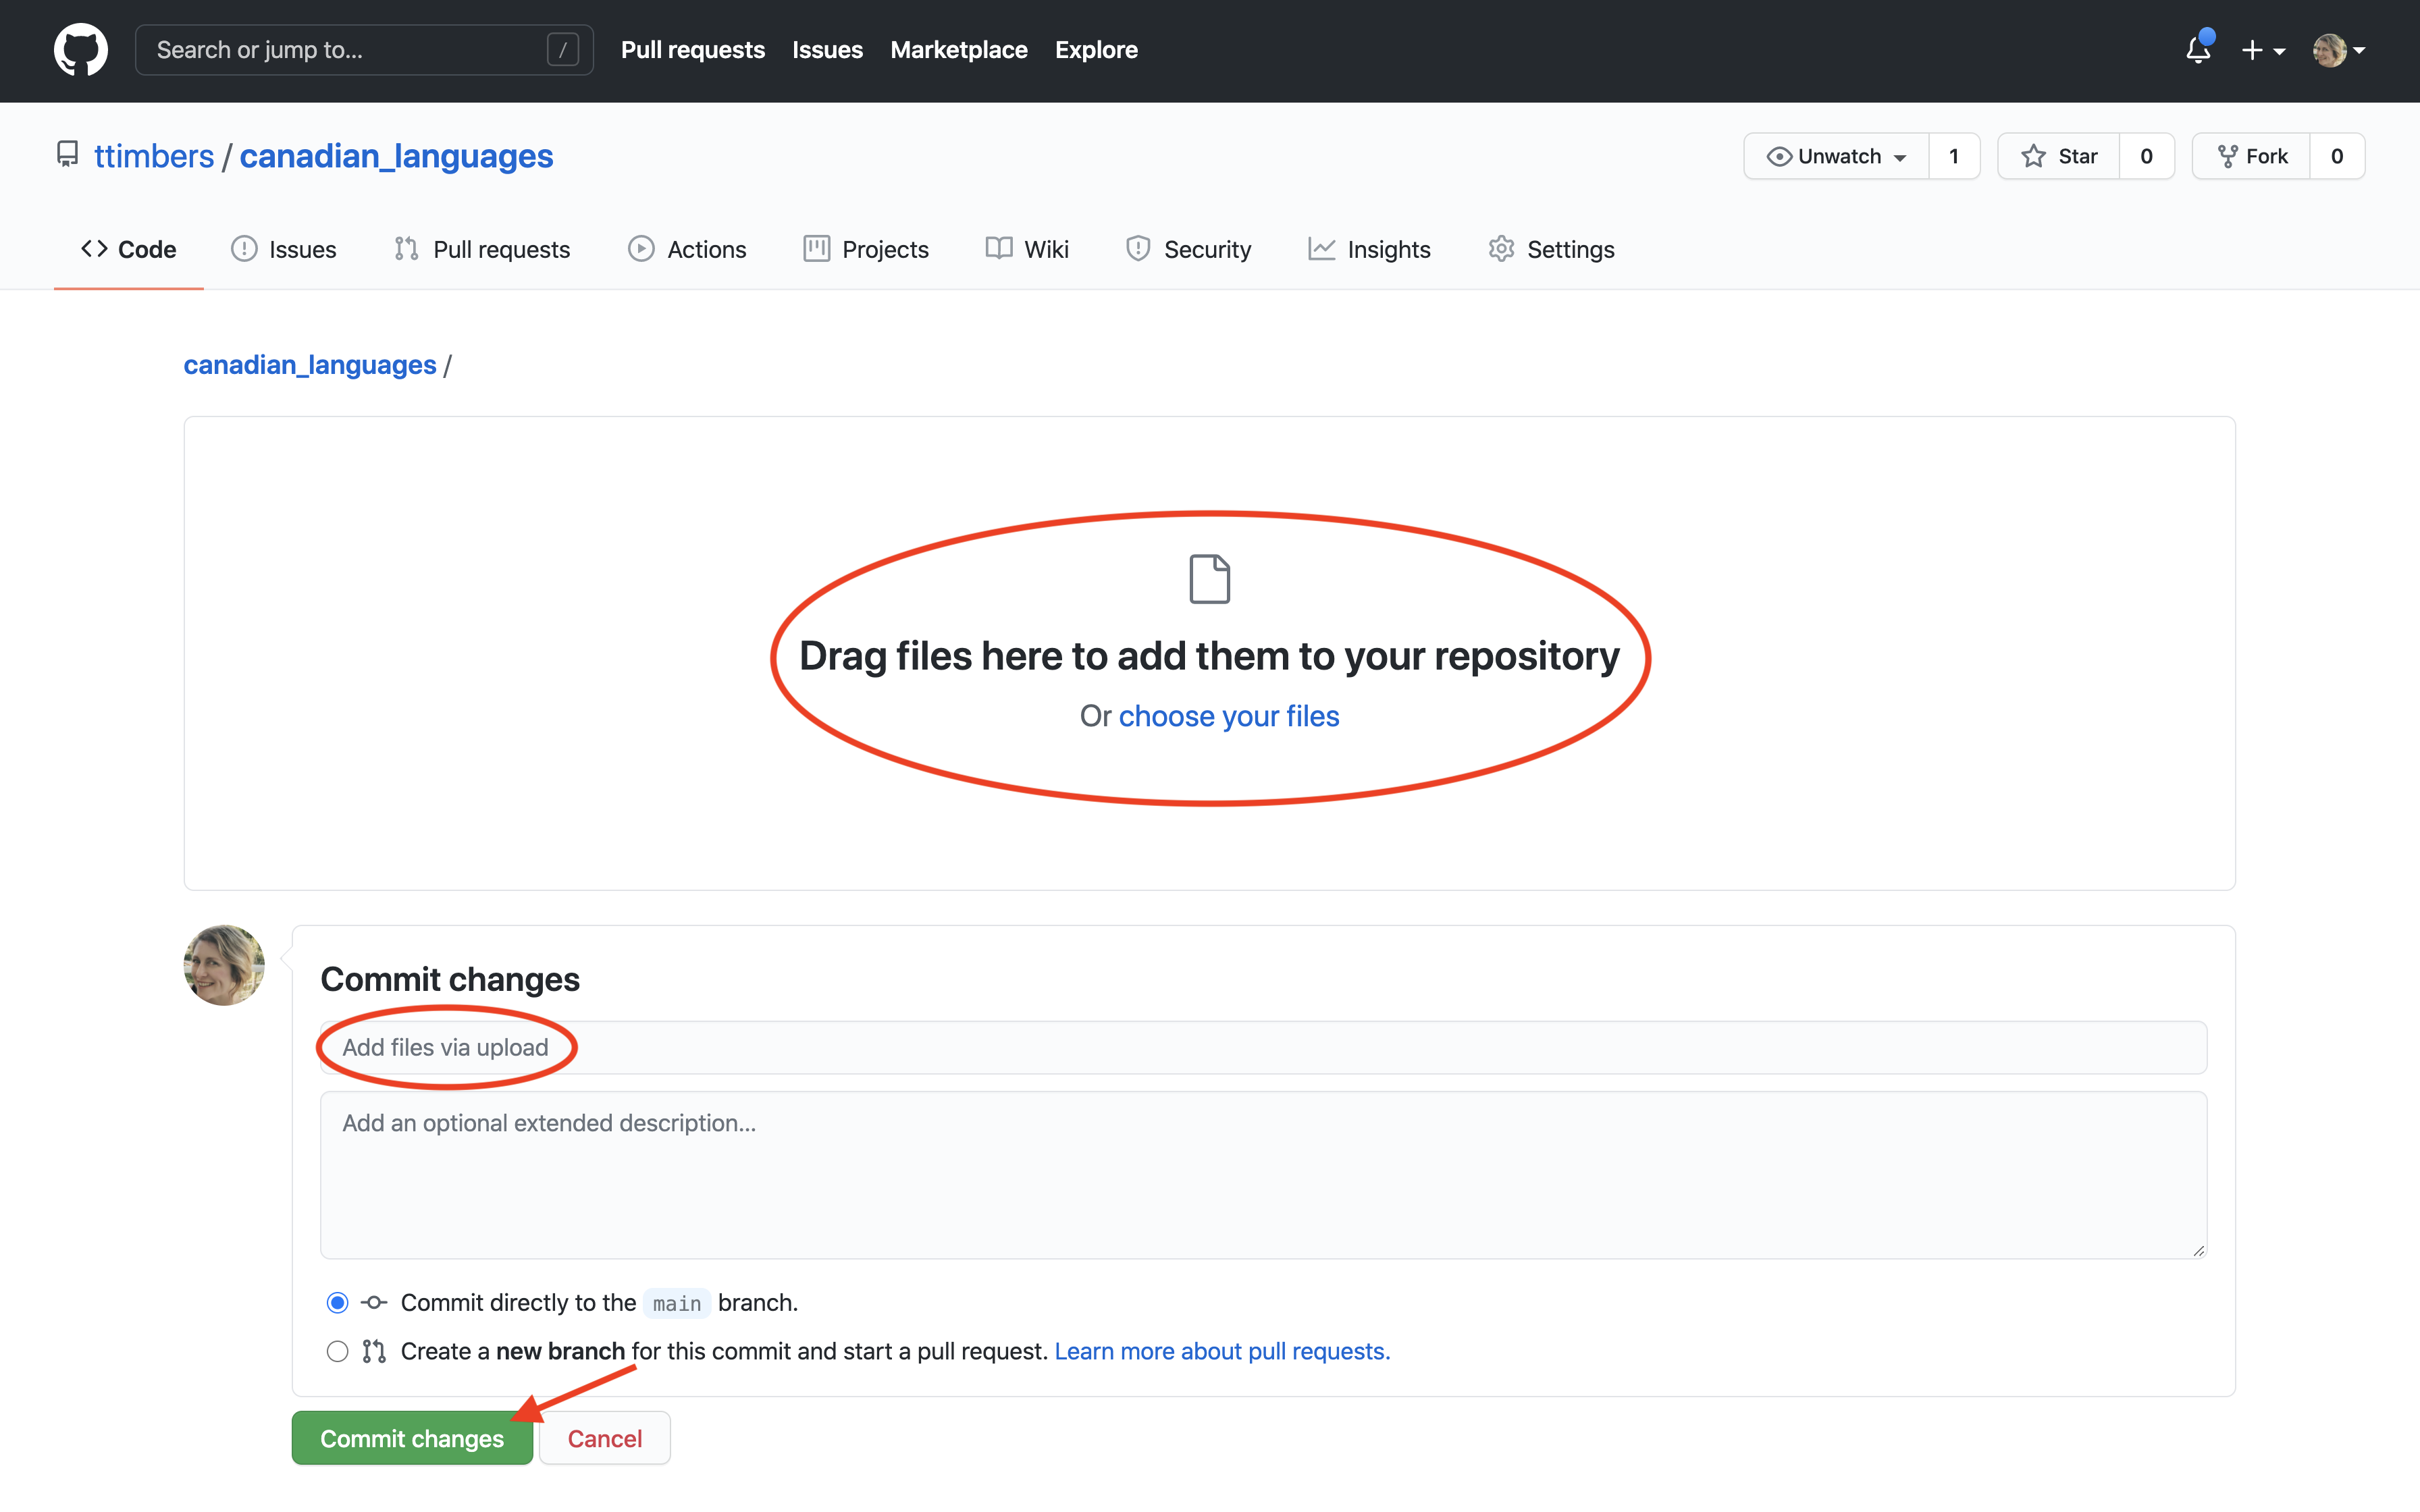
Subsection 12.6.3 Creating files on GitHub with the "Add file" menu
Section 12.7 Working with local repositories using Jupyter
Although there are several ways to create and edit files on GitHub, they are not quite powerful enough for efficiently creating and editing complex files, or files that need to be executed to assess whether they work (e.g., files containing code). For example, you wouldn’t be able to run an analysis written with R code directly on GitHub. Thus, it is useful to be able to connect the remote repository that was created on GitHub to a local coding environment. This can be done by creating and working in a local copy of the repository. In this chapter, we focus on interacting with Git via Jupyter using the Jupyter Git extension. The Jupyter Git extension can be run by Jupyter on your local computer, or on a JupyterHub server. We recommend reading Chapter 11 to learn how to use Jupyter before reading this chapter.
Subsection 12.7.1 Generating a GitHub personal access token
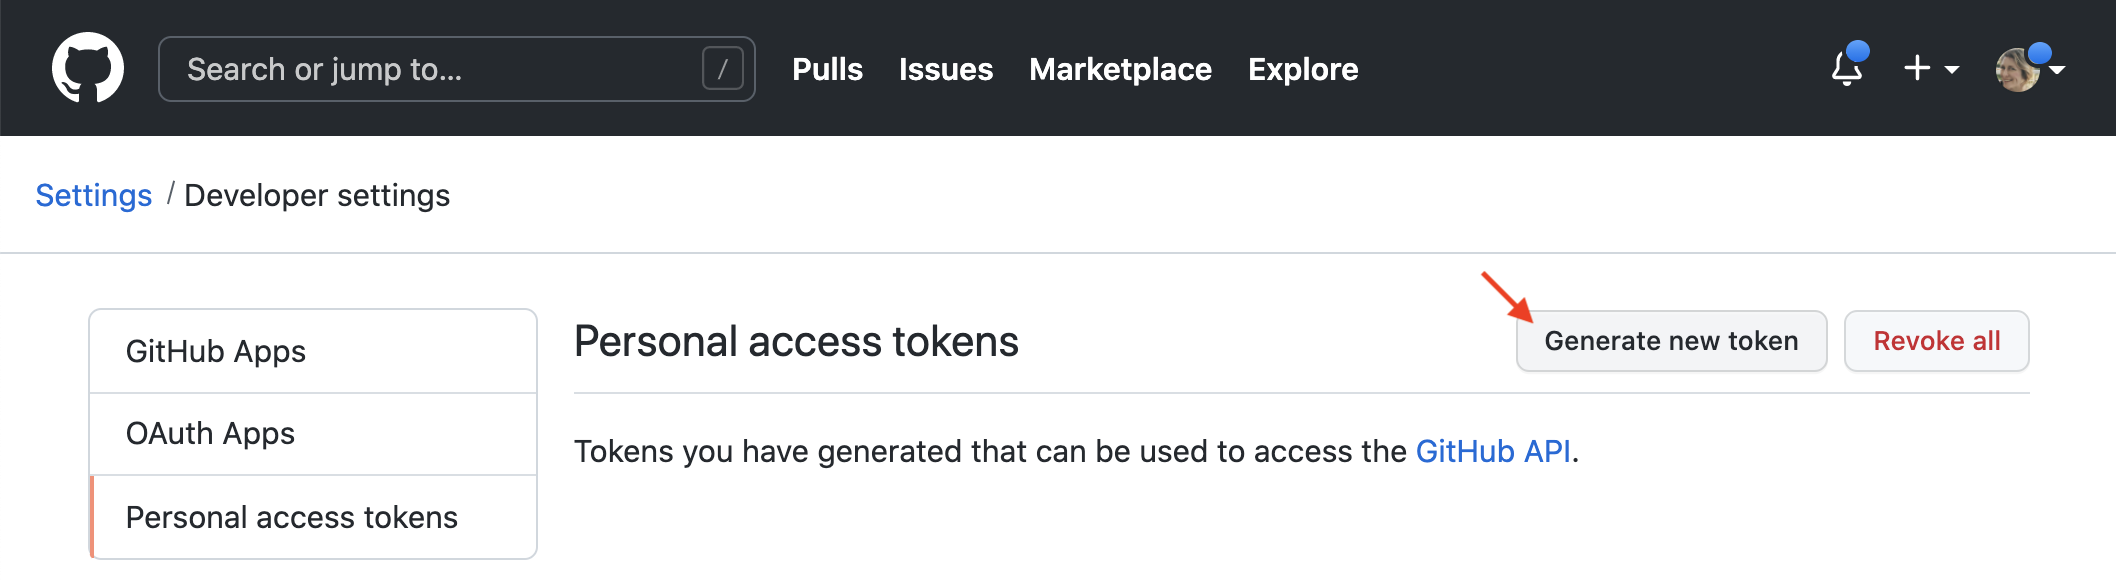
To send and retrieve work between your local repository and the remote repository on GitHub, you will frequently need to authenticate with GitHub to prove you have the required permission. There are several methods to do this, but for beginners we recommend using the HTTPS method because it is easier and requires less setup. In order to use the HTTPS method, GitHub requires you to provide a personal access token. A personal access token is like a password—so keep it a secret!—but it gives you more fine-grained control over what parts of your account the token can be used to access, and lets you set an expiry date for the authentication. To generate a personal access token, you must first visit
github.com/settings/tokens, which will take you to the "Personal access tokens" page in your account settings. Once there, click "Generate new token" (Figure 12.7.1). Note that you may be asked to re-authenticate with your username and password to proceed.
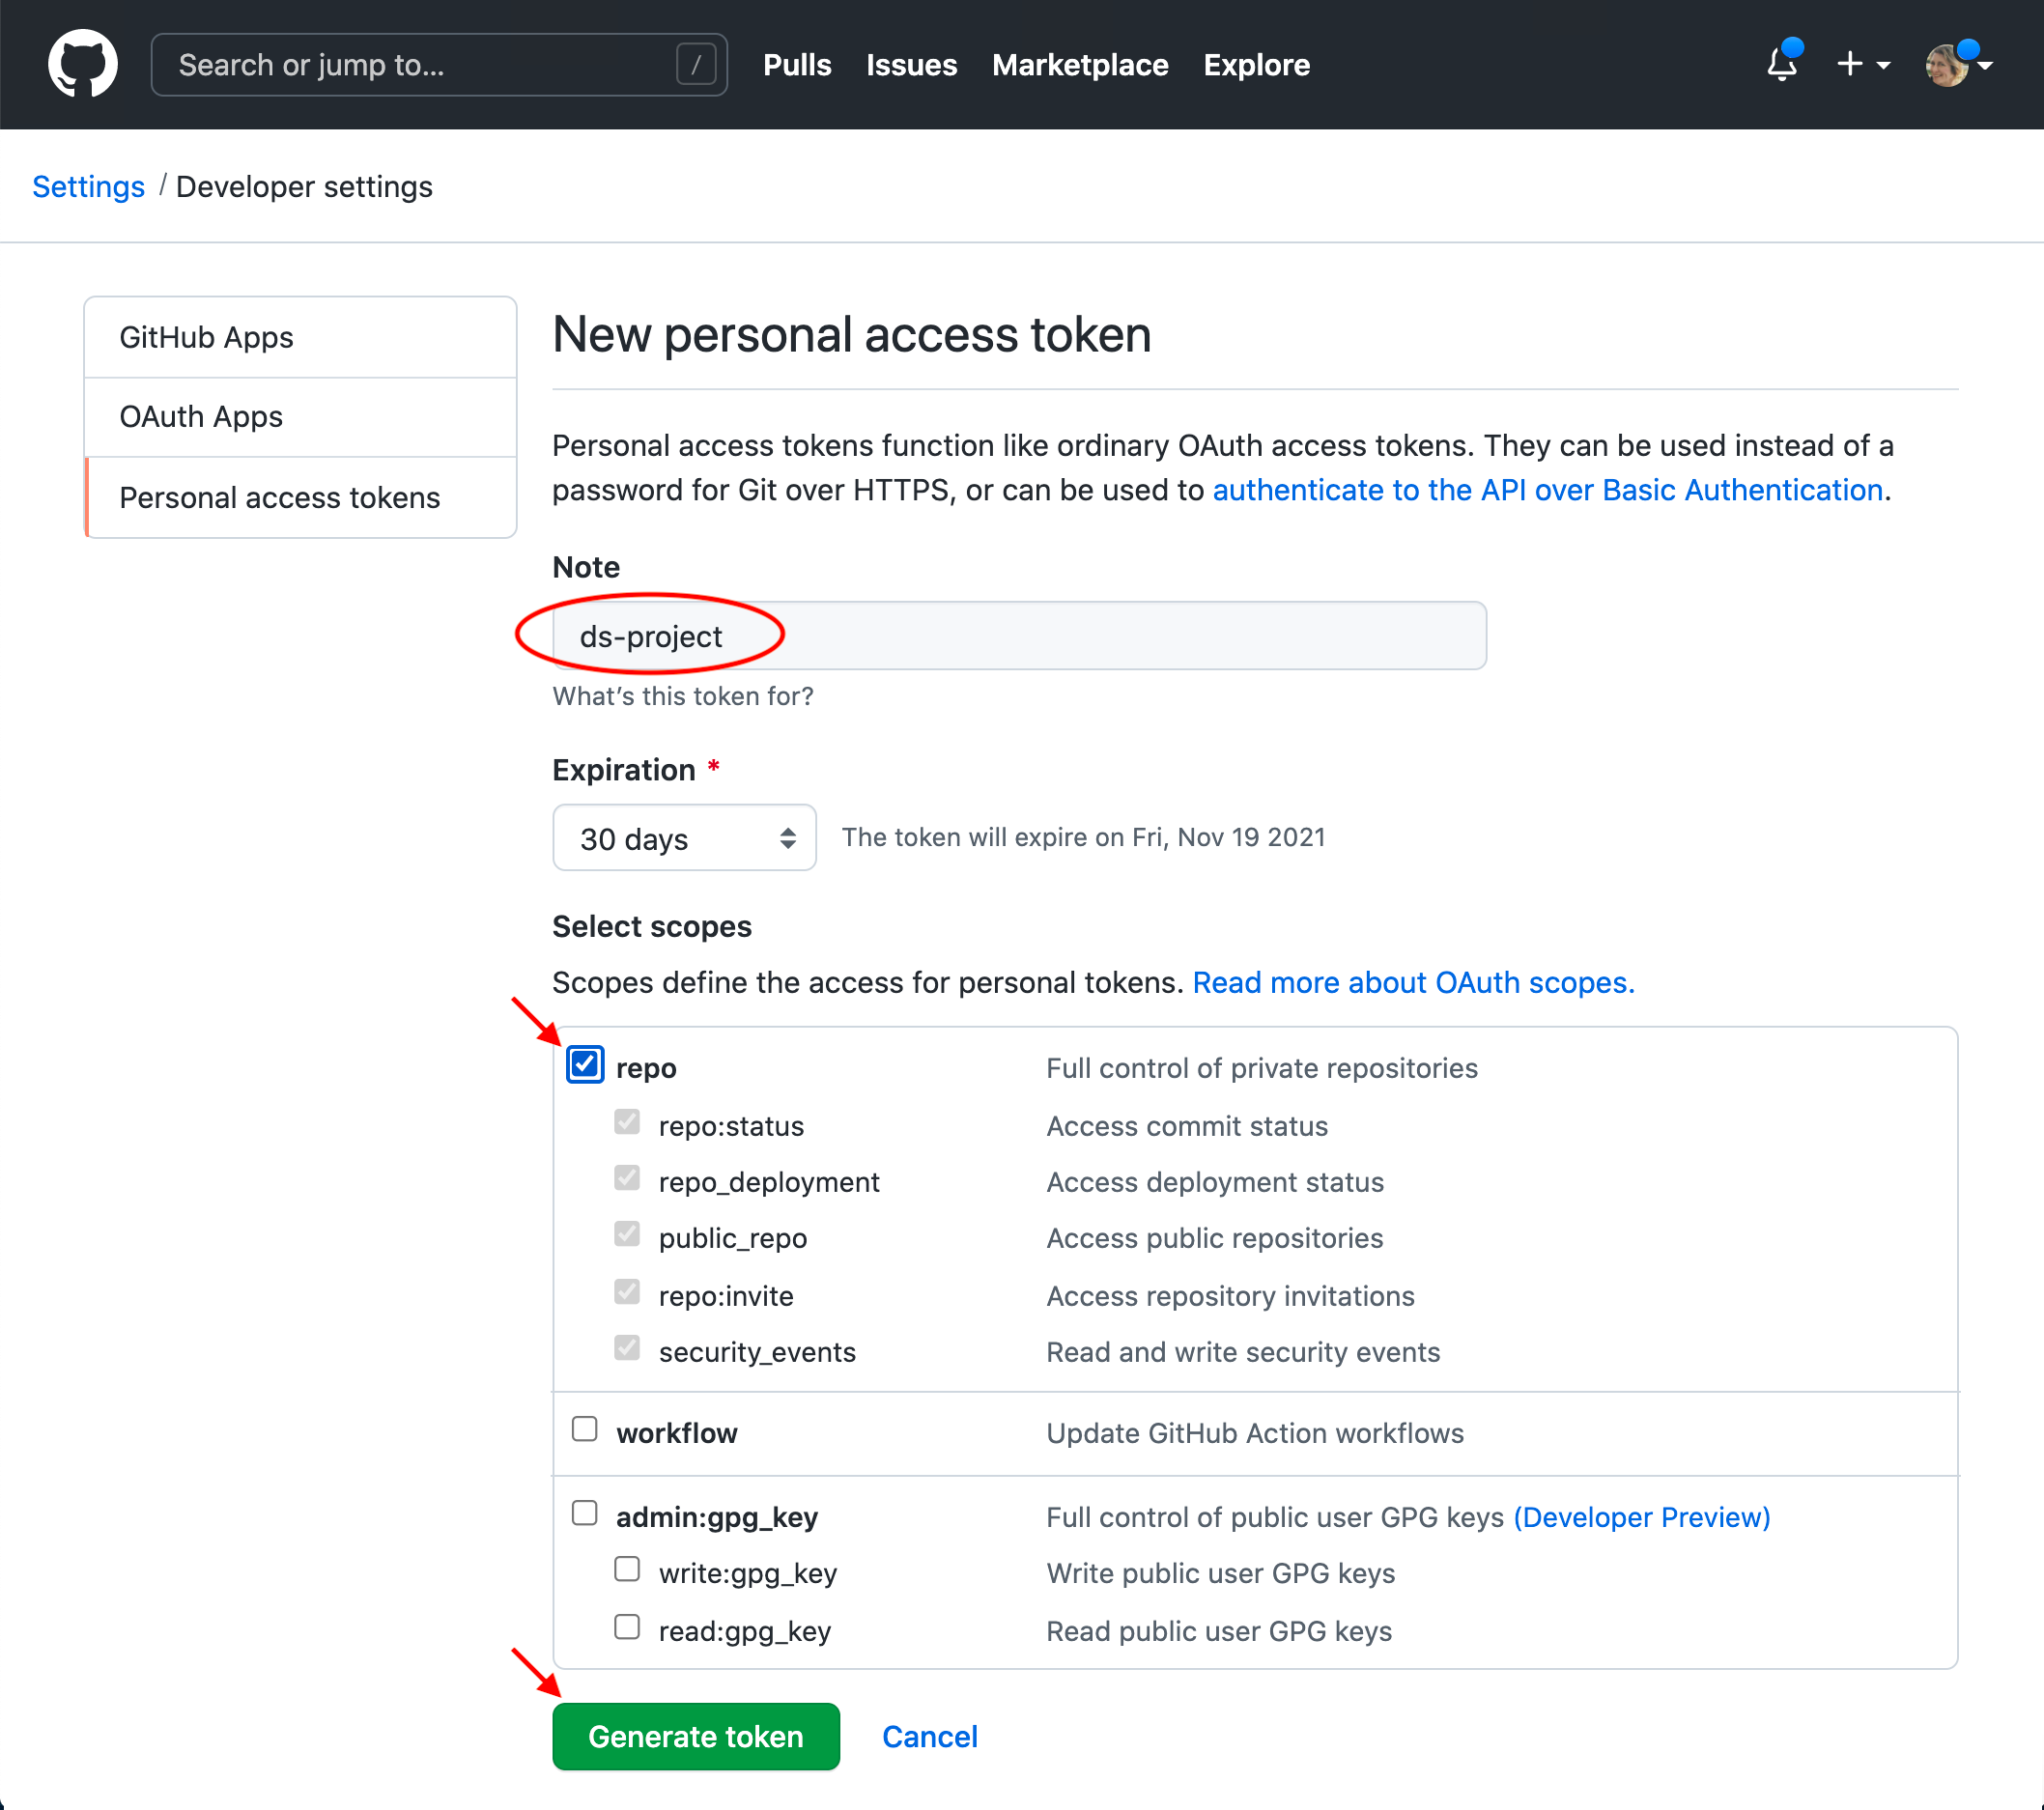
You will be asked to add a note to describe the purpose for your personal access token. Next, you need to select permissions for the token; this is where you can control what parts of your account the token can be used to access. Make sure to choose only those permissions that you absolutely require. In Figure 12.7.2, we tick only the "repo" box, which gives the token access to our repositories (so that we can push and pull) but none of our other GitHub account features. Finally, to generate the token, scroll to the bottom of that page and click the green "Generate token" button (Figure 12.7.2).
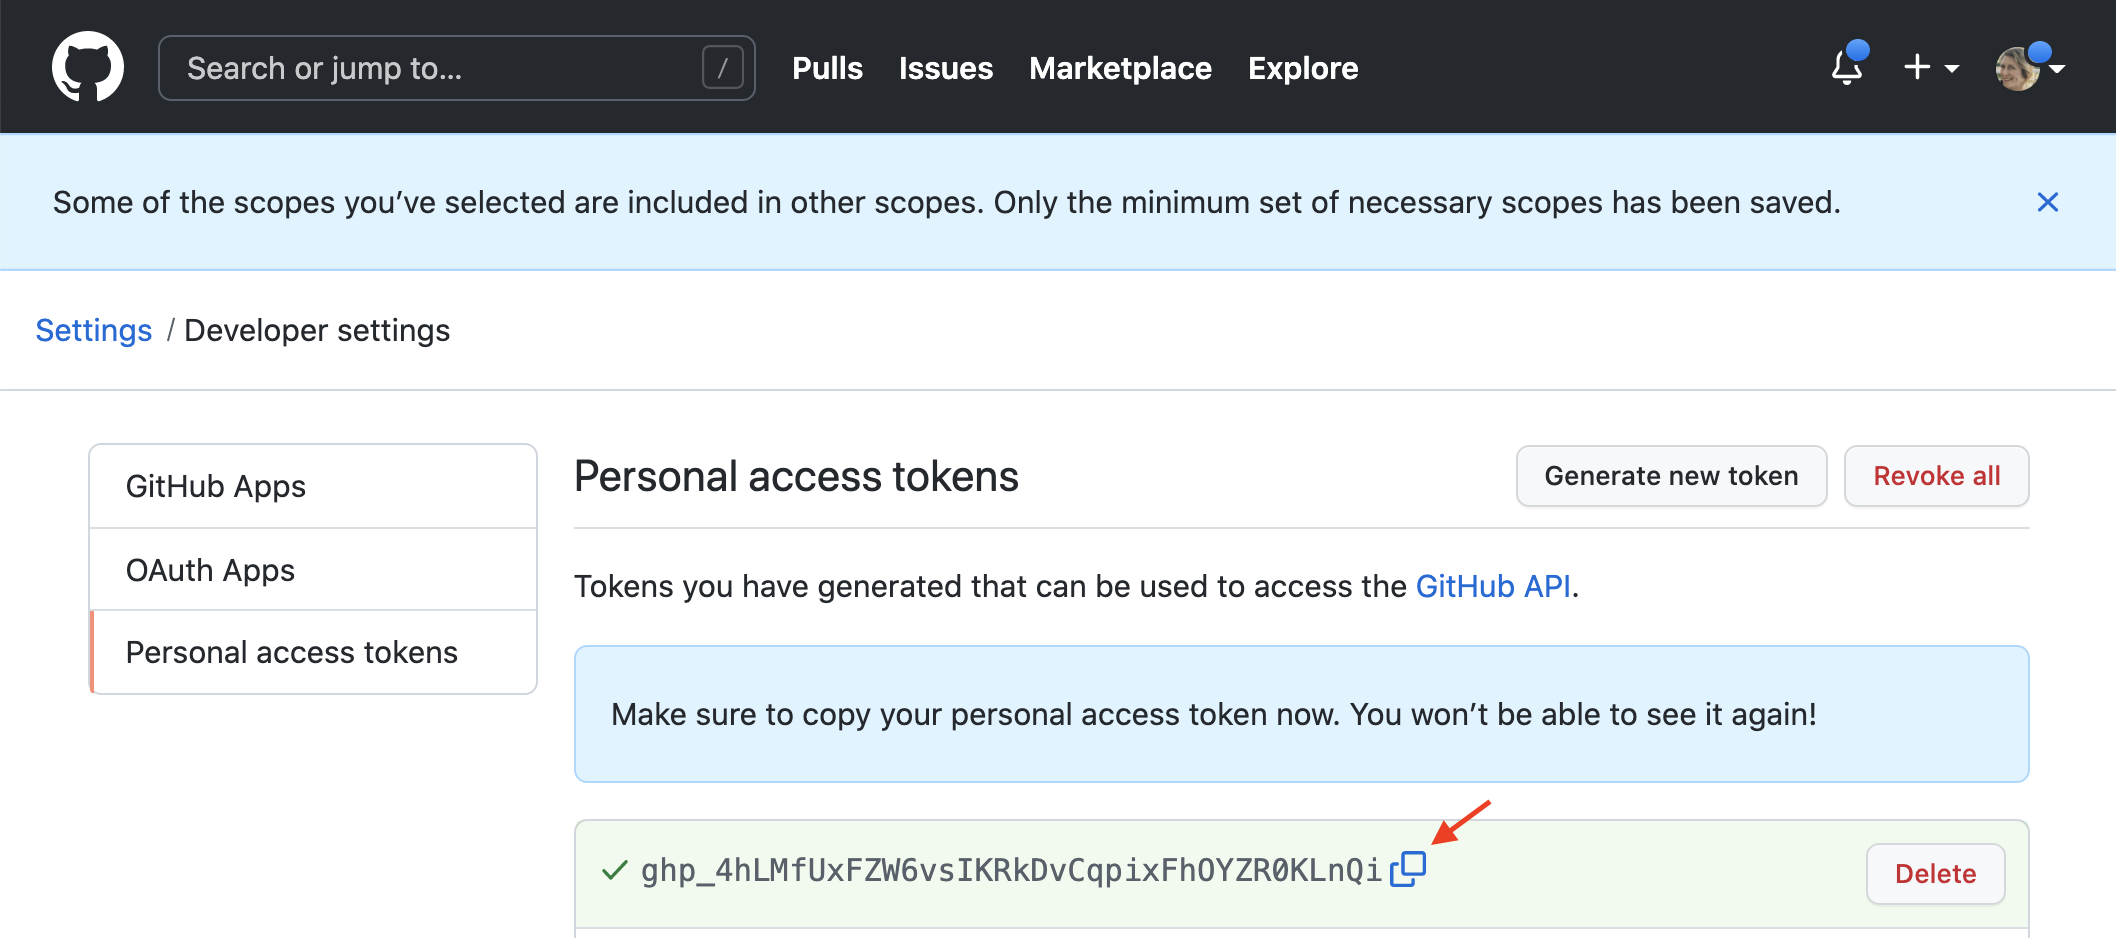
Finally, you will be taken to a page where you will be able to see and copy the personal access token you just generated (Figure 12.7.3). Since it provides access to certain parts of your account, you should treat this token like a password; for example, you should consider securely storing it (and your other passwords and tokens, too!) using a password manager. Note that this page will only display the token to you once, so make sure you store it in a safe place right away. If you accidentally forget to store it, though, do not fret—you can delete that token by clicking the "Delete" button next to your token, and generate a new one from scratch. To learn more about GitHub authentication, see the additional resources section at the end of this chapter.
Subsection 12.7.2 Cloning a repository using Jupyter
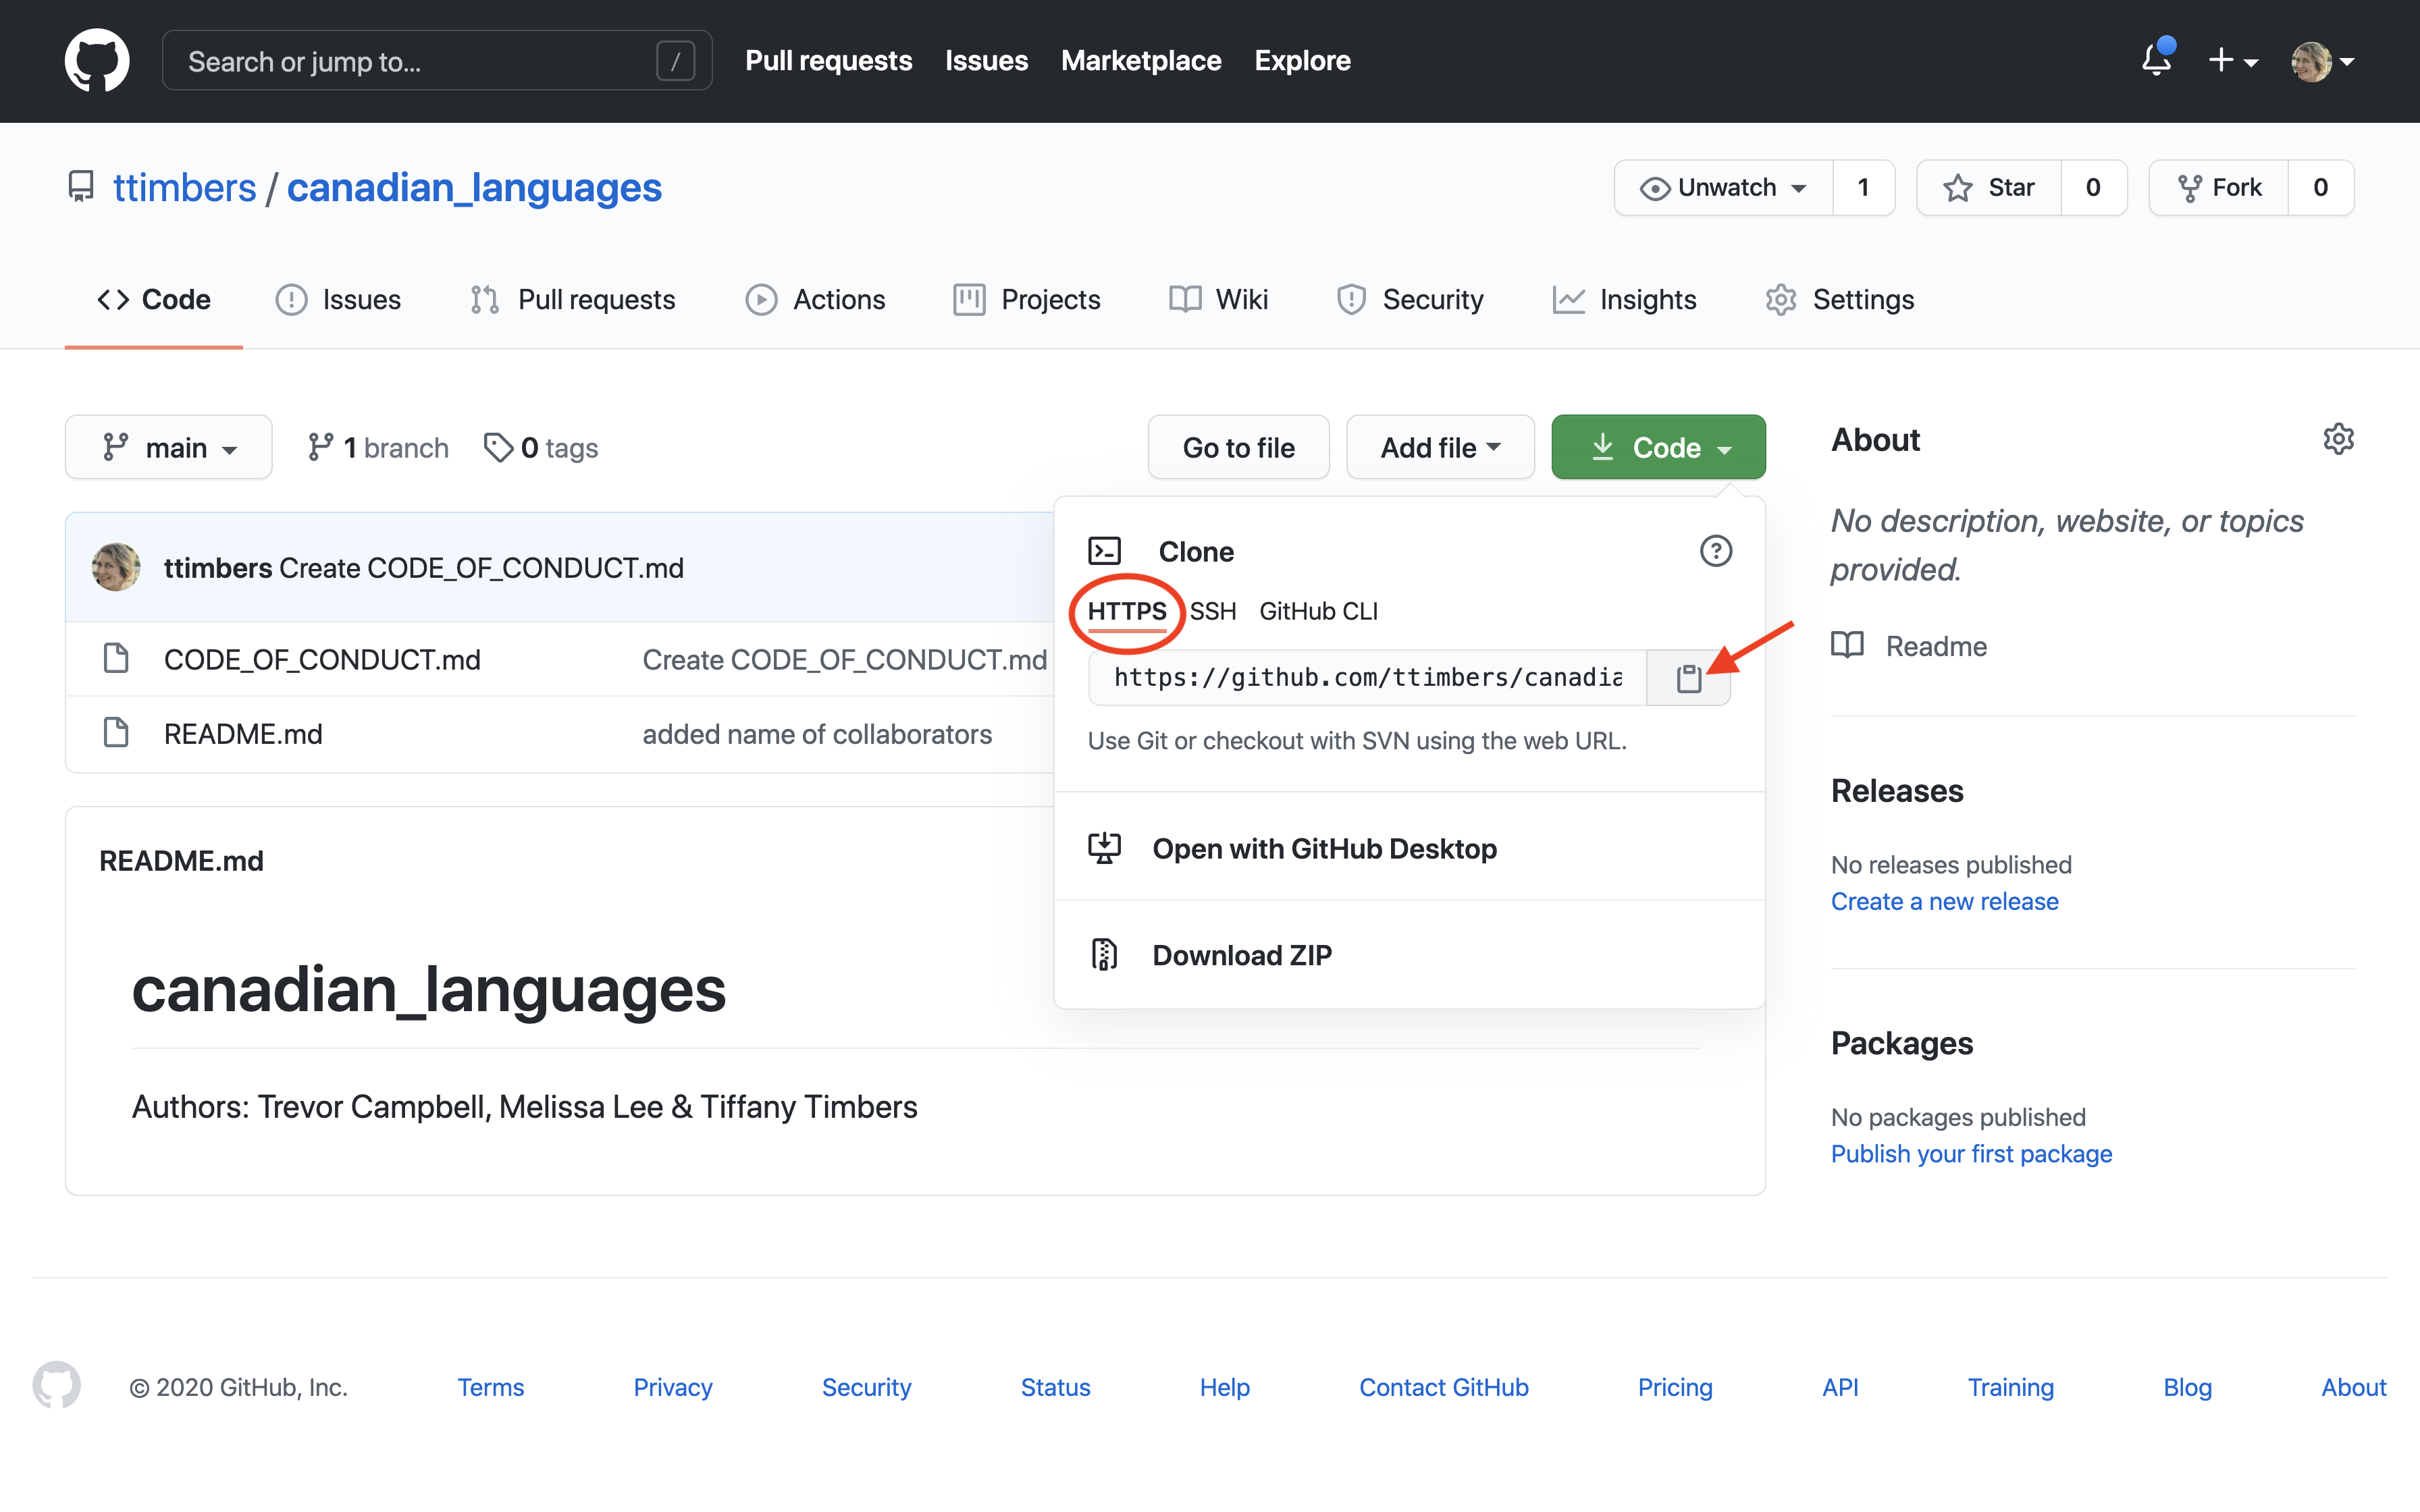
Cloning a remote repository from GitHub to create a local repository results in a copy that knows where it was obtained from so that it knows where to send/receive new committed edits. In order to do this, first copy the URL from the HTTPS tab of the Code drop-down menu on GitHub (Figure 12.7.4).
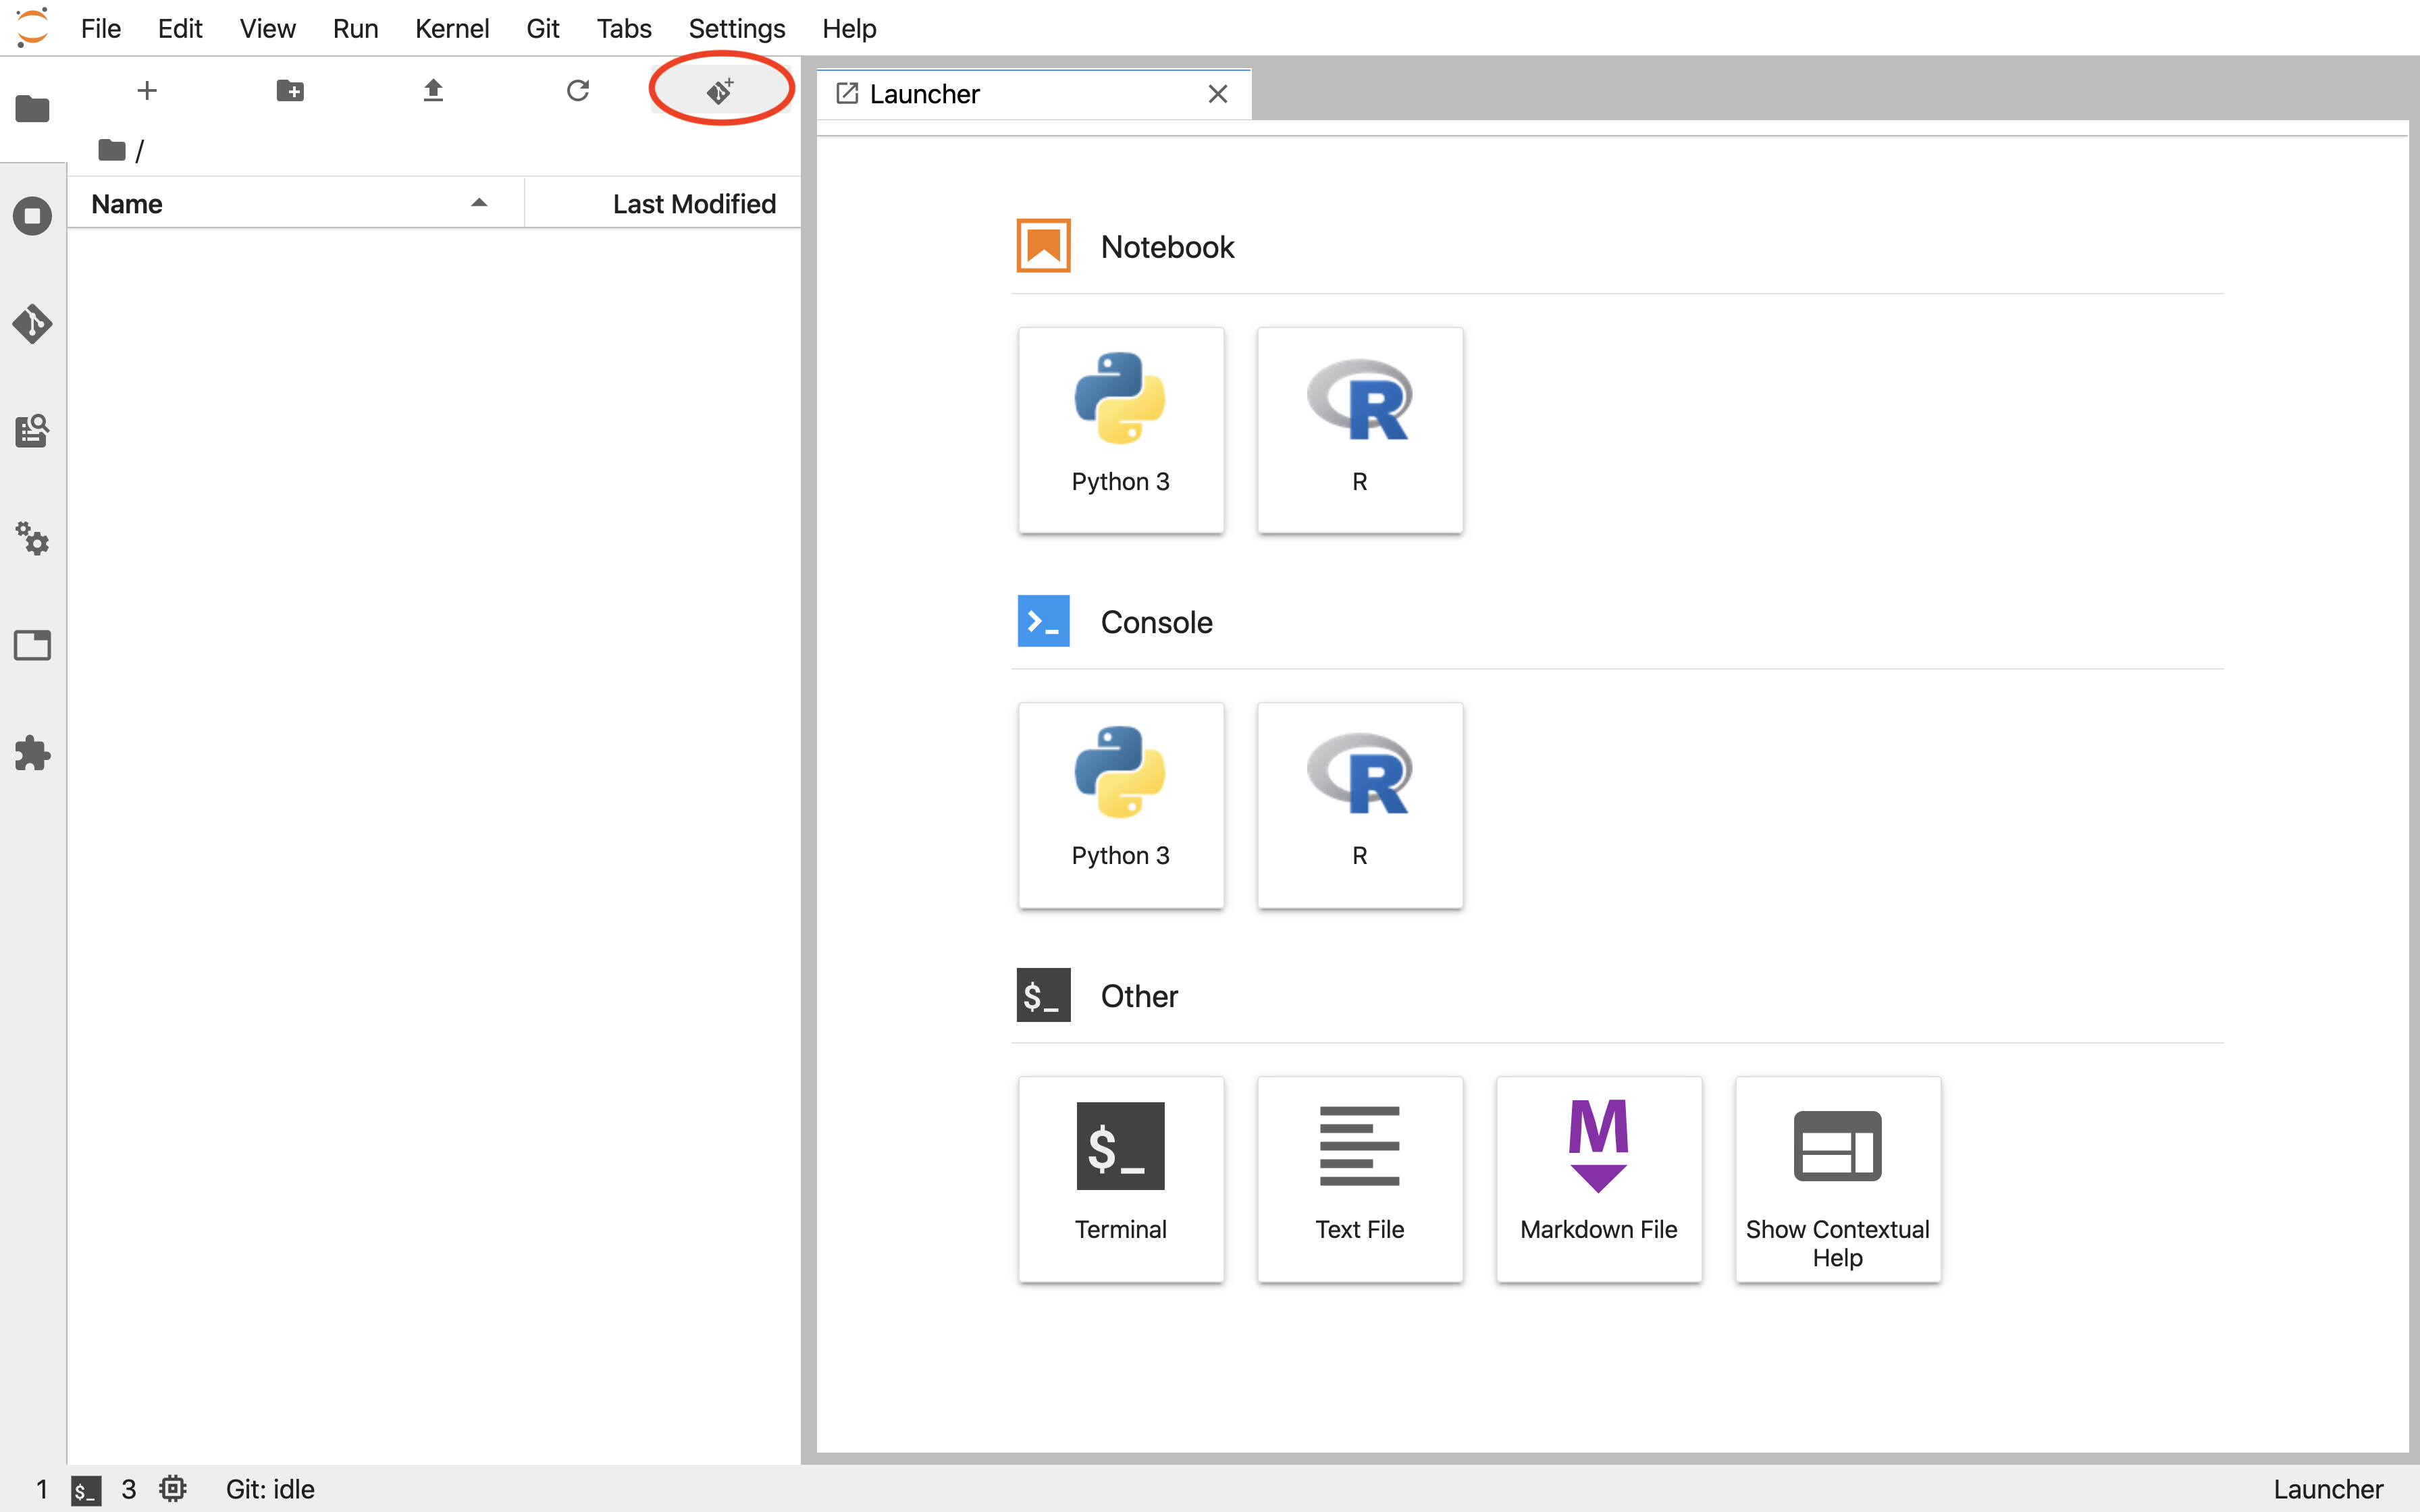
Open Jupyter, and click the Git+ icon on the file browser tab (Figure 12.7.5).
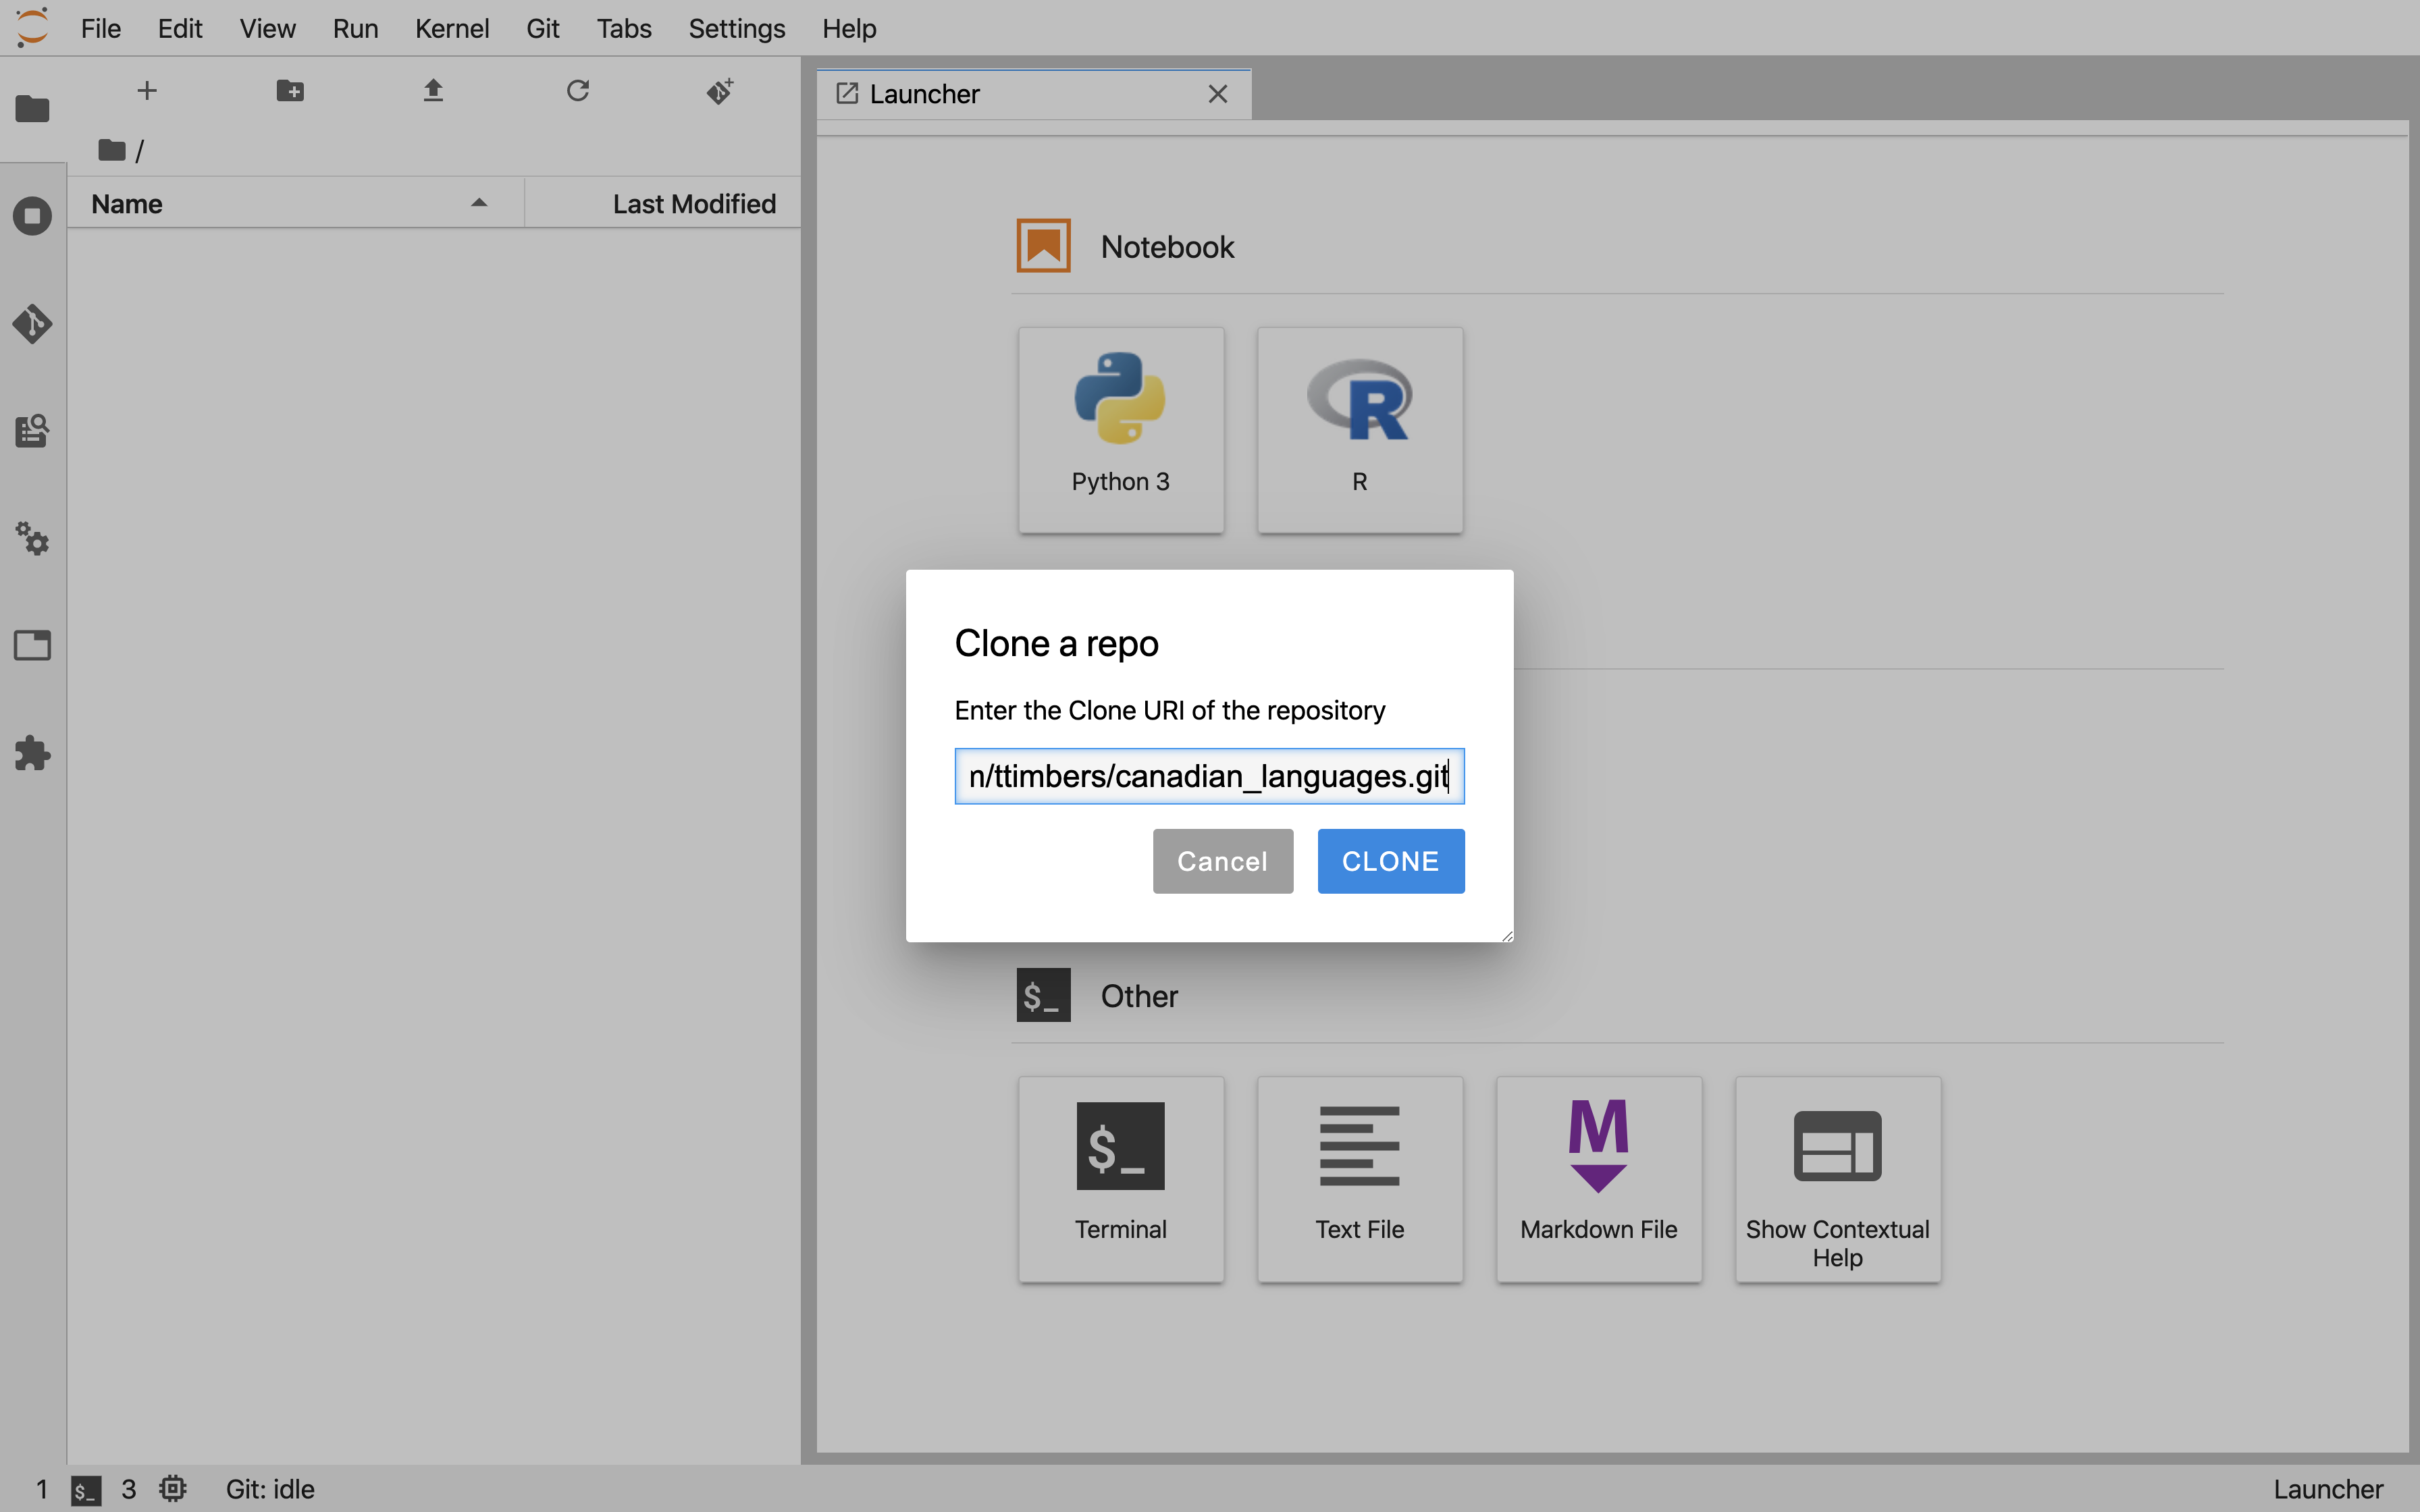
Paste the URL of the GitHub project repository you created and click the blue "CLONE" button (Figure 12.7.6).
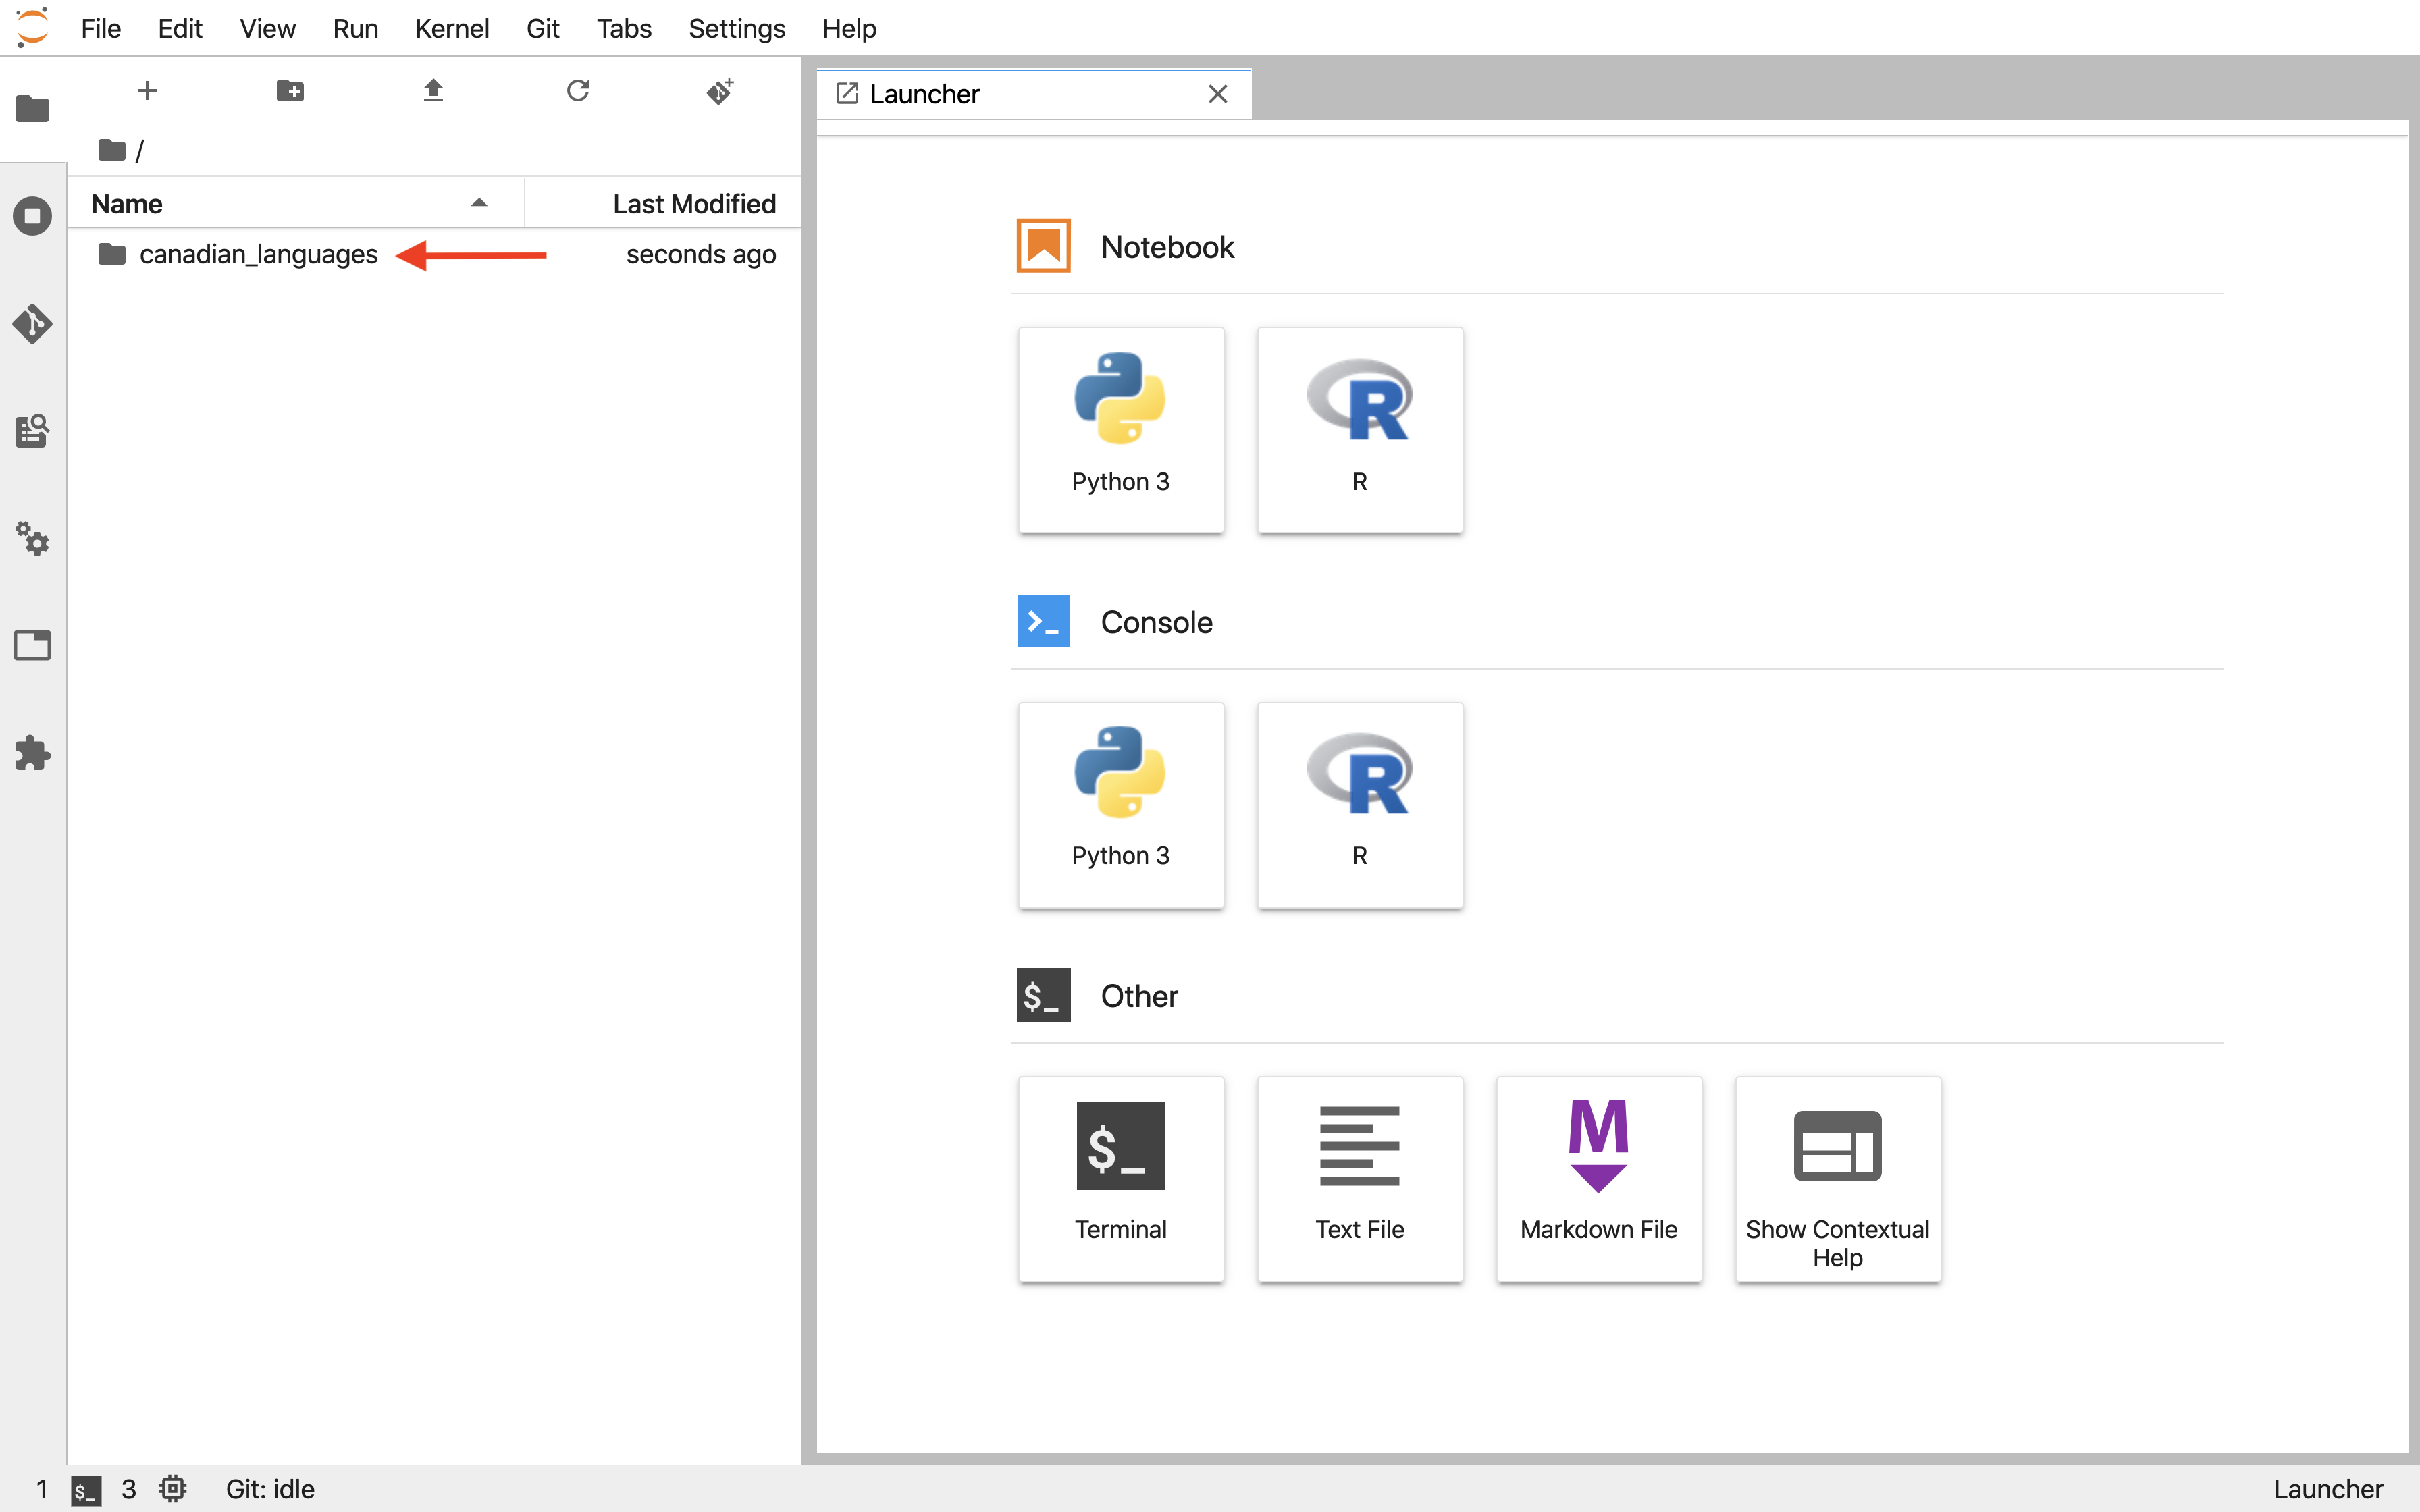
On the file browser tab, you will now see a folder for the repository. Inside this folder will be all the files that existed on GitHub (Figure 12.7.7).
Subsection 12.7.3 Specifying files to commit
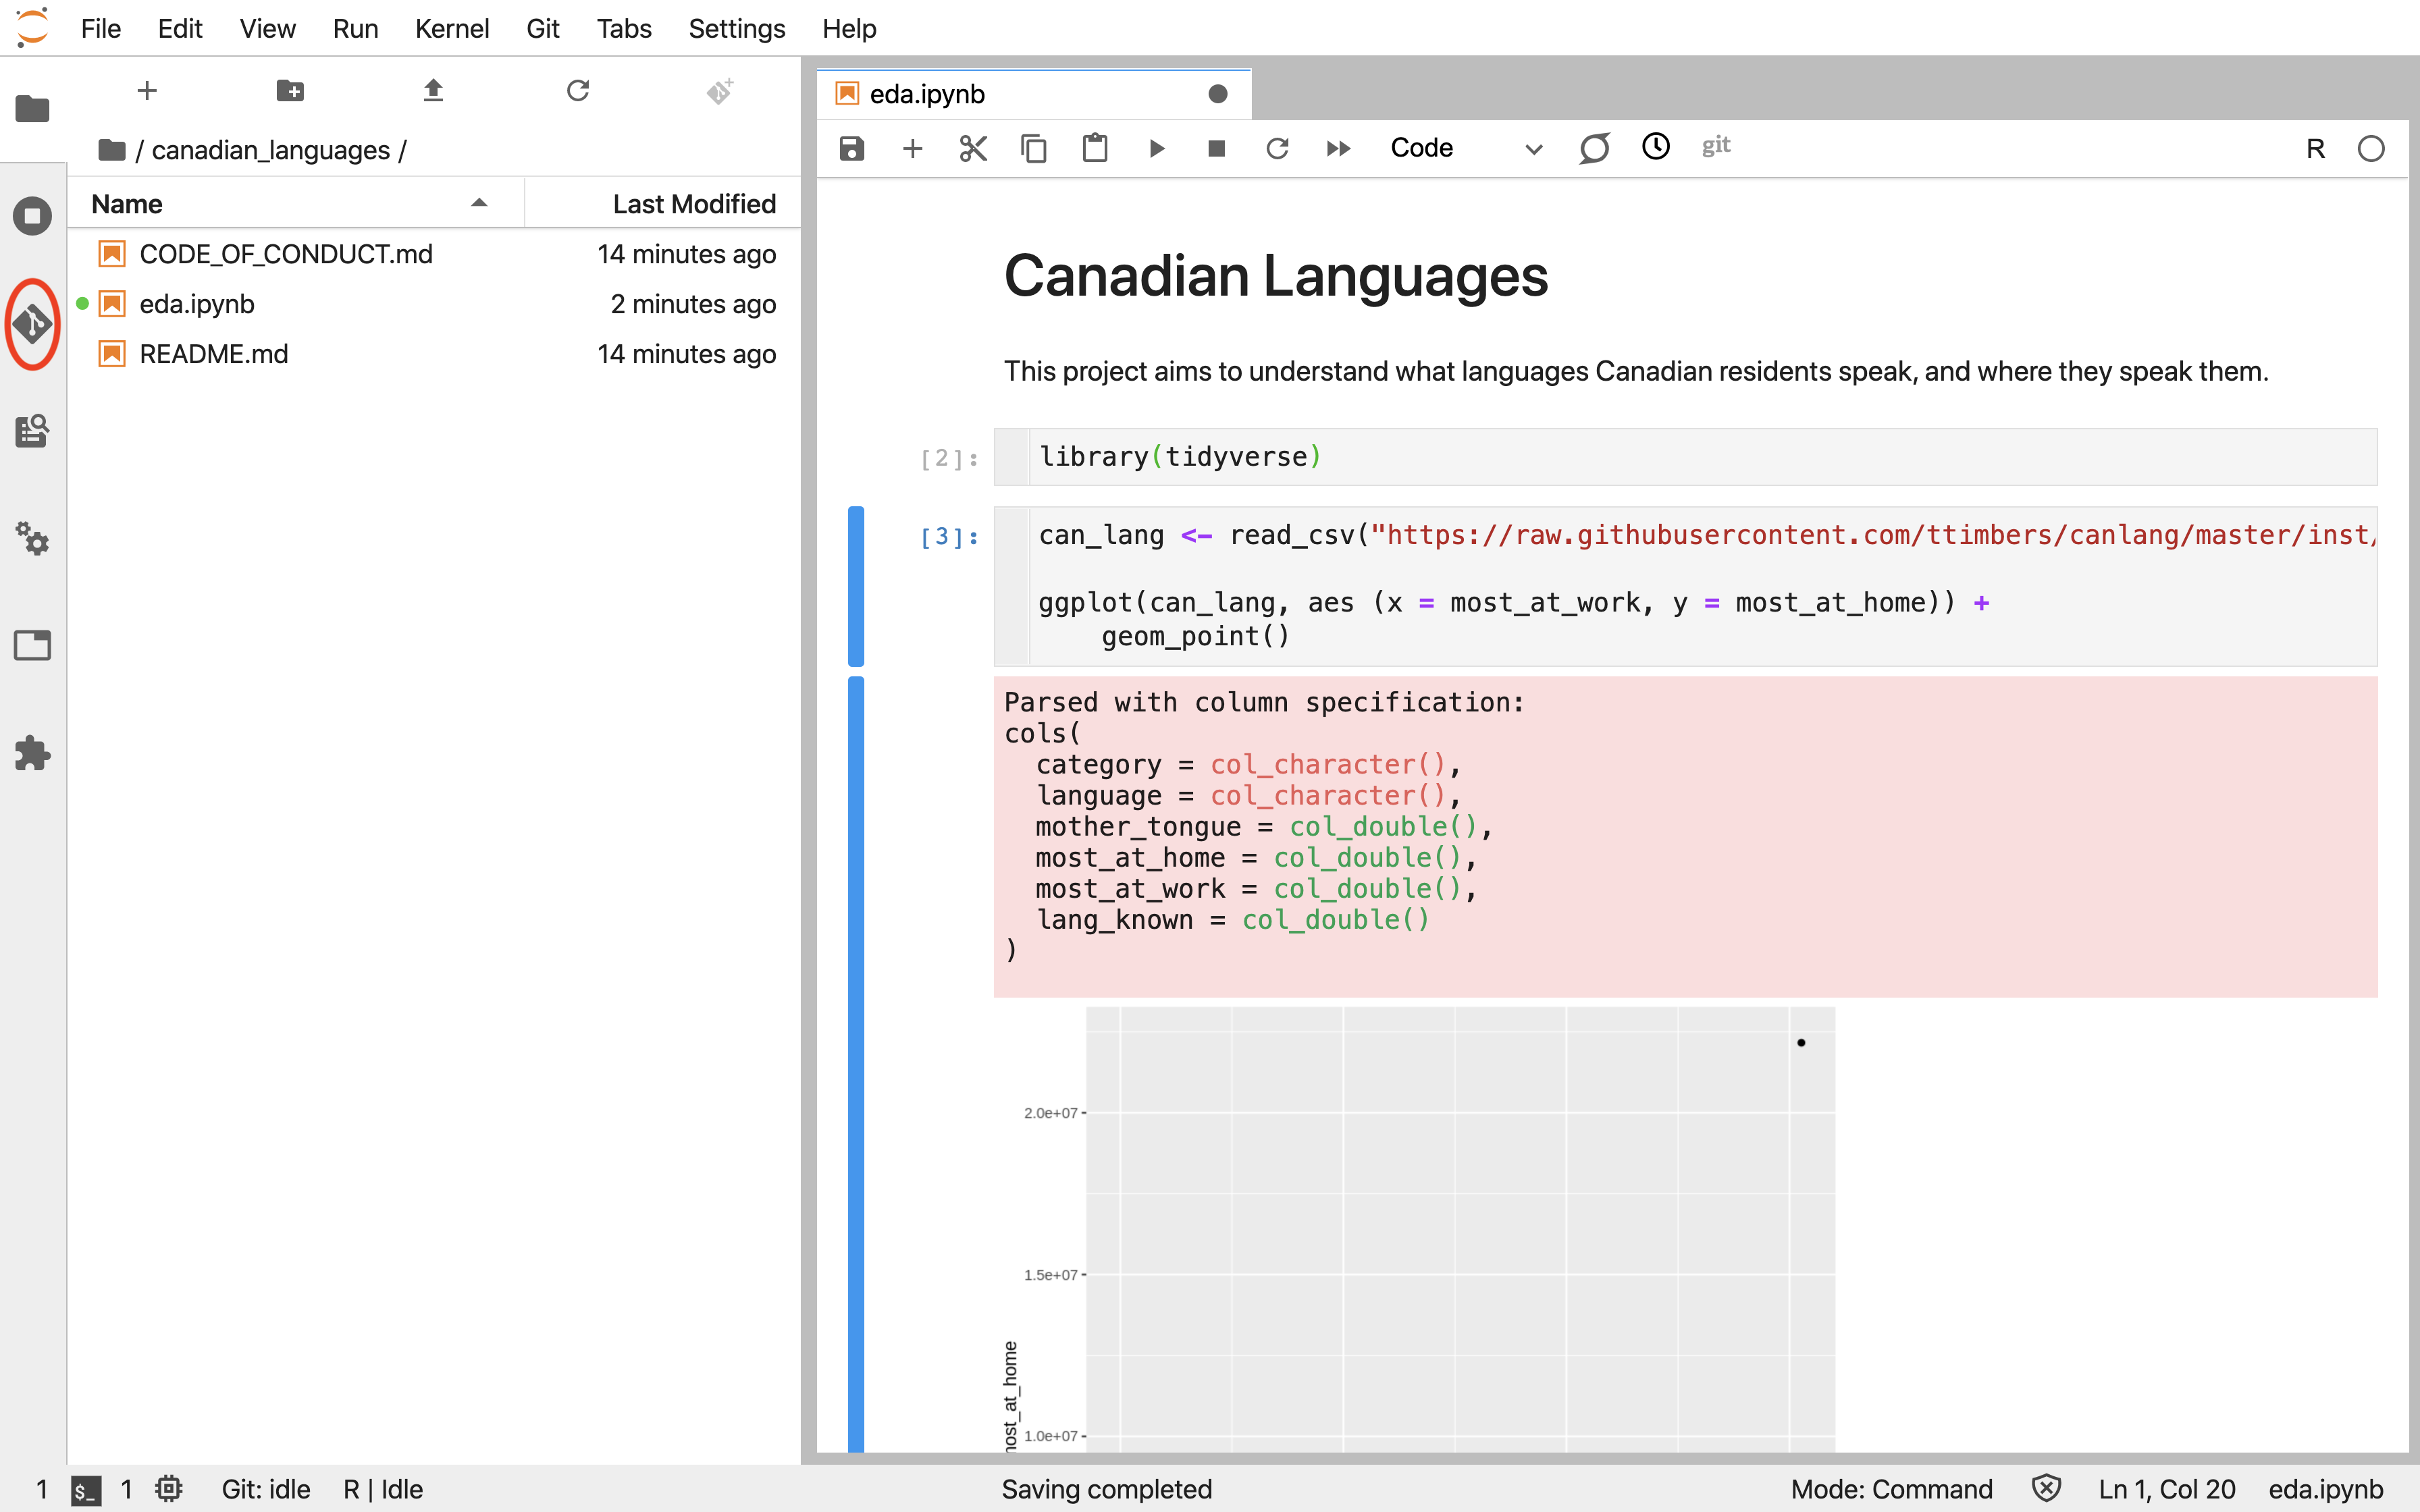
Now that you have cloned the remote repository from GitHub to create a local repository, you can get to work editing, creating, and deleting files. For example, suppose you created and saved a new file (named
eda.ipynb) that you would like to send back to the project repository on GitHub (Figure 12.7.8). To "add" this modified file to the staging area (i.e., flag that this is a file whose changes we would like to commit), click the Jupyter Git extension icon on the far left-hand side of Jupyter (Figure 12.7.8).
This opens the Jupyter Git graphical user interface pane. Next, click the plus sign (+) beside the file(s) that you want to "add" (Figure 12.7.9). Note that because this is the first change for this file, it falls under the "Untracked" heading. However, next time you edit this file and want to add the changes, you will find it under the "Changed" heading.
You will also see an
eda-checkpoint.ipynb file under the "Untracked" heading. This is a temporary "checkpoint file" created by Jupyter when you work on eda.ipynb. You generally do not want to add auto-generated files to Git repositories; only add the files you directly create and edit.
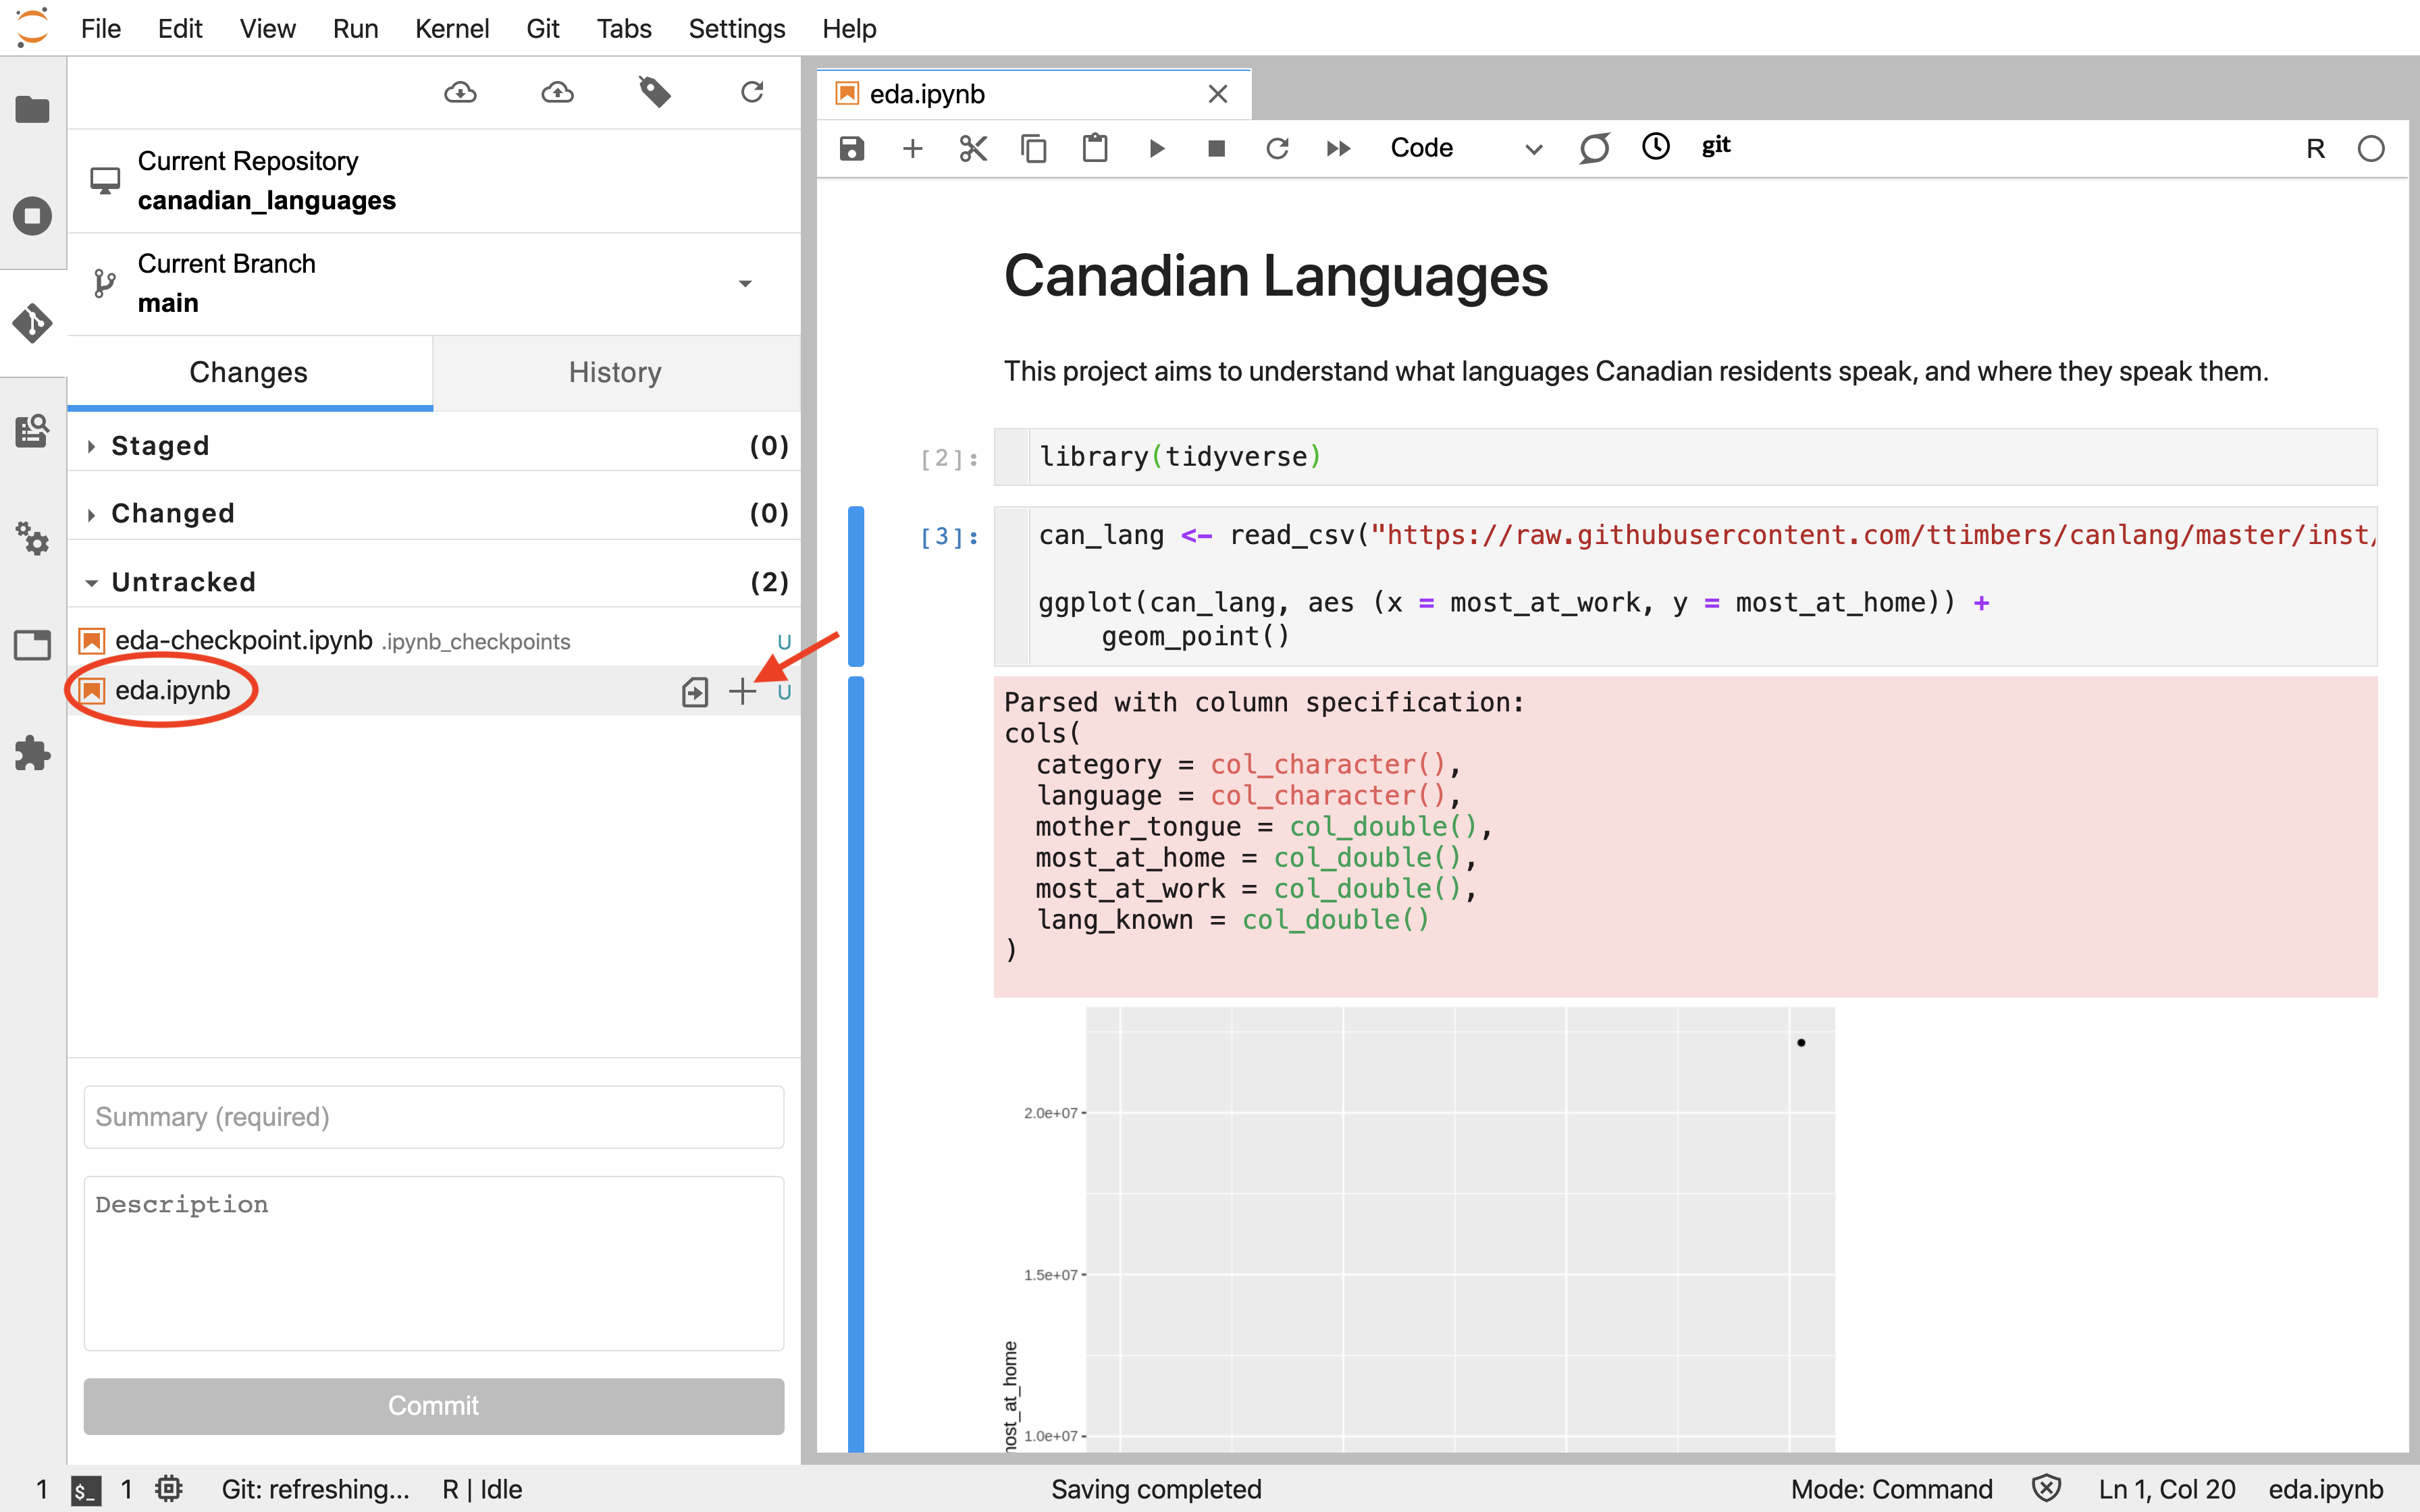
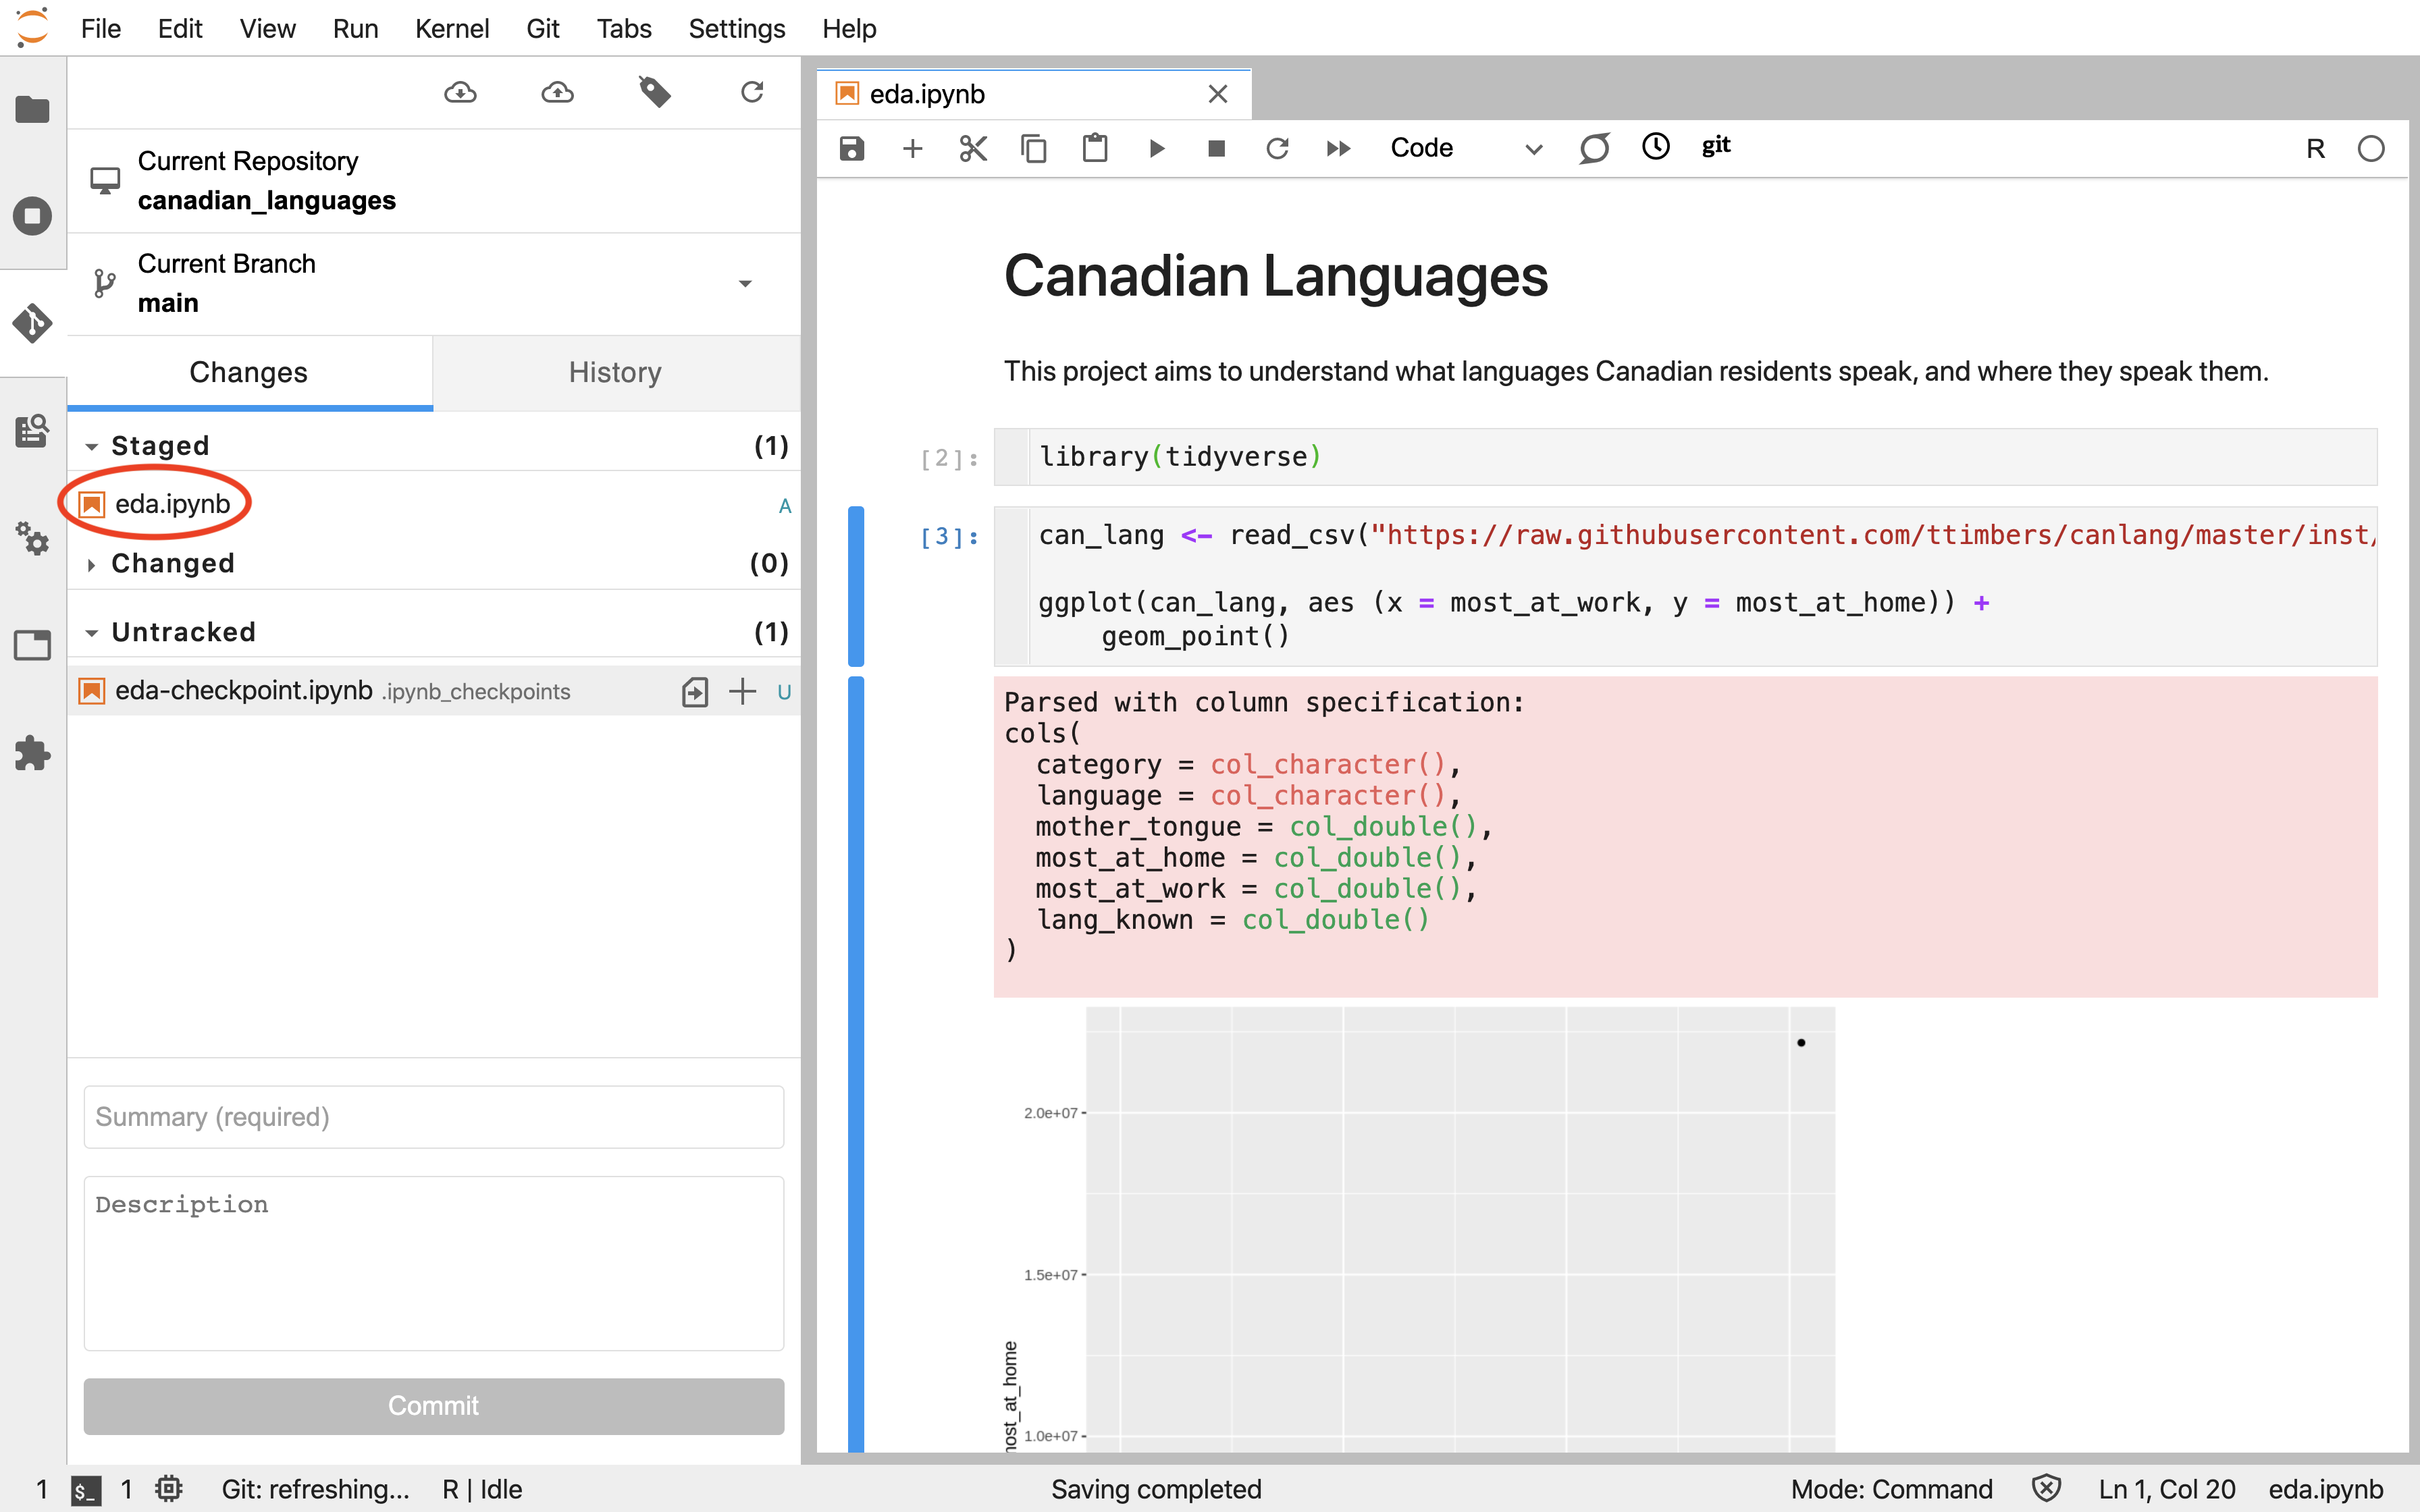
eda.ipynb is added to the staging area via the plus sign (+).Clicking the plus sign (+) moves the file from the "Untracked" heading to the "Staged" heading, so that Git knows you want a snapshot of its current state as a commit (Figure 12.7.10). Now you are ready to "commit" the changes. Make sure to include a (clear and helpful!) message about what was changed so that your collaborators (and future you) know what happened in this commit.
eda.ipynb makes it visible in the staging area.Subsection 12.7.4 Making the commit
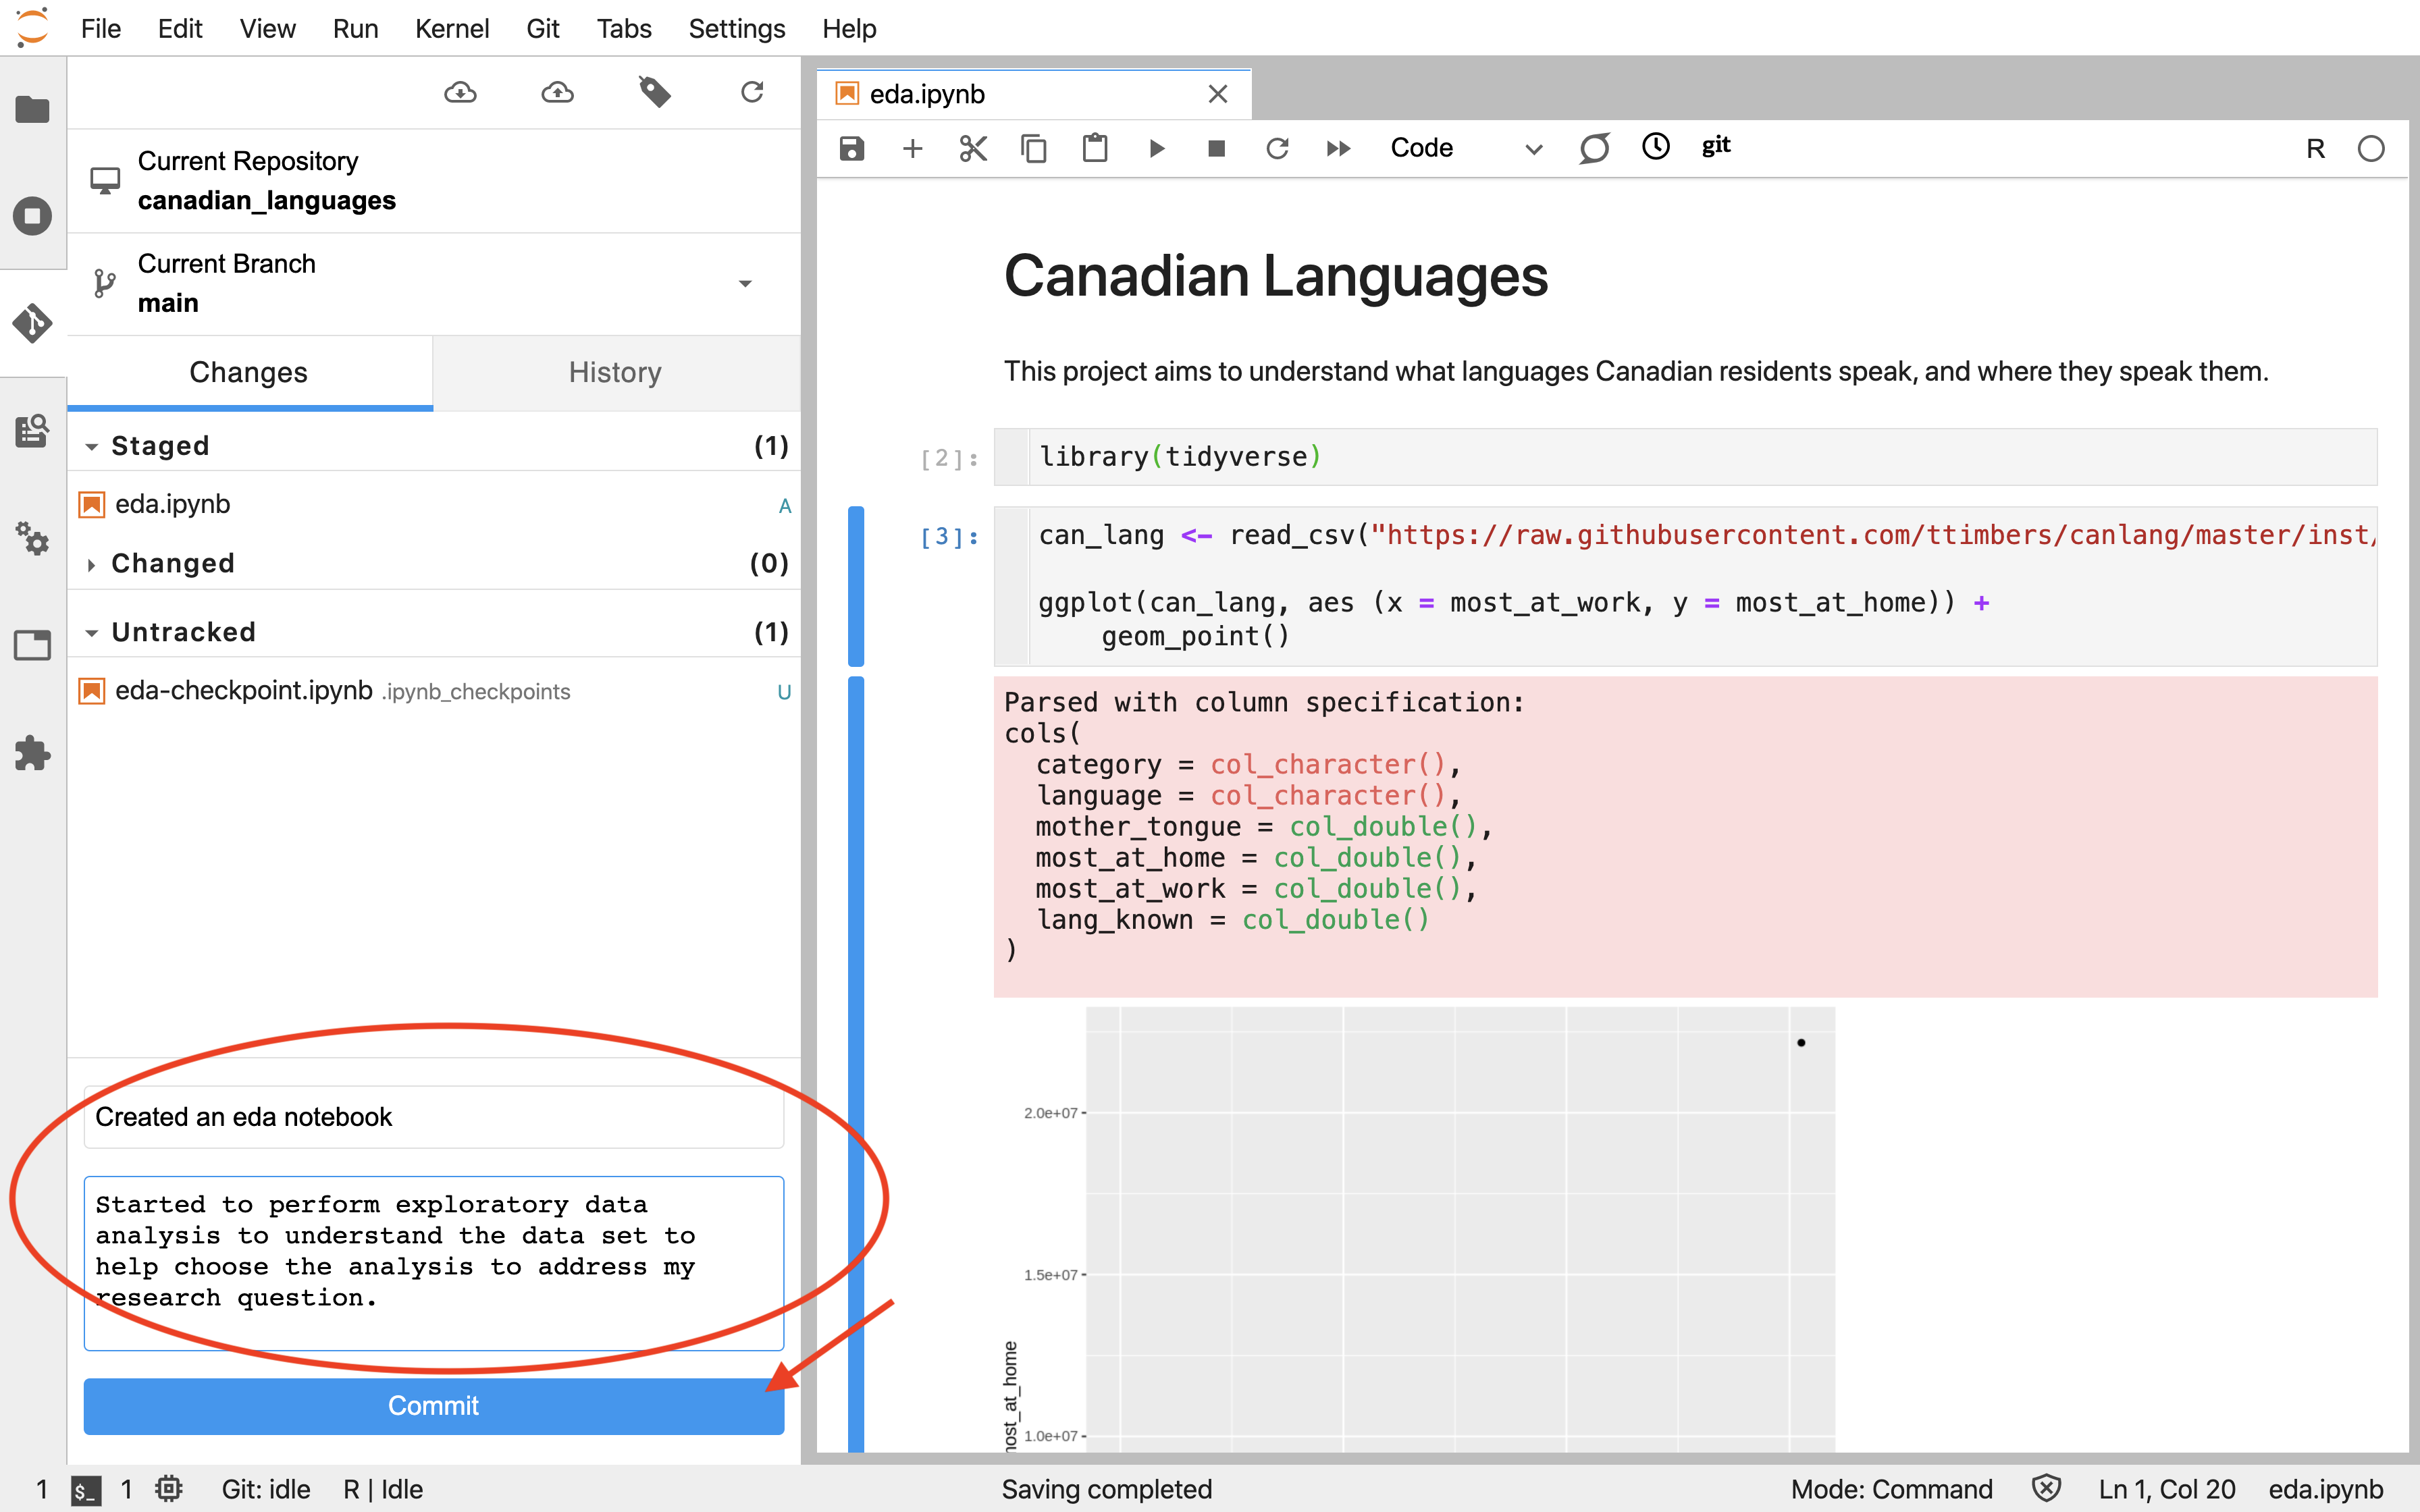
To snapshot the changes with an associated commit message, you must put a message in the text box at the bottom of the Git pane and click on the blue "Commit" button (Figure 12.7.11). It is highly recommended to write useful and meaningful messages about what was changed. These commit messages, and the datetime stamp for a given commit, are the primary means to navigate through the project’s history in the event that you need to view or retrieve a past version of a file, or revert your project to an earlier state. When you click the "Commit" button for the first time, you will be prompted to enter your name and email. This only needs to be done once for each machine you use Git on.
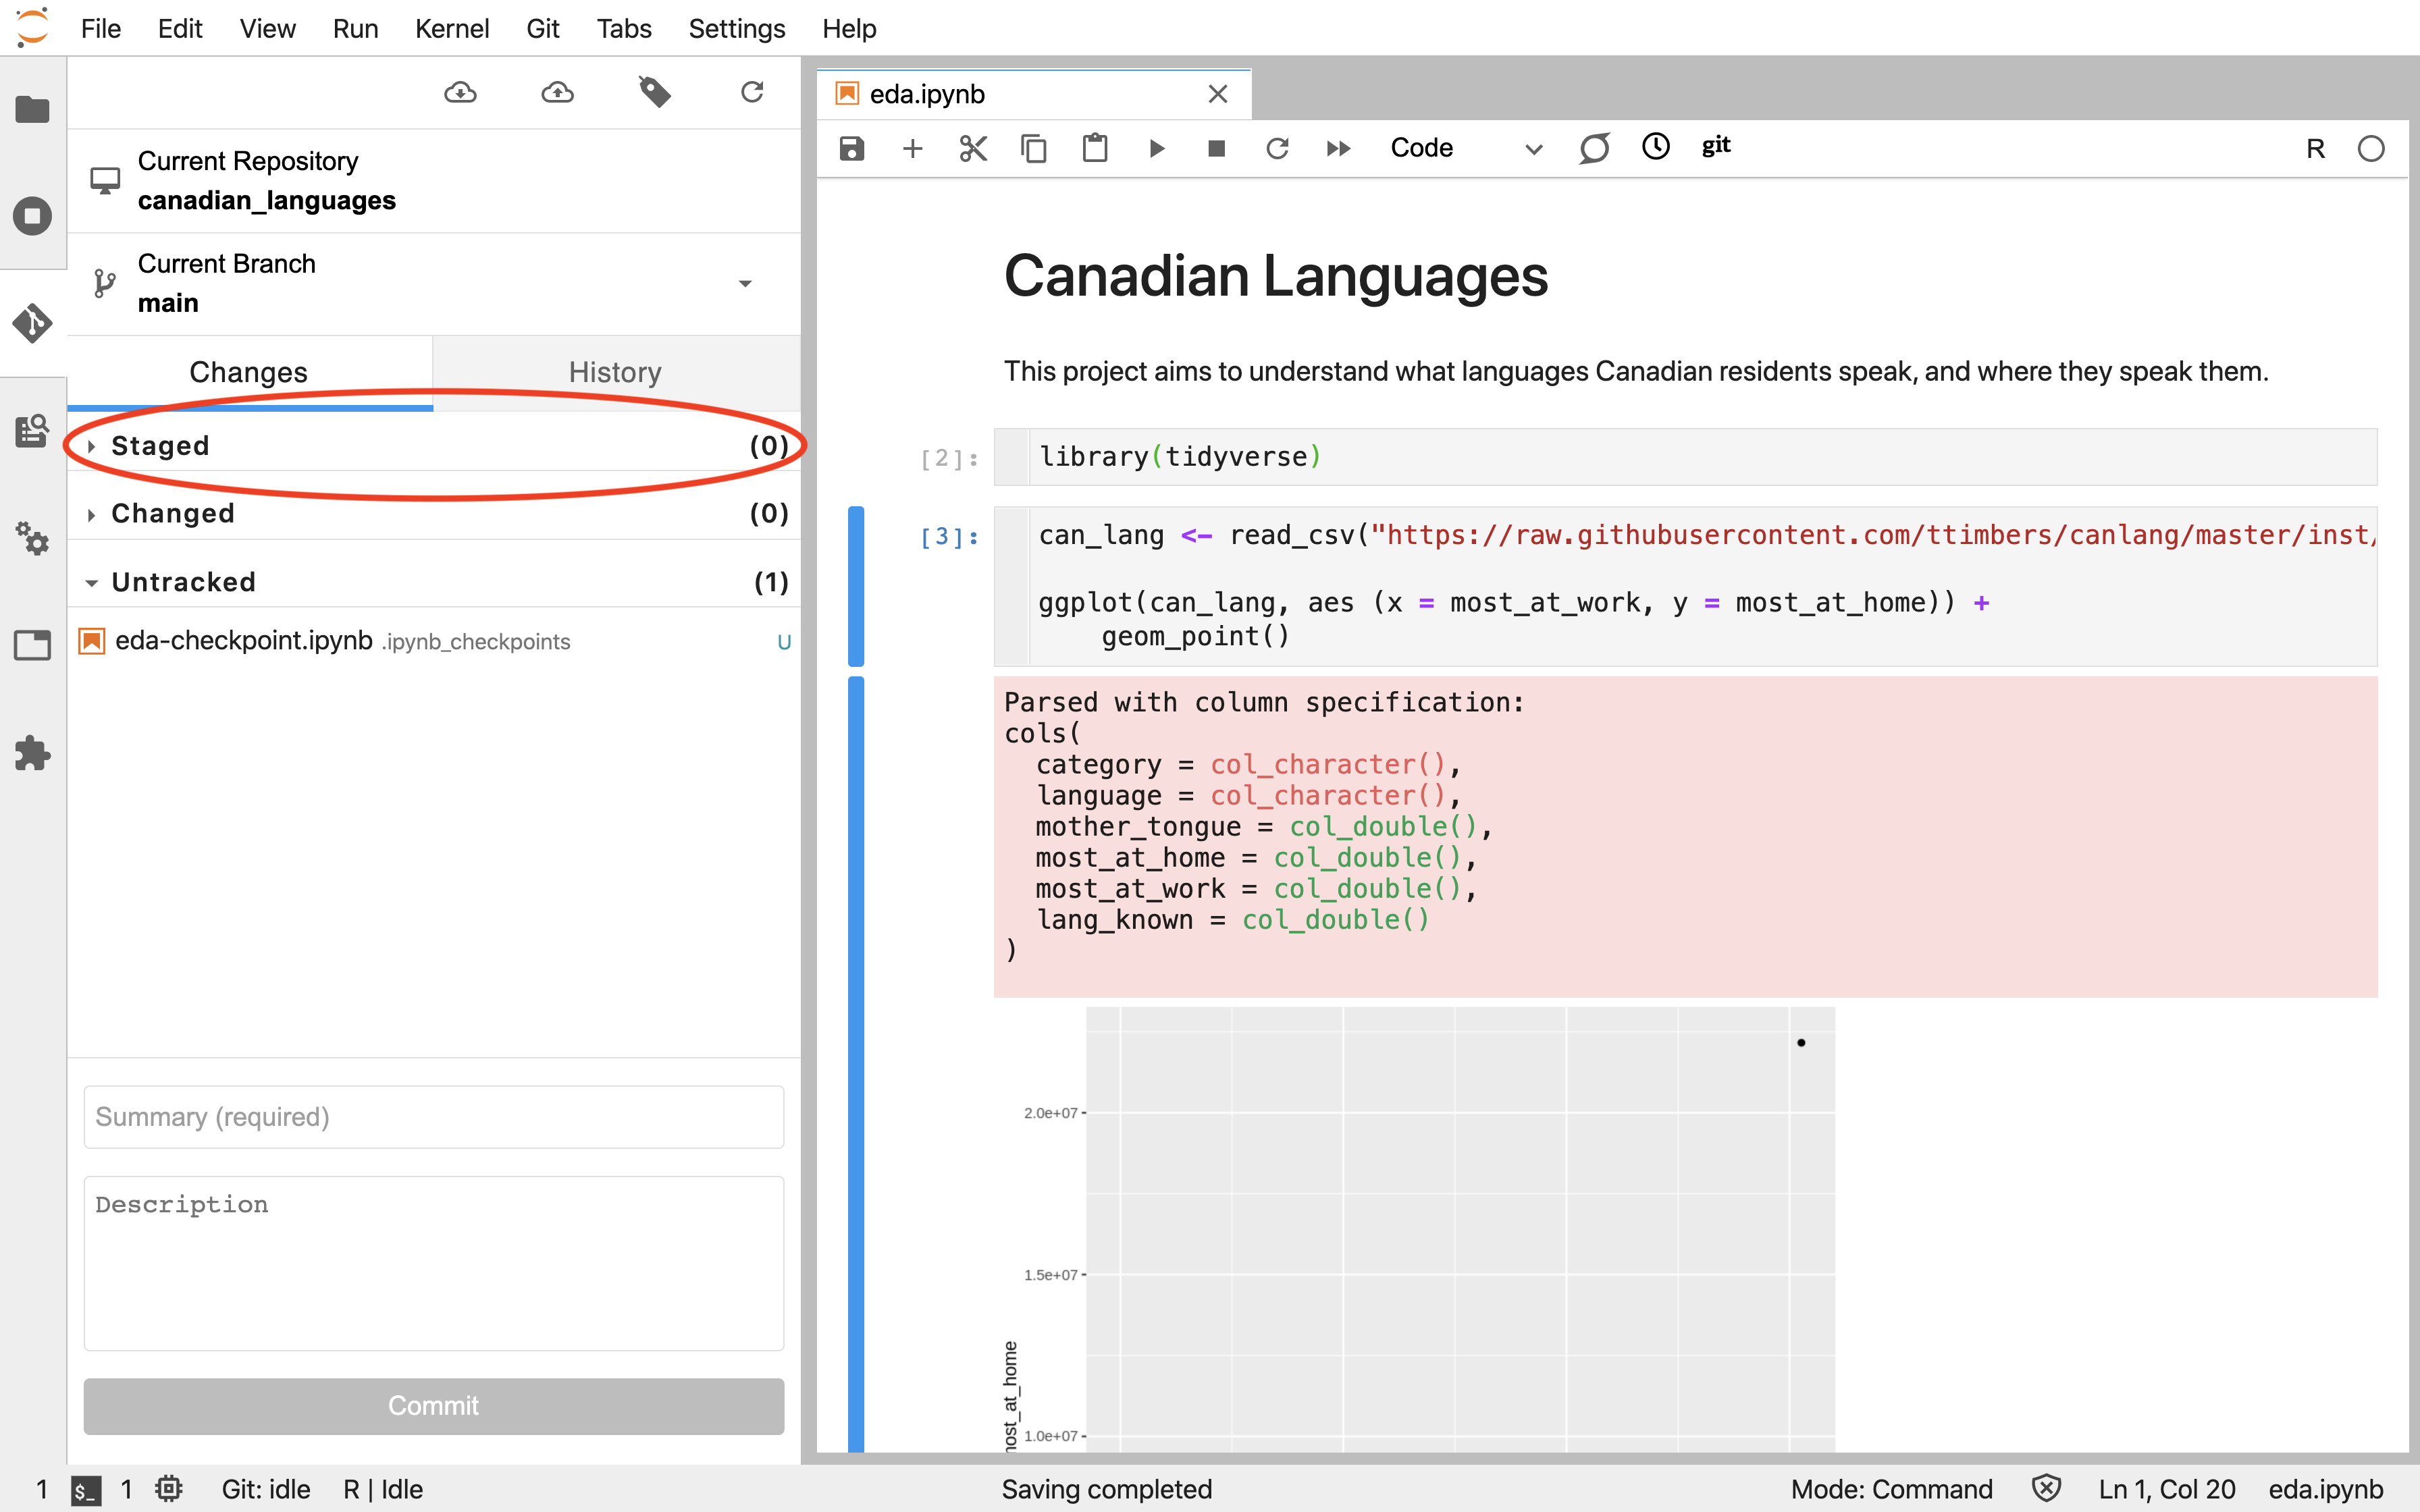
After "committing" the file(s), you will see there are 0 "Staged" files. You are now ready to push your changes to the remote repository on GitHub (Figure 12.7.12).
Subsection 12.7.5 Pushing the commits to GitHub
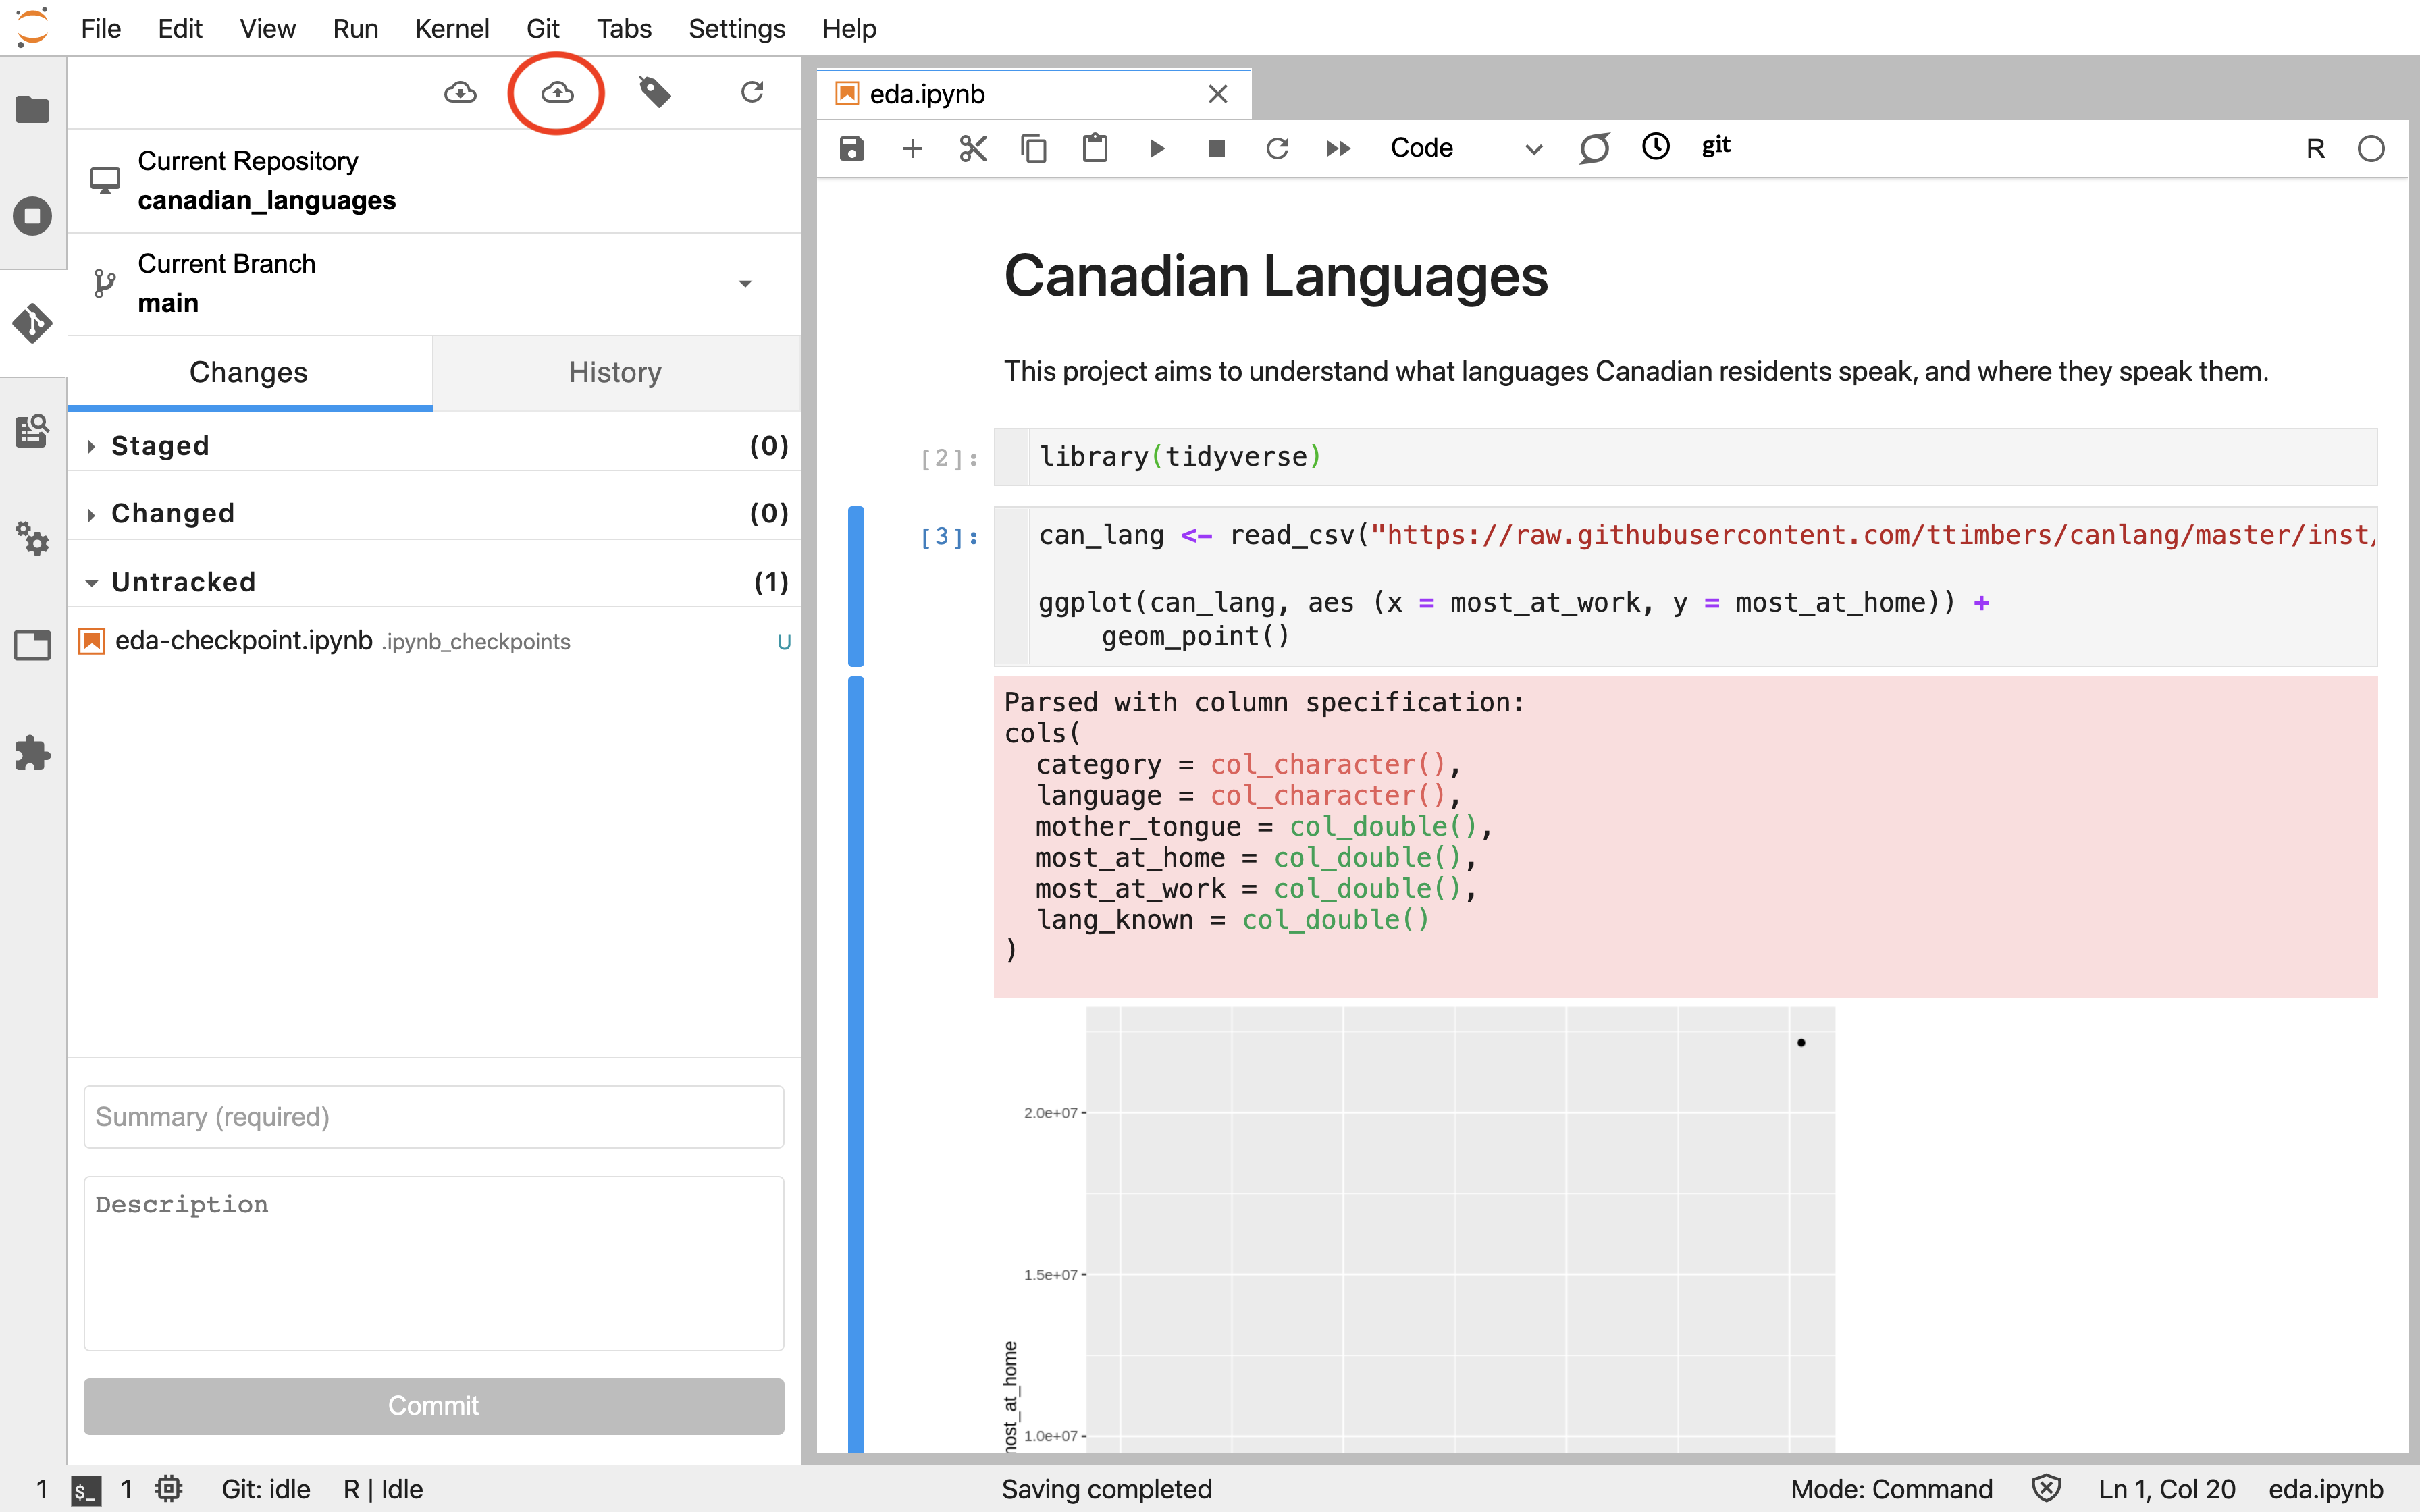
To send the committed changes back to the remote repository on GitHub, you need to push them. To do this, click on the cloud icon with the up arrow on the Jupyter Git tab (Figure 12.7.13).
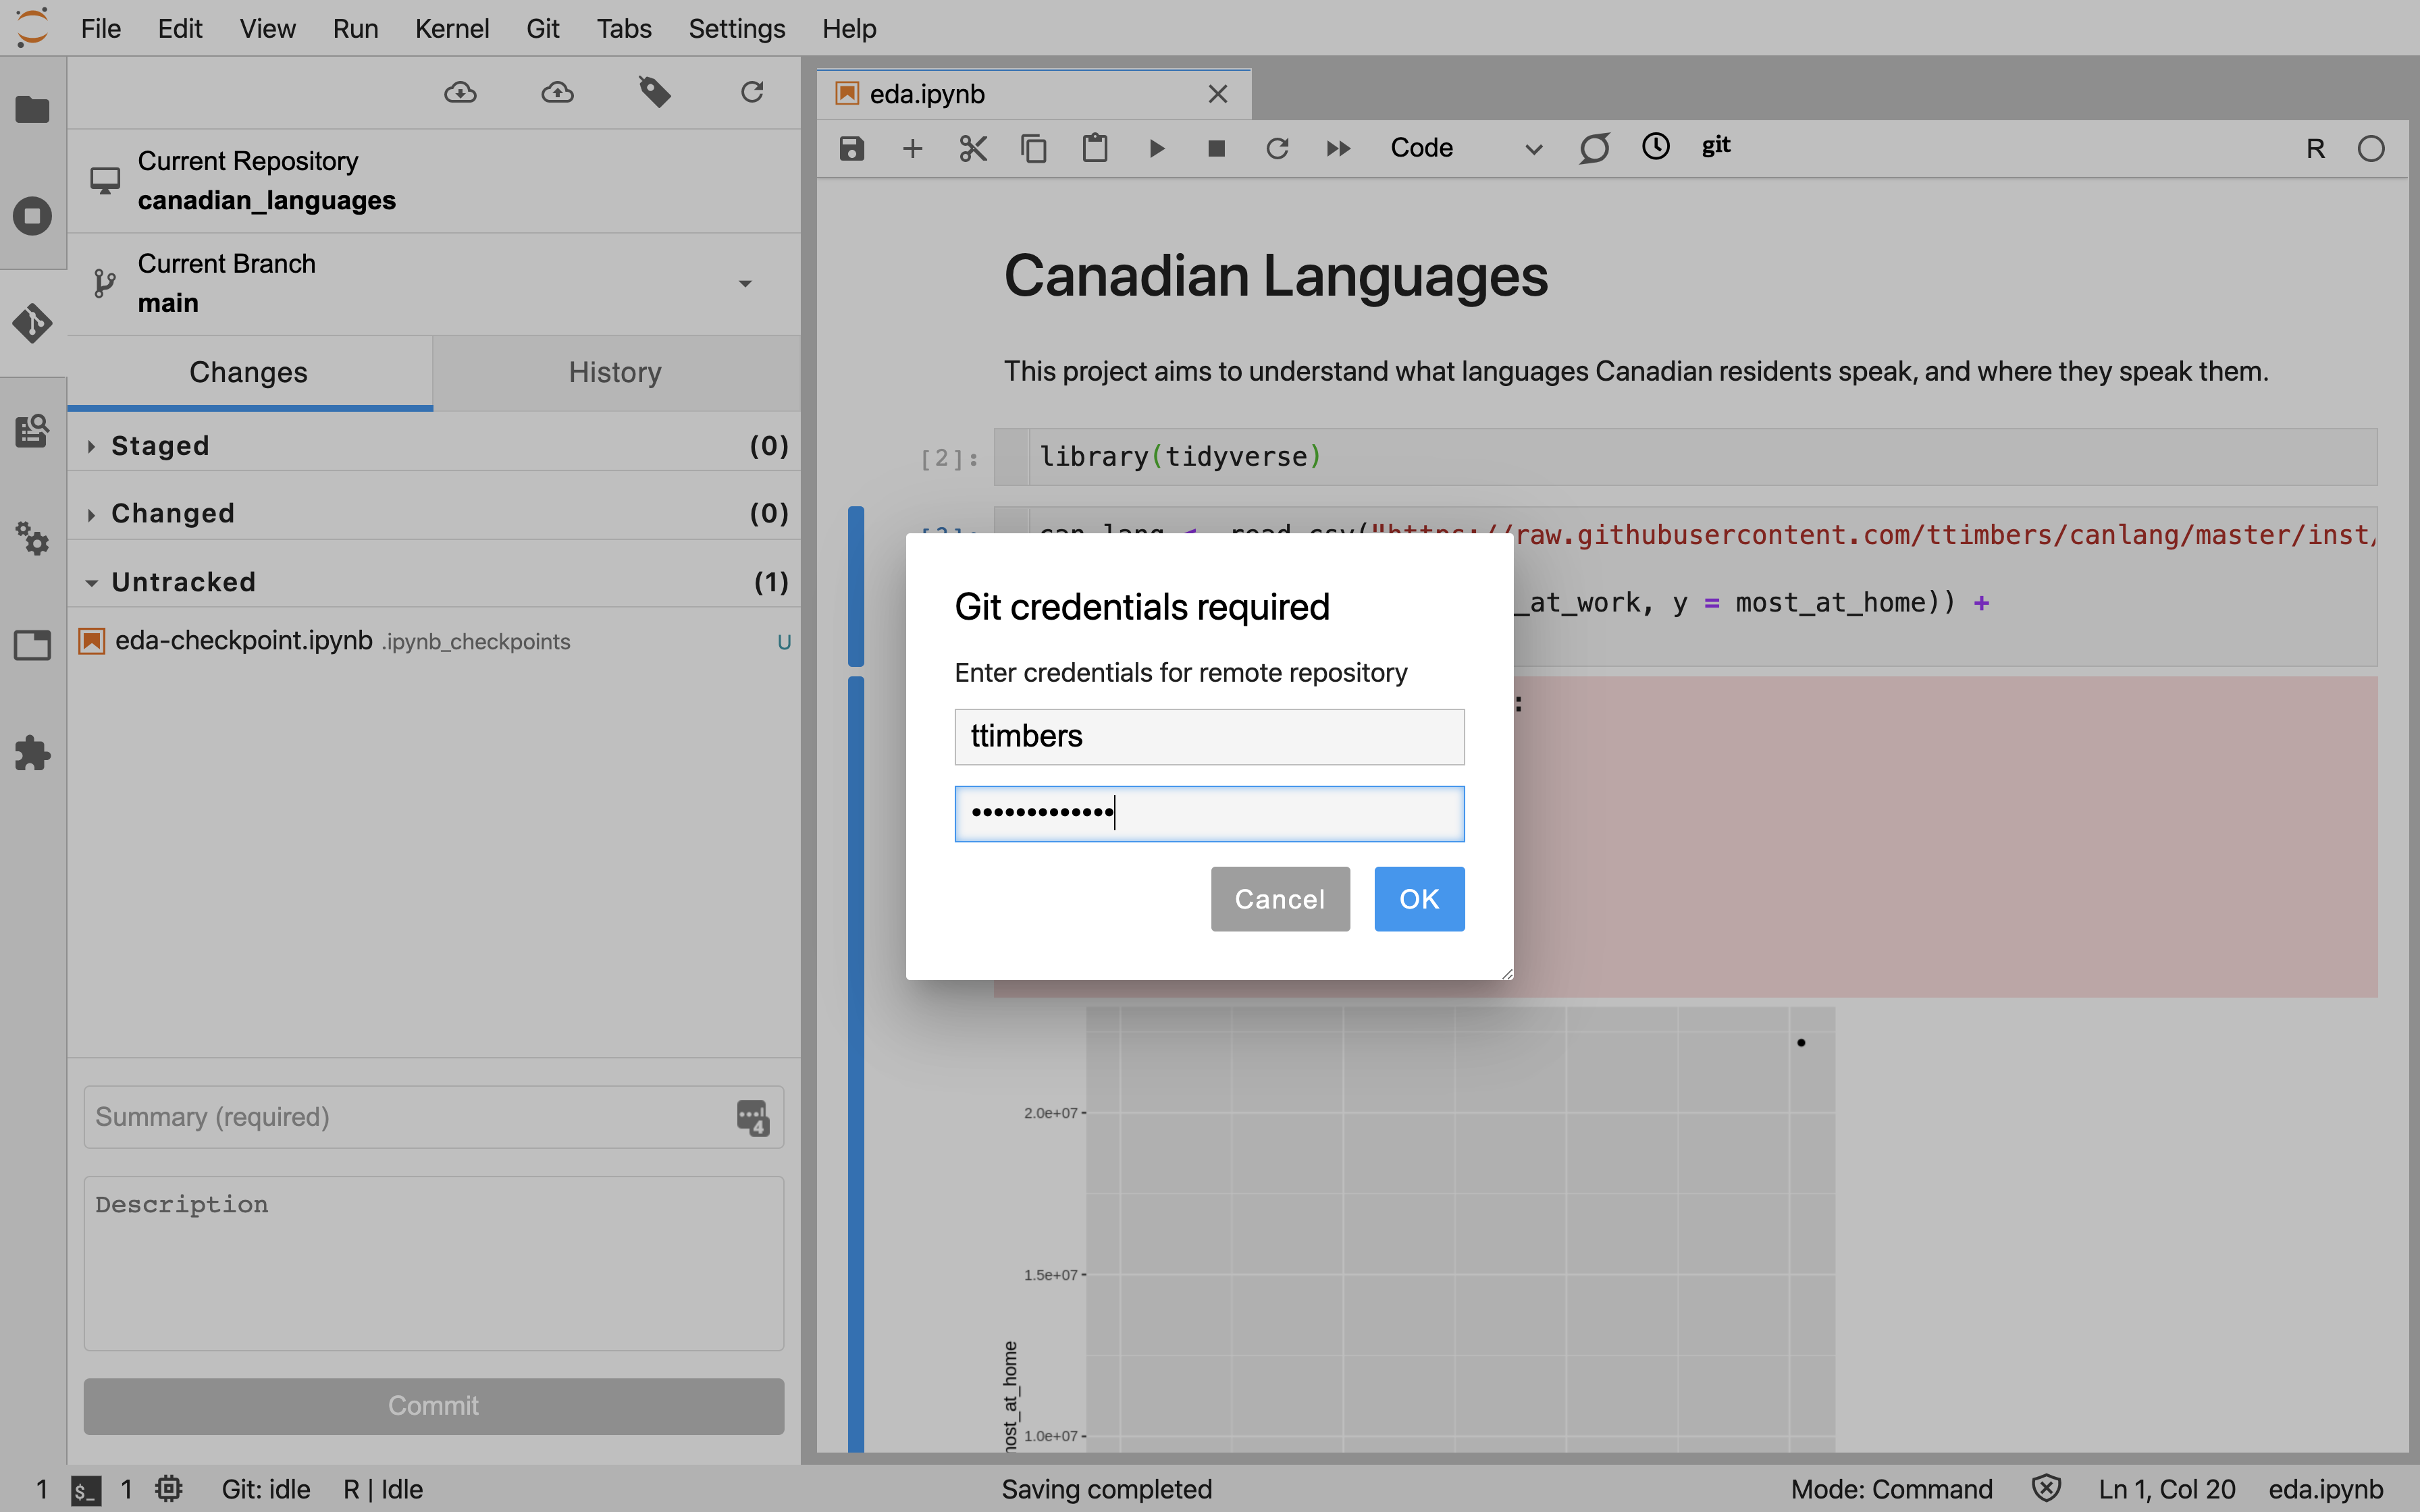
You will then be prompted to enter your GitHub username and the personal access token that you generated earlier (not your account password!). Click the blue "OK" button to initiate the push (Figure 12.7.14).
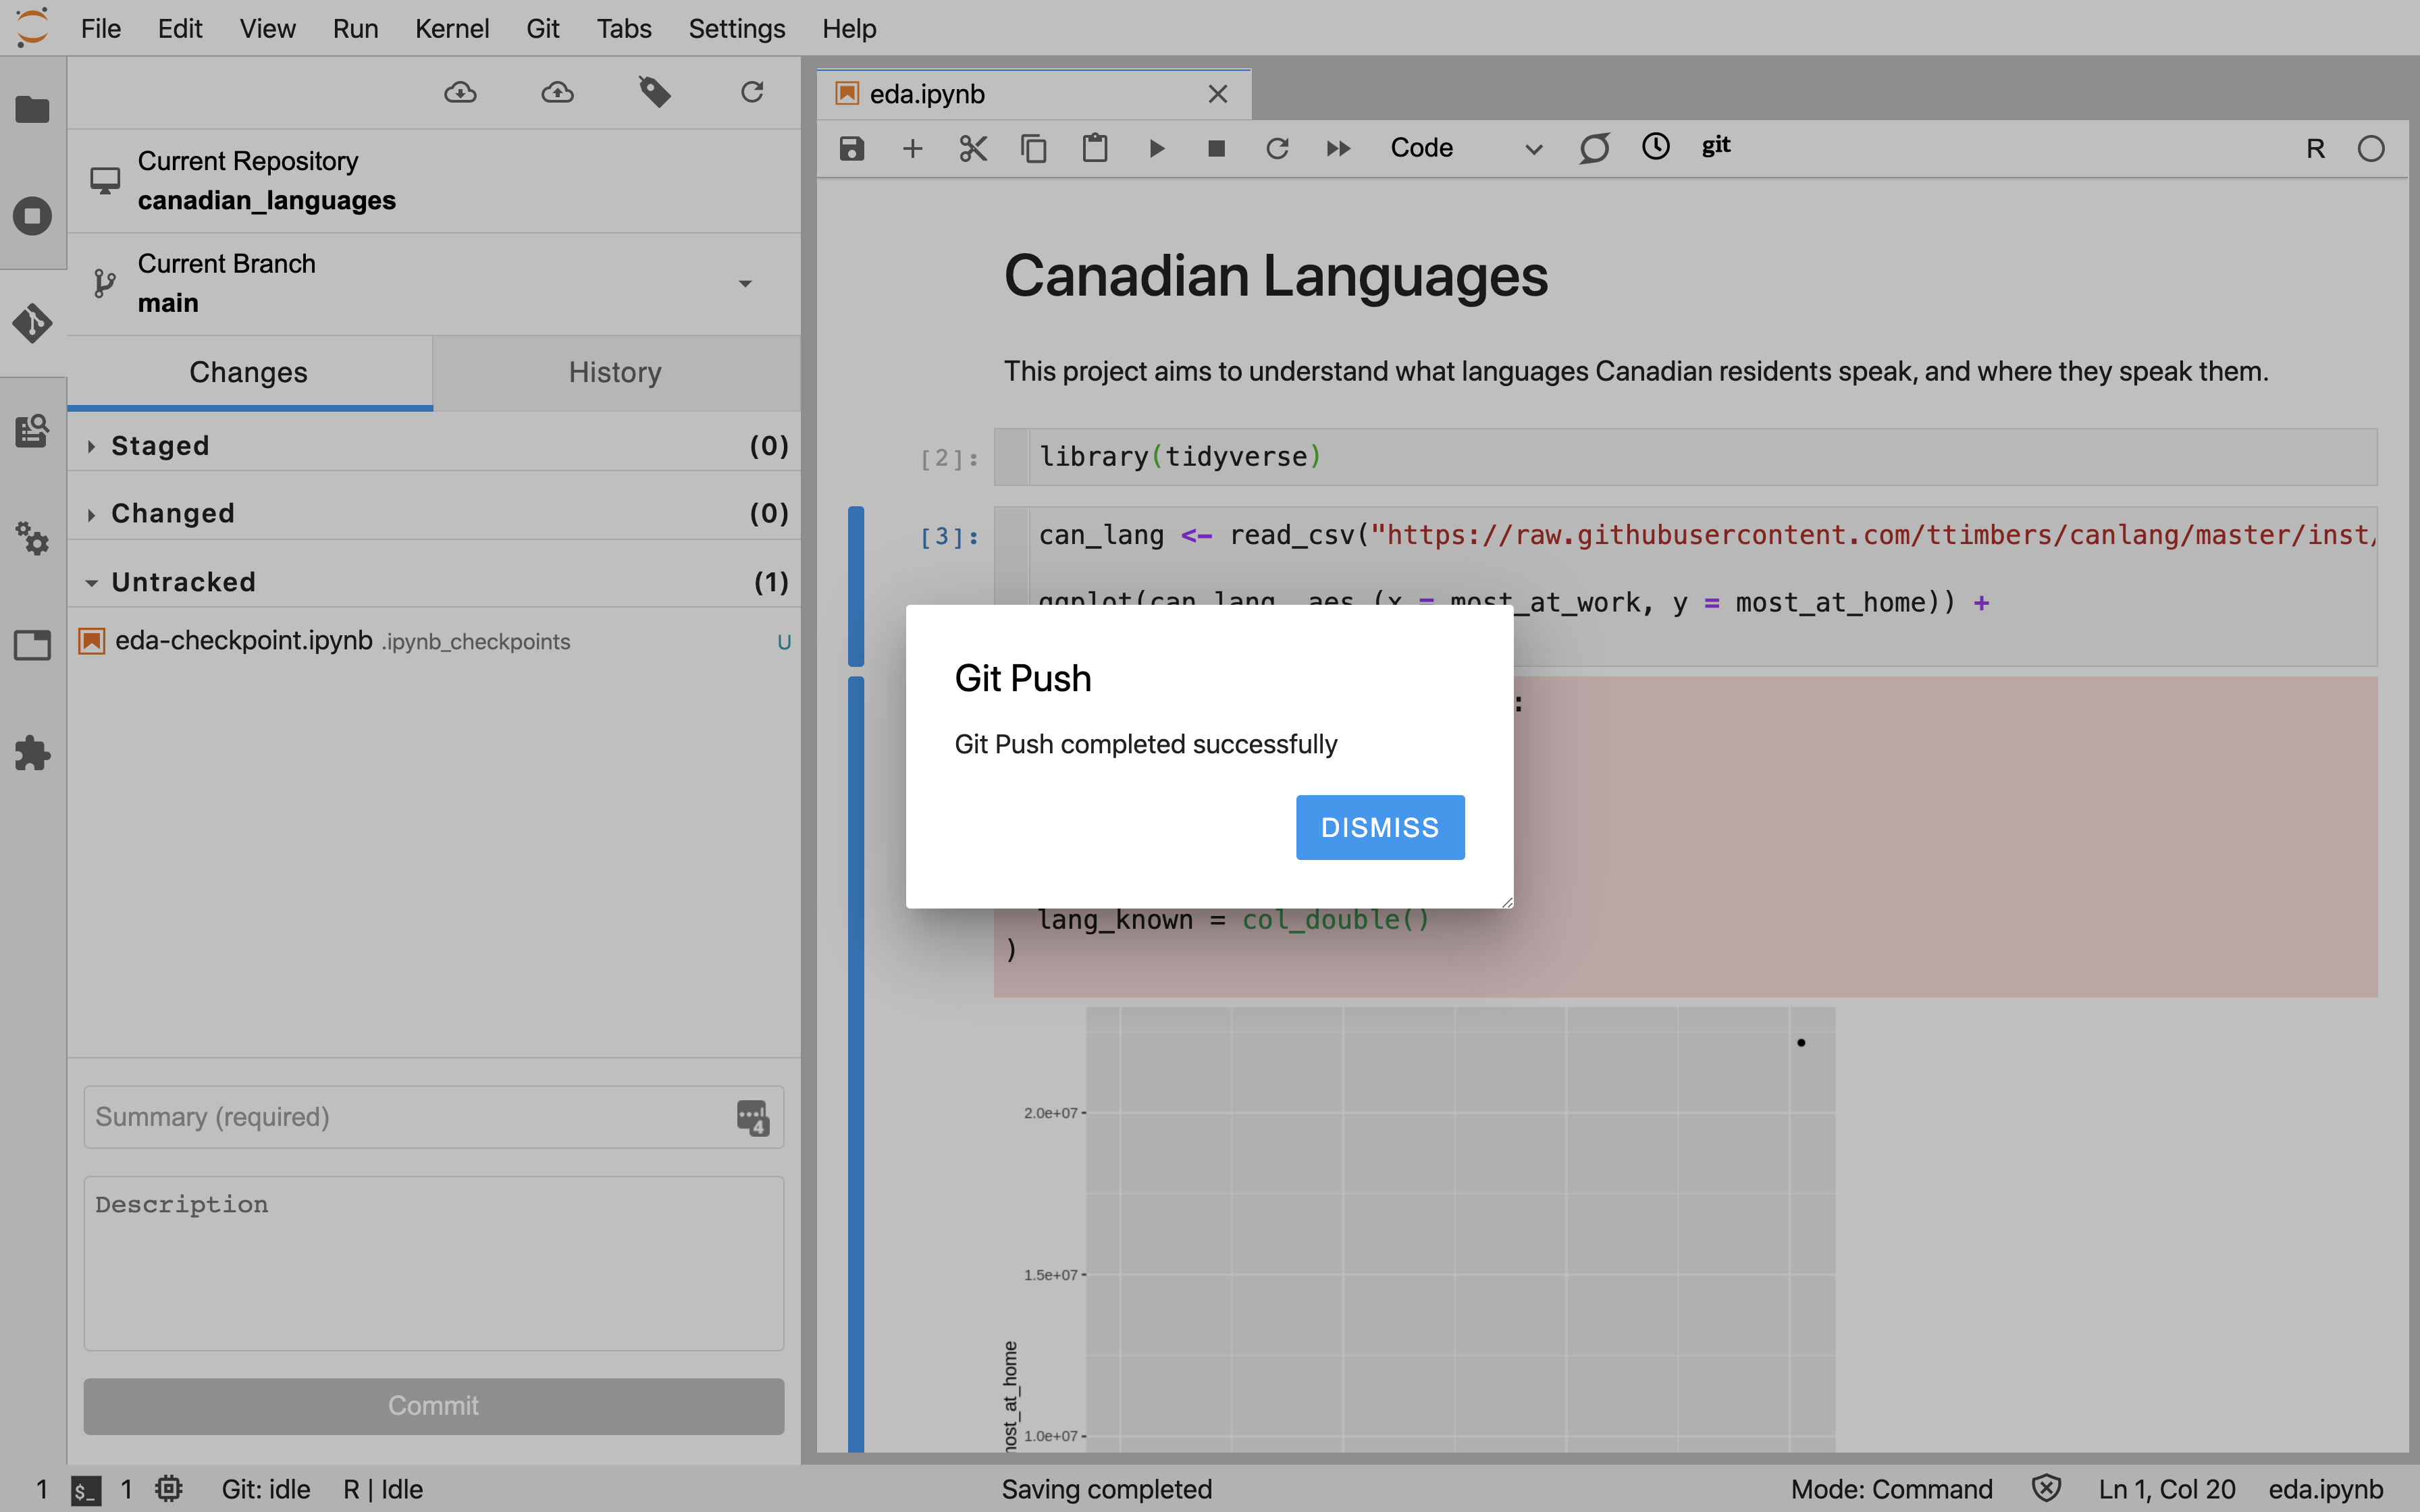
If the files were successfully pushed to the project repository on GitHub, you will be shown a success message (Figure 12.7.15). Click "Dismiss" to continue working in Jupyter.
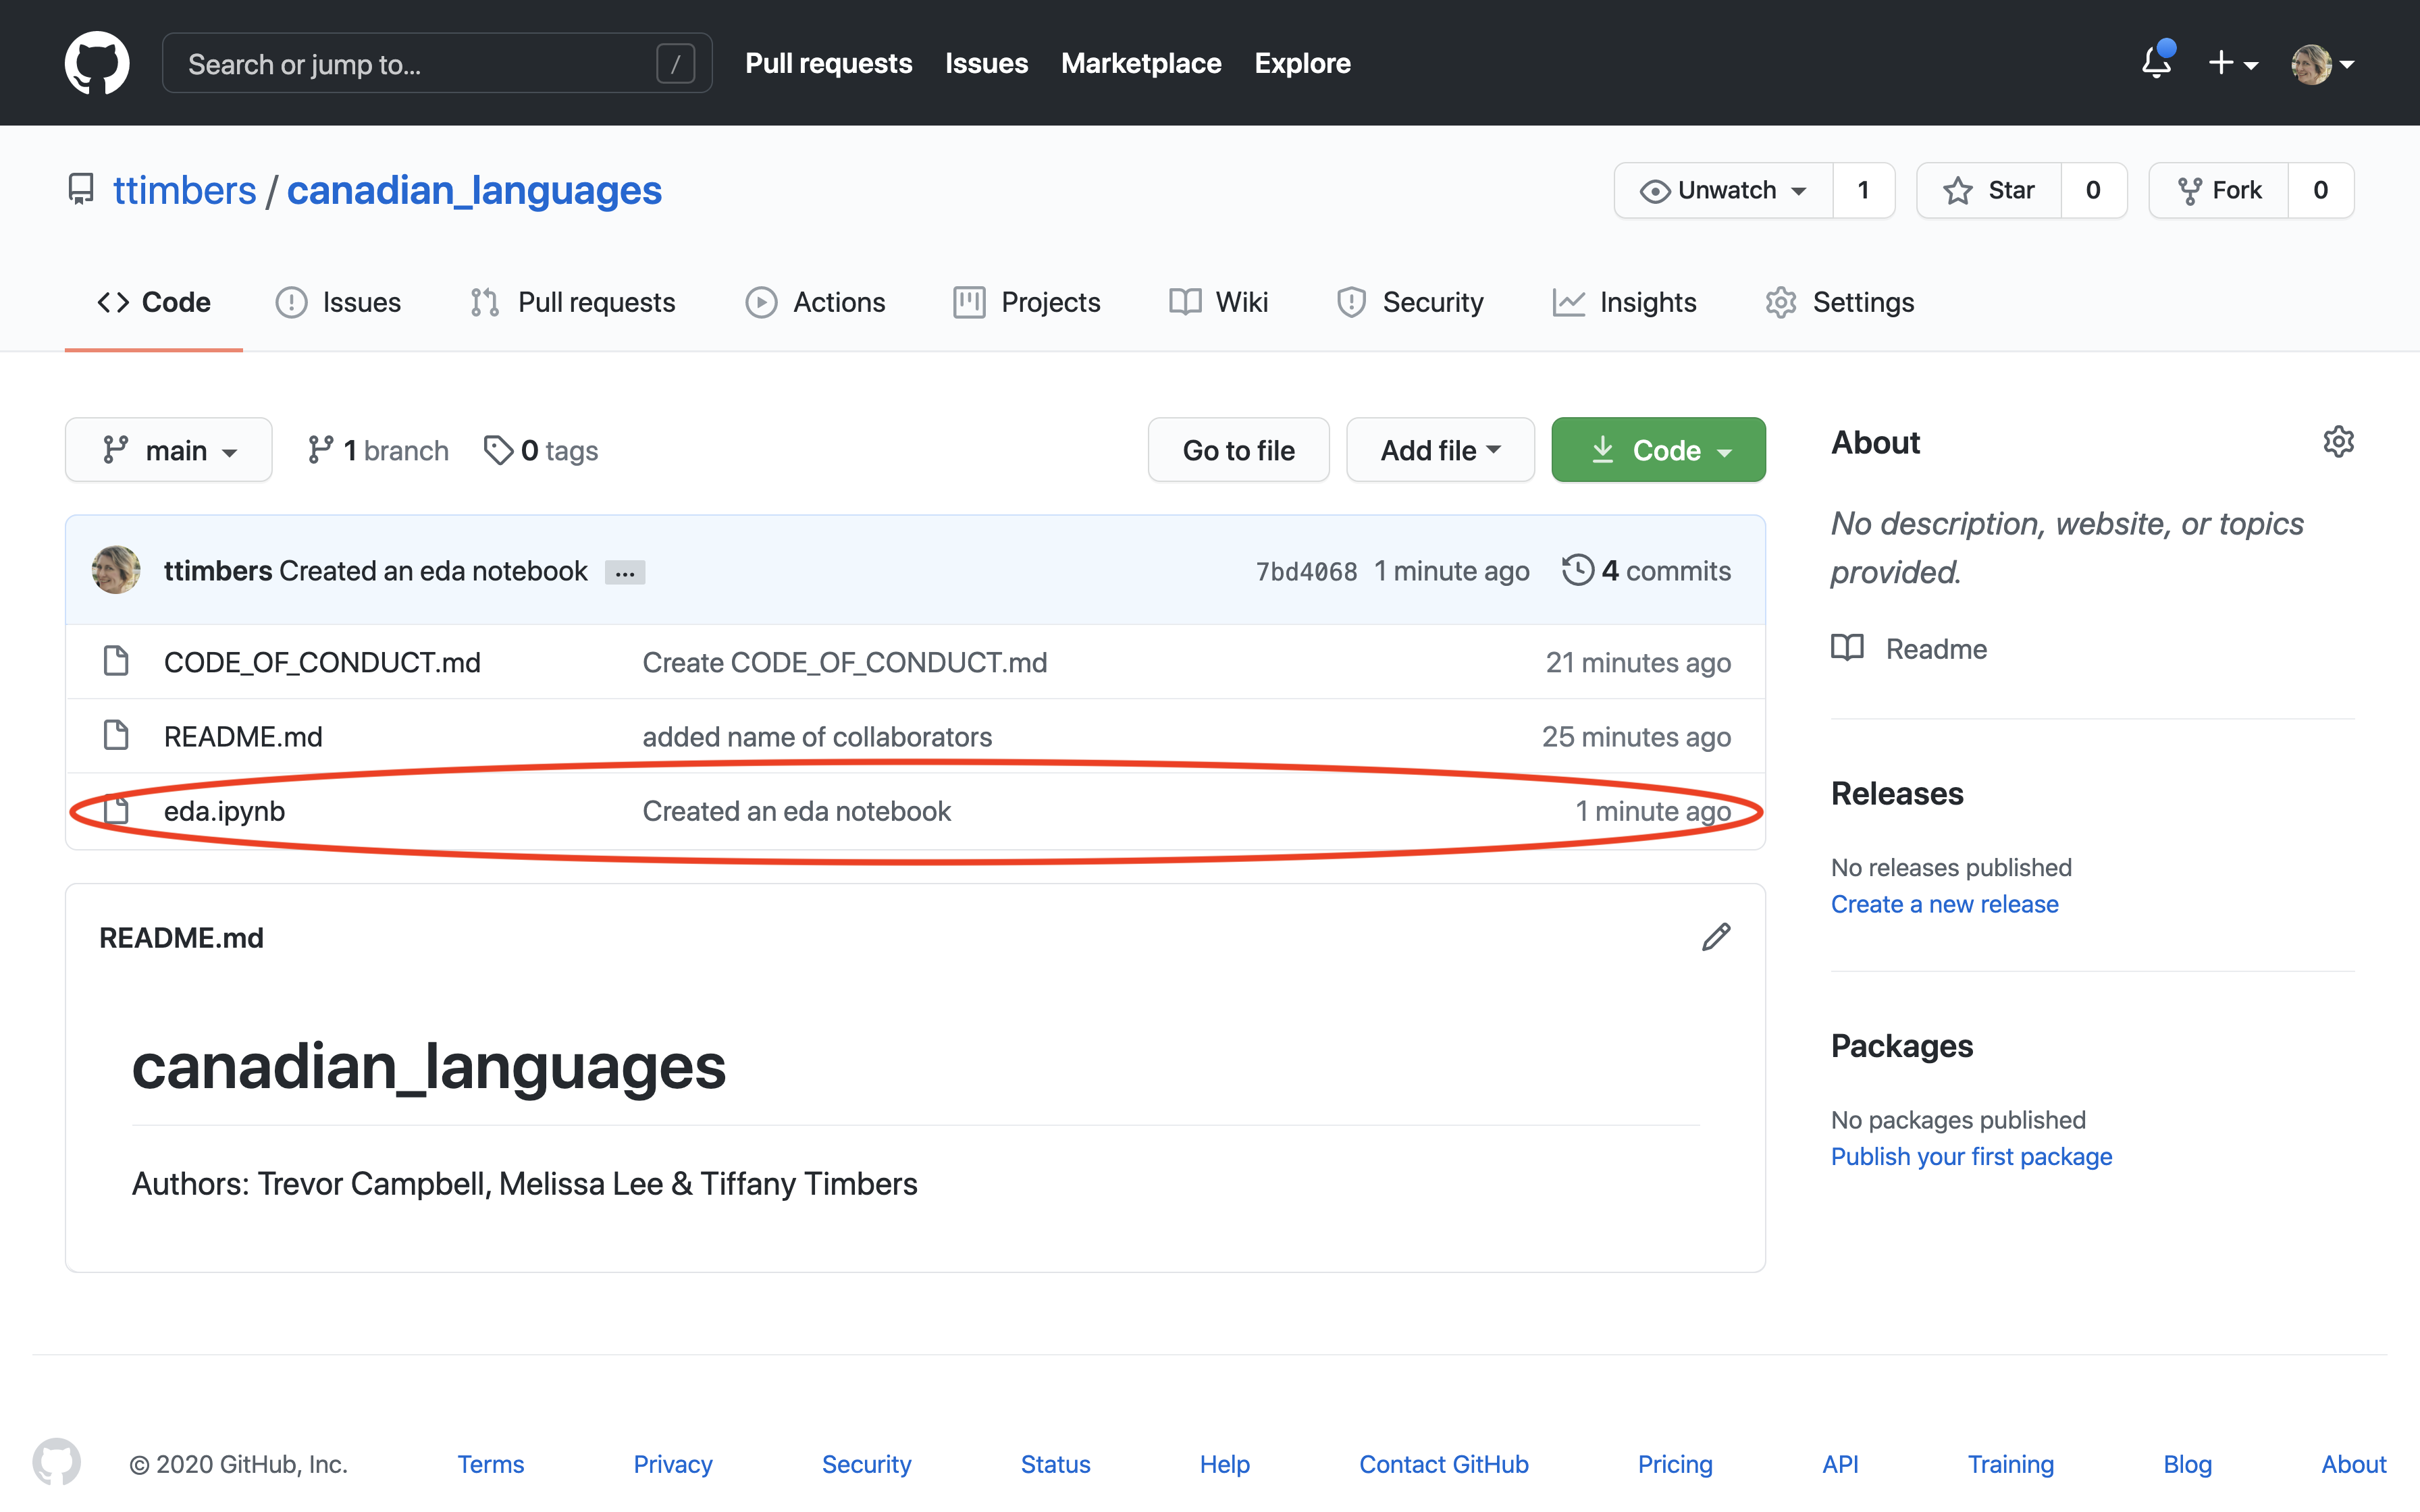
If you visit the remote repository on GitHub, you will see that the changes now exist there too (Figure 12.7.16)!
Section 12.8 Collaboration
Subsection 12.8.1 Giving collaborators access to your project
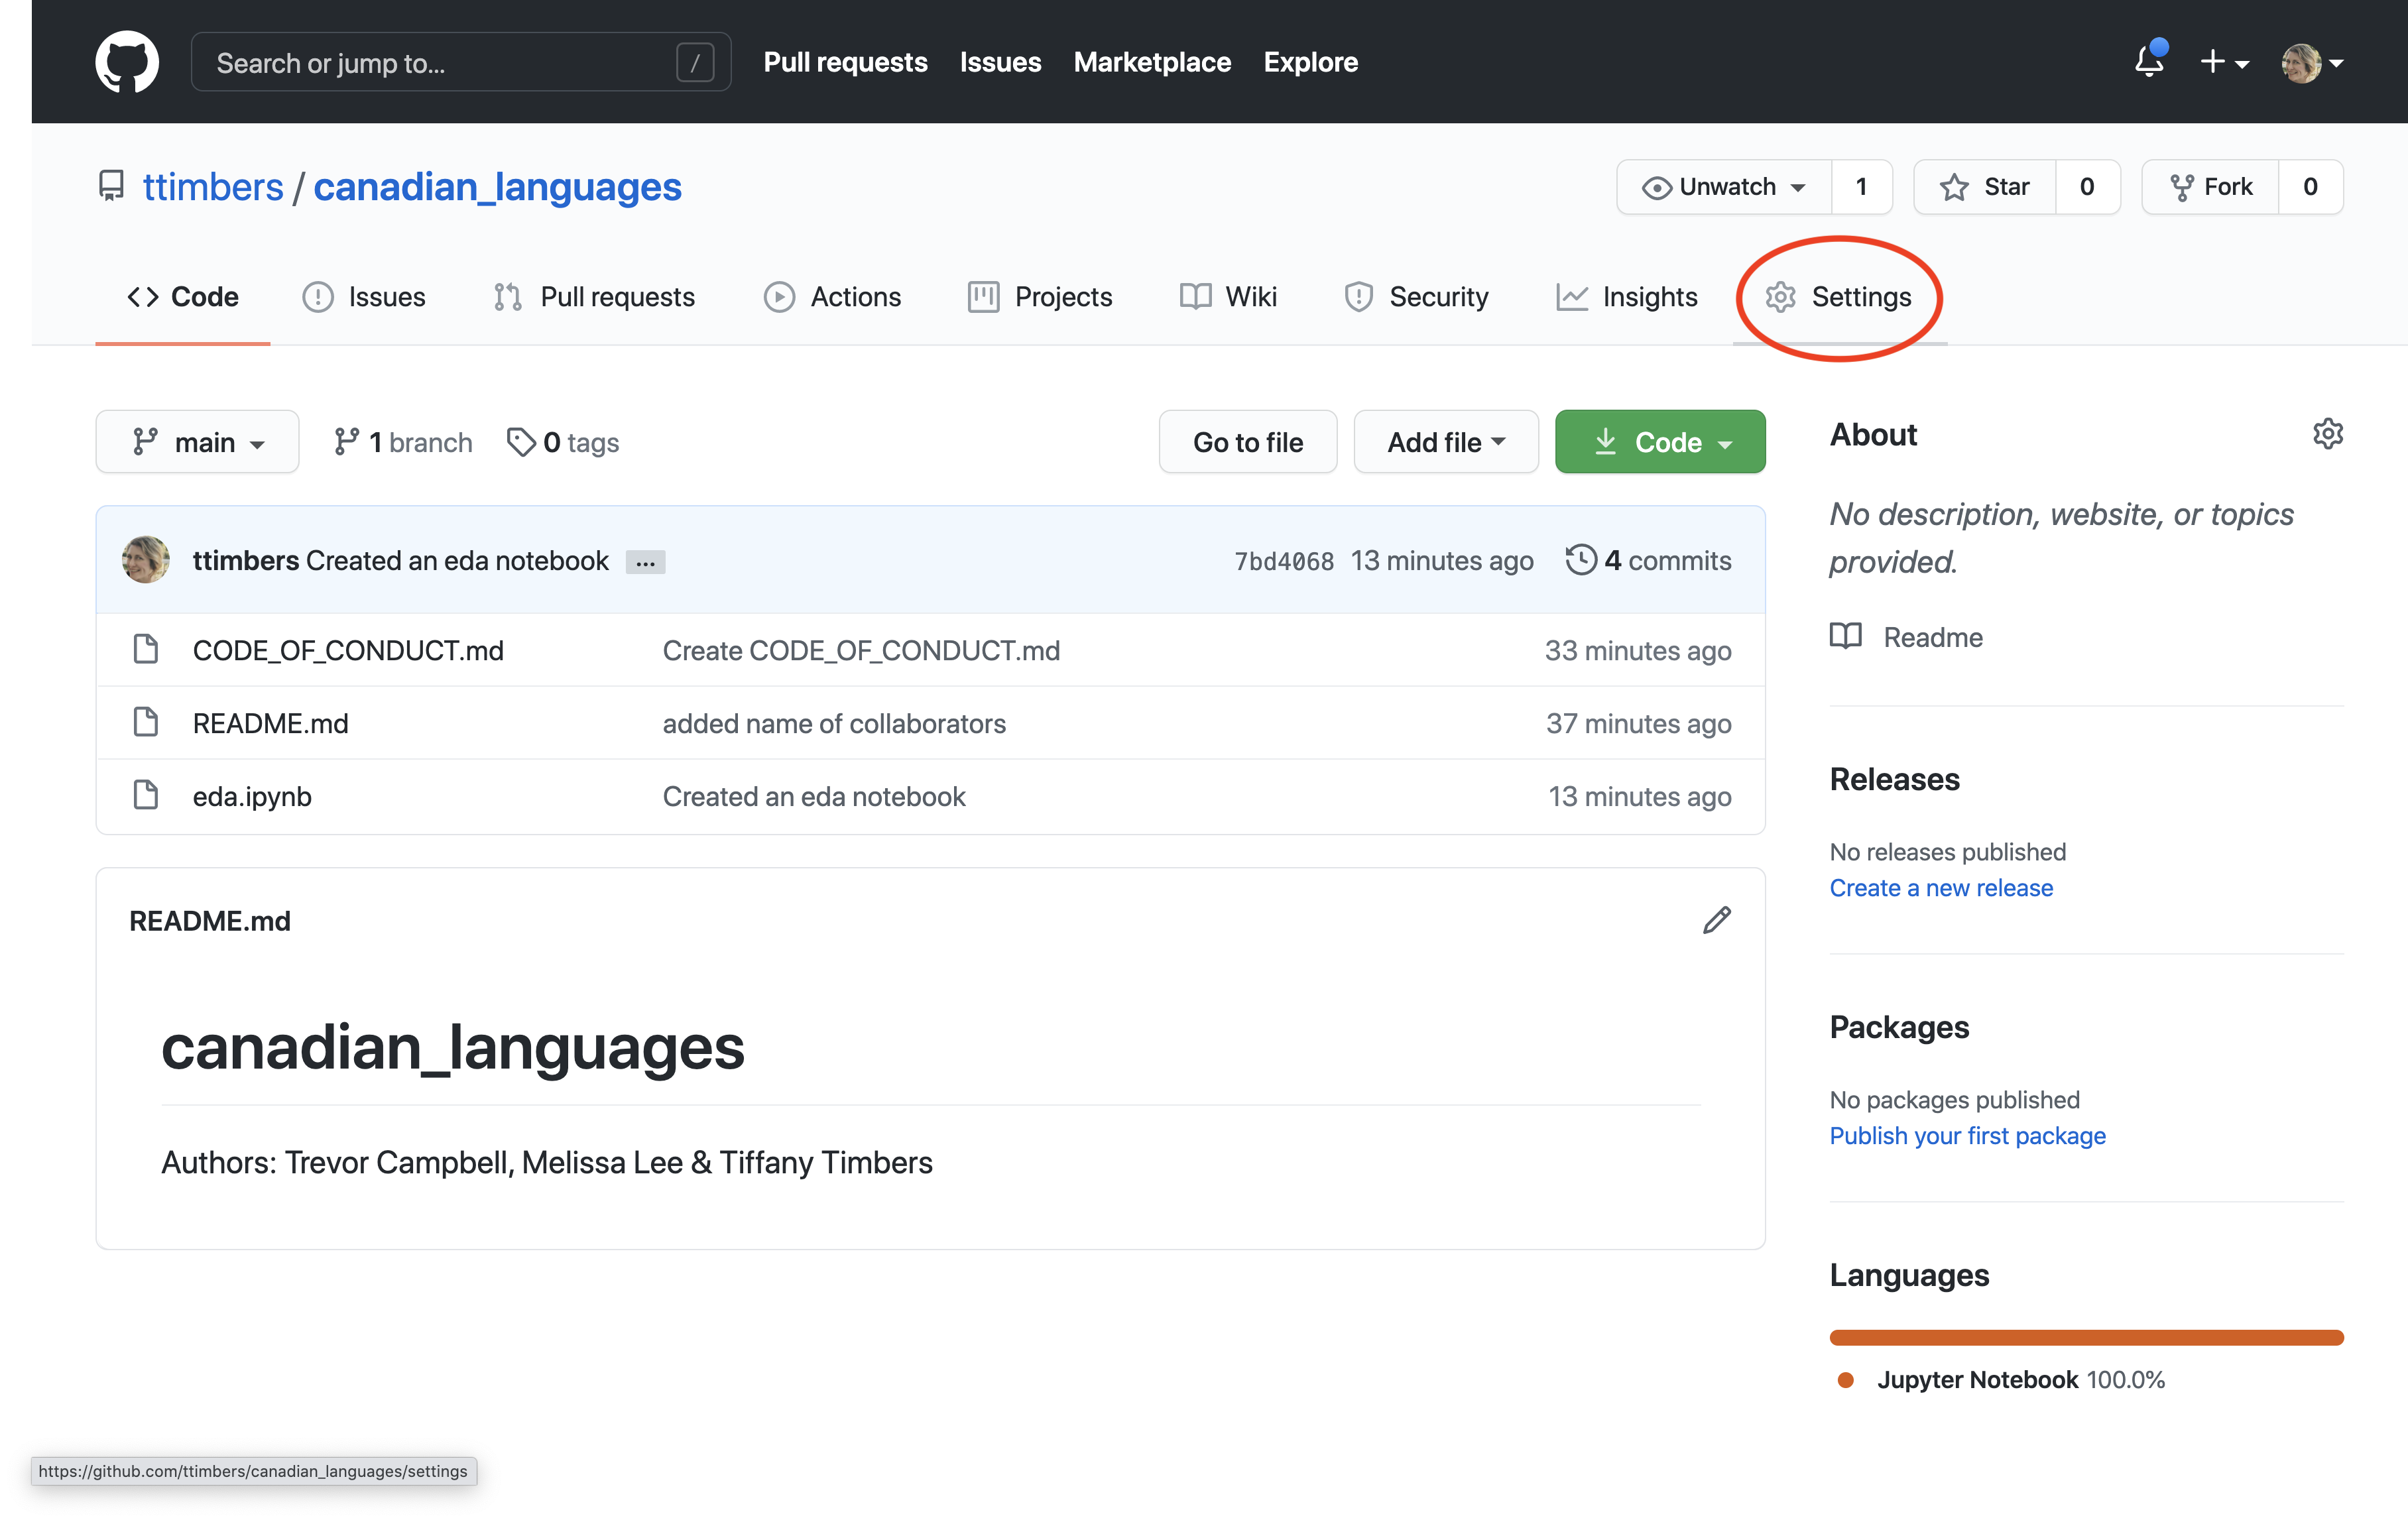
As mentioned earlier, GitHub allows you to control who has access to your project. The default of both public and private projects are that only the person who created the GitHub repository has permissions to create, edit and delete files (write access). To give your collaborators write access to the projects, navigate to the "Settings" tab (Figure 12.8.1).
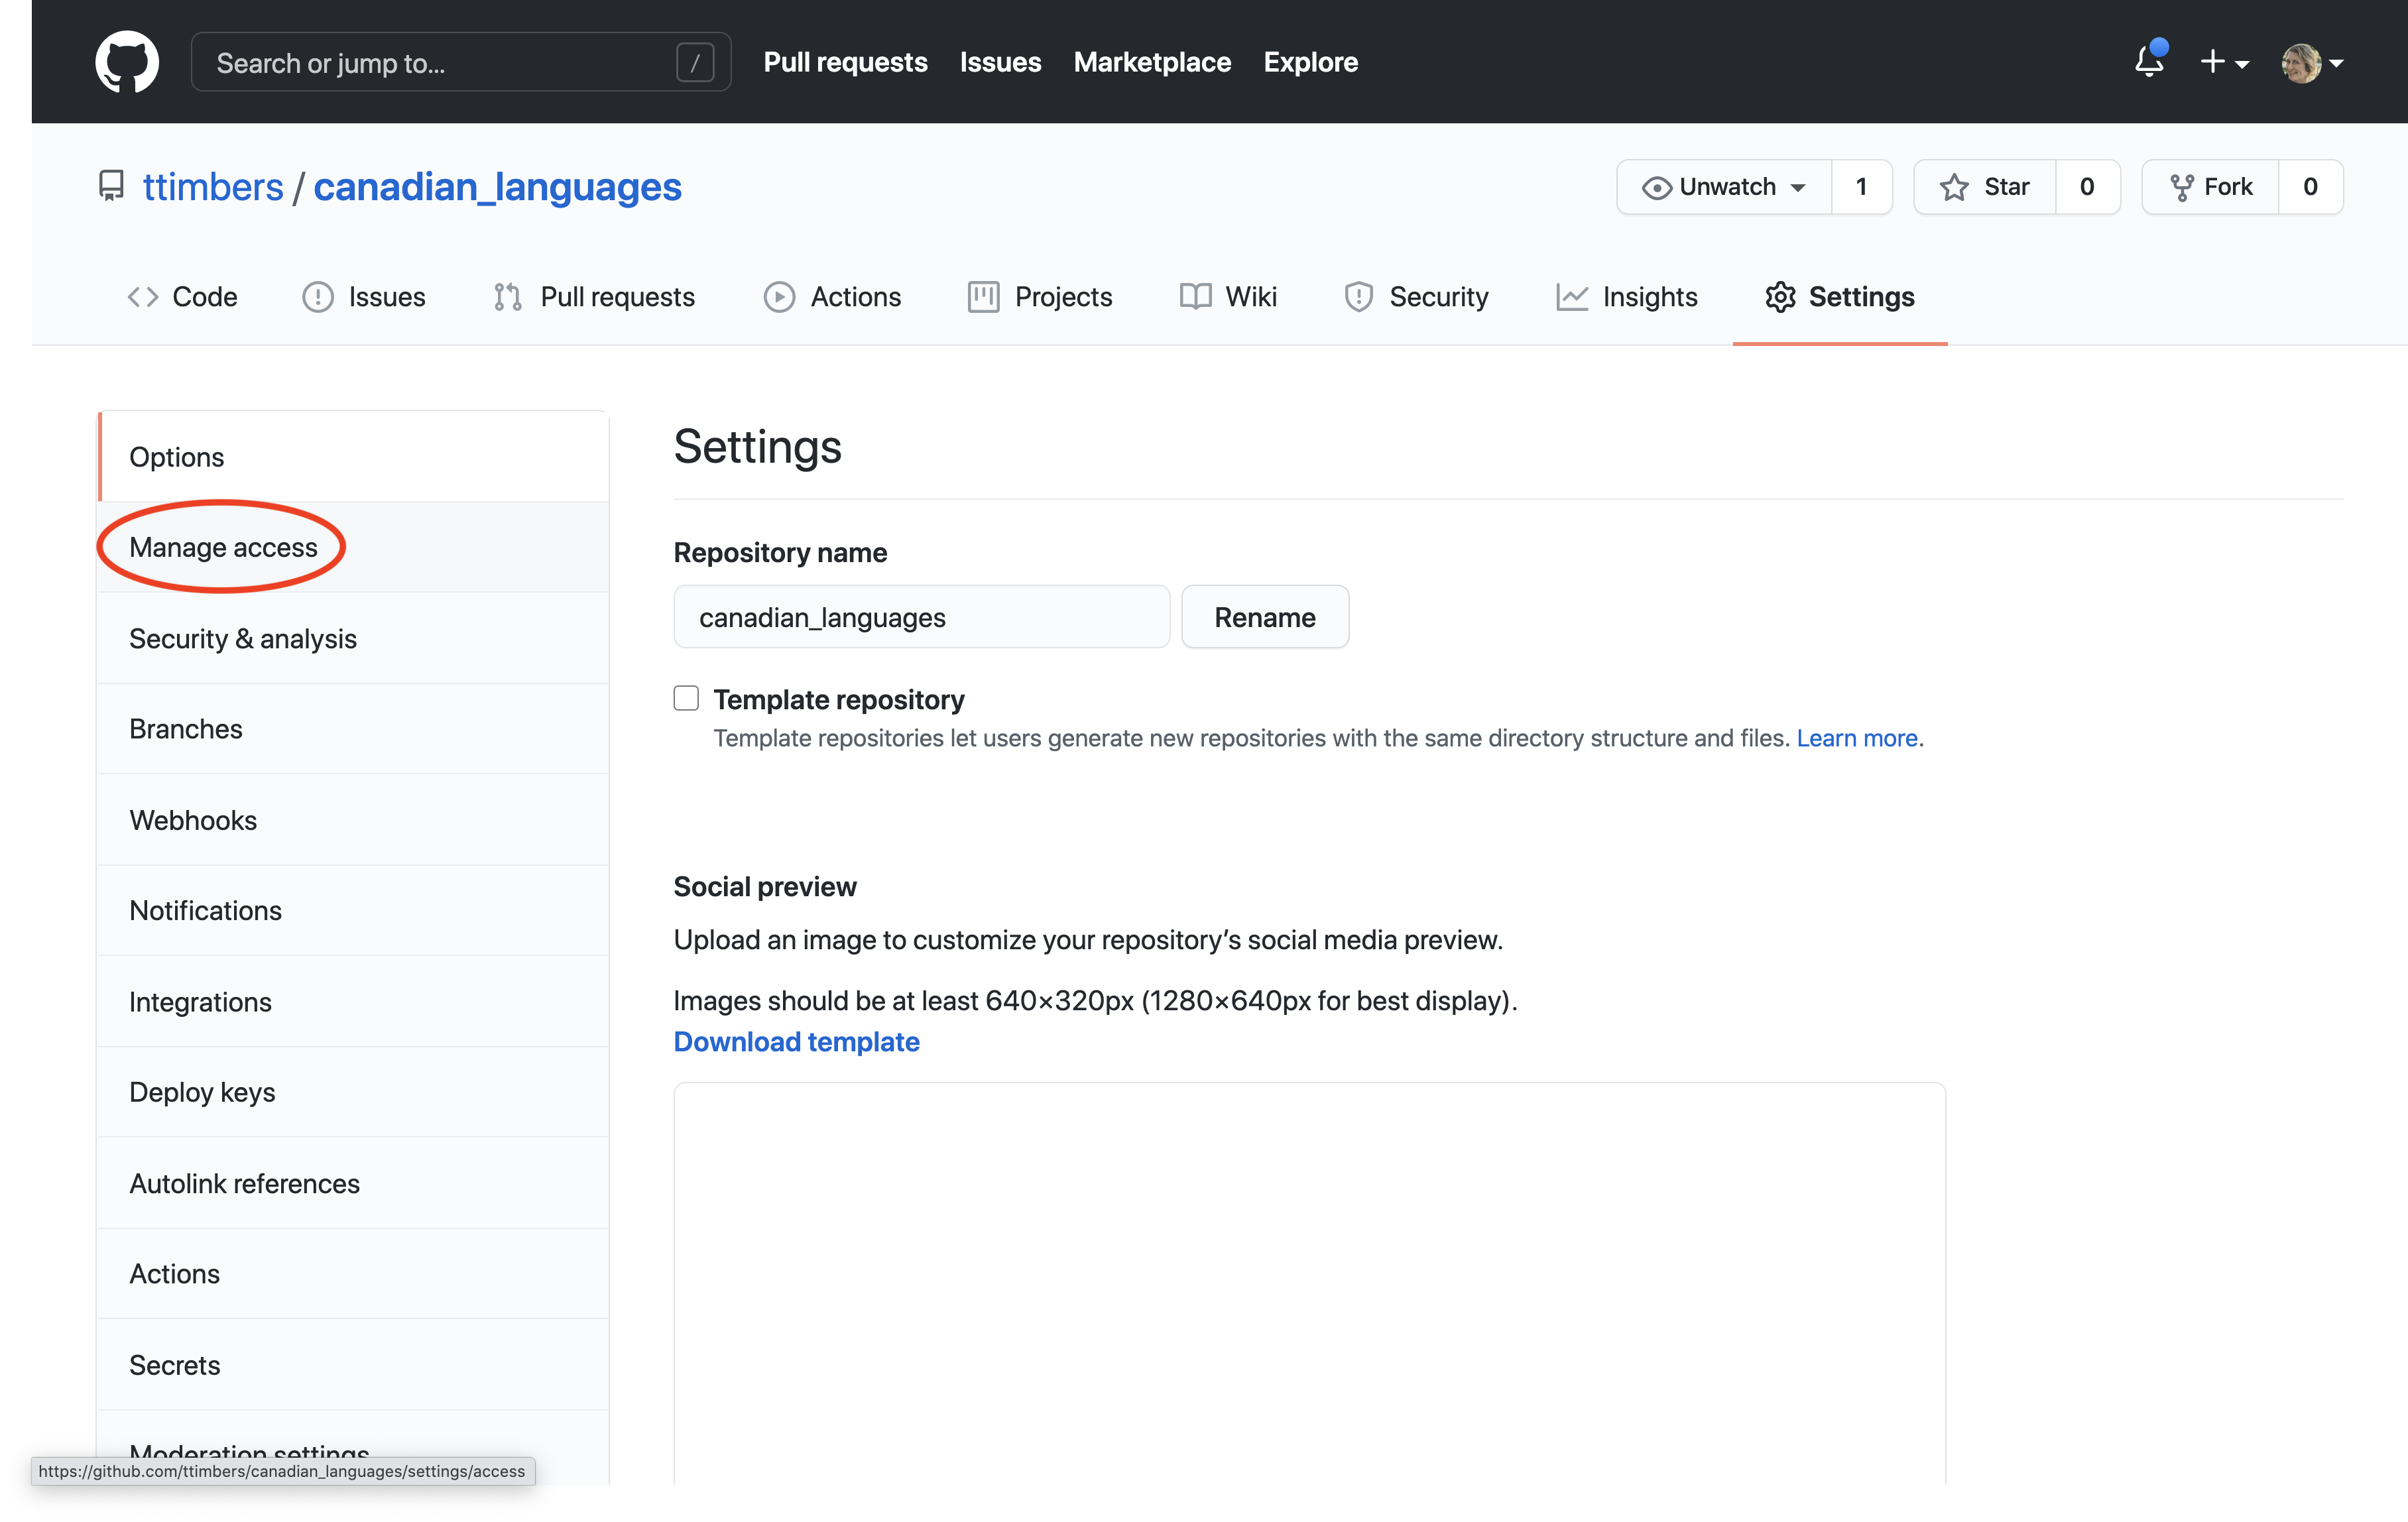
Then click "Manage access" (Figure 12.8.2).
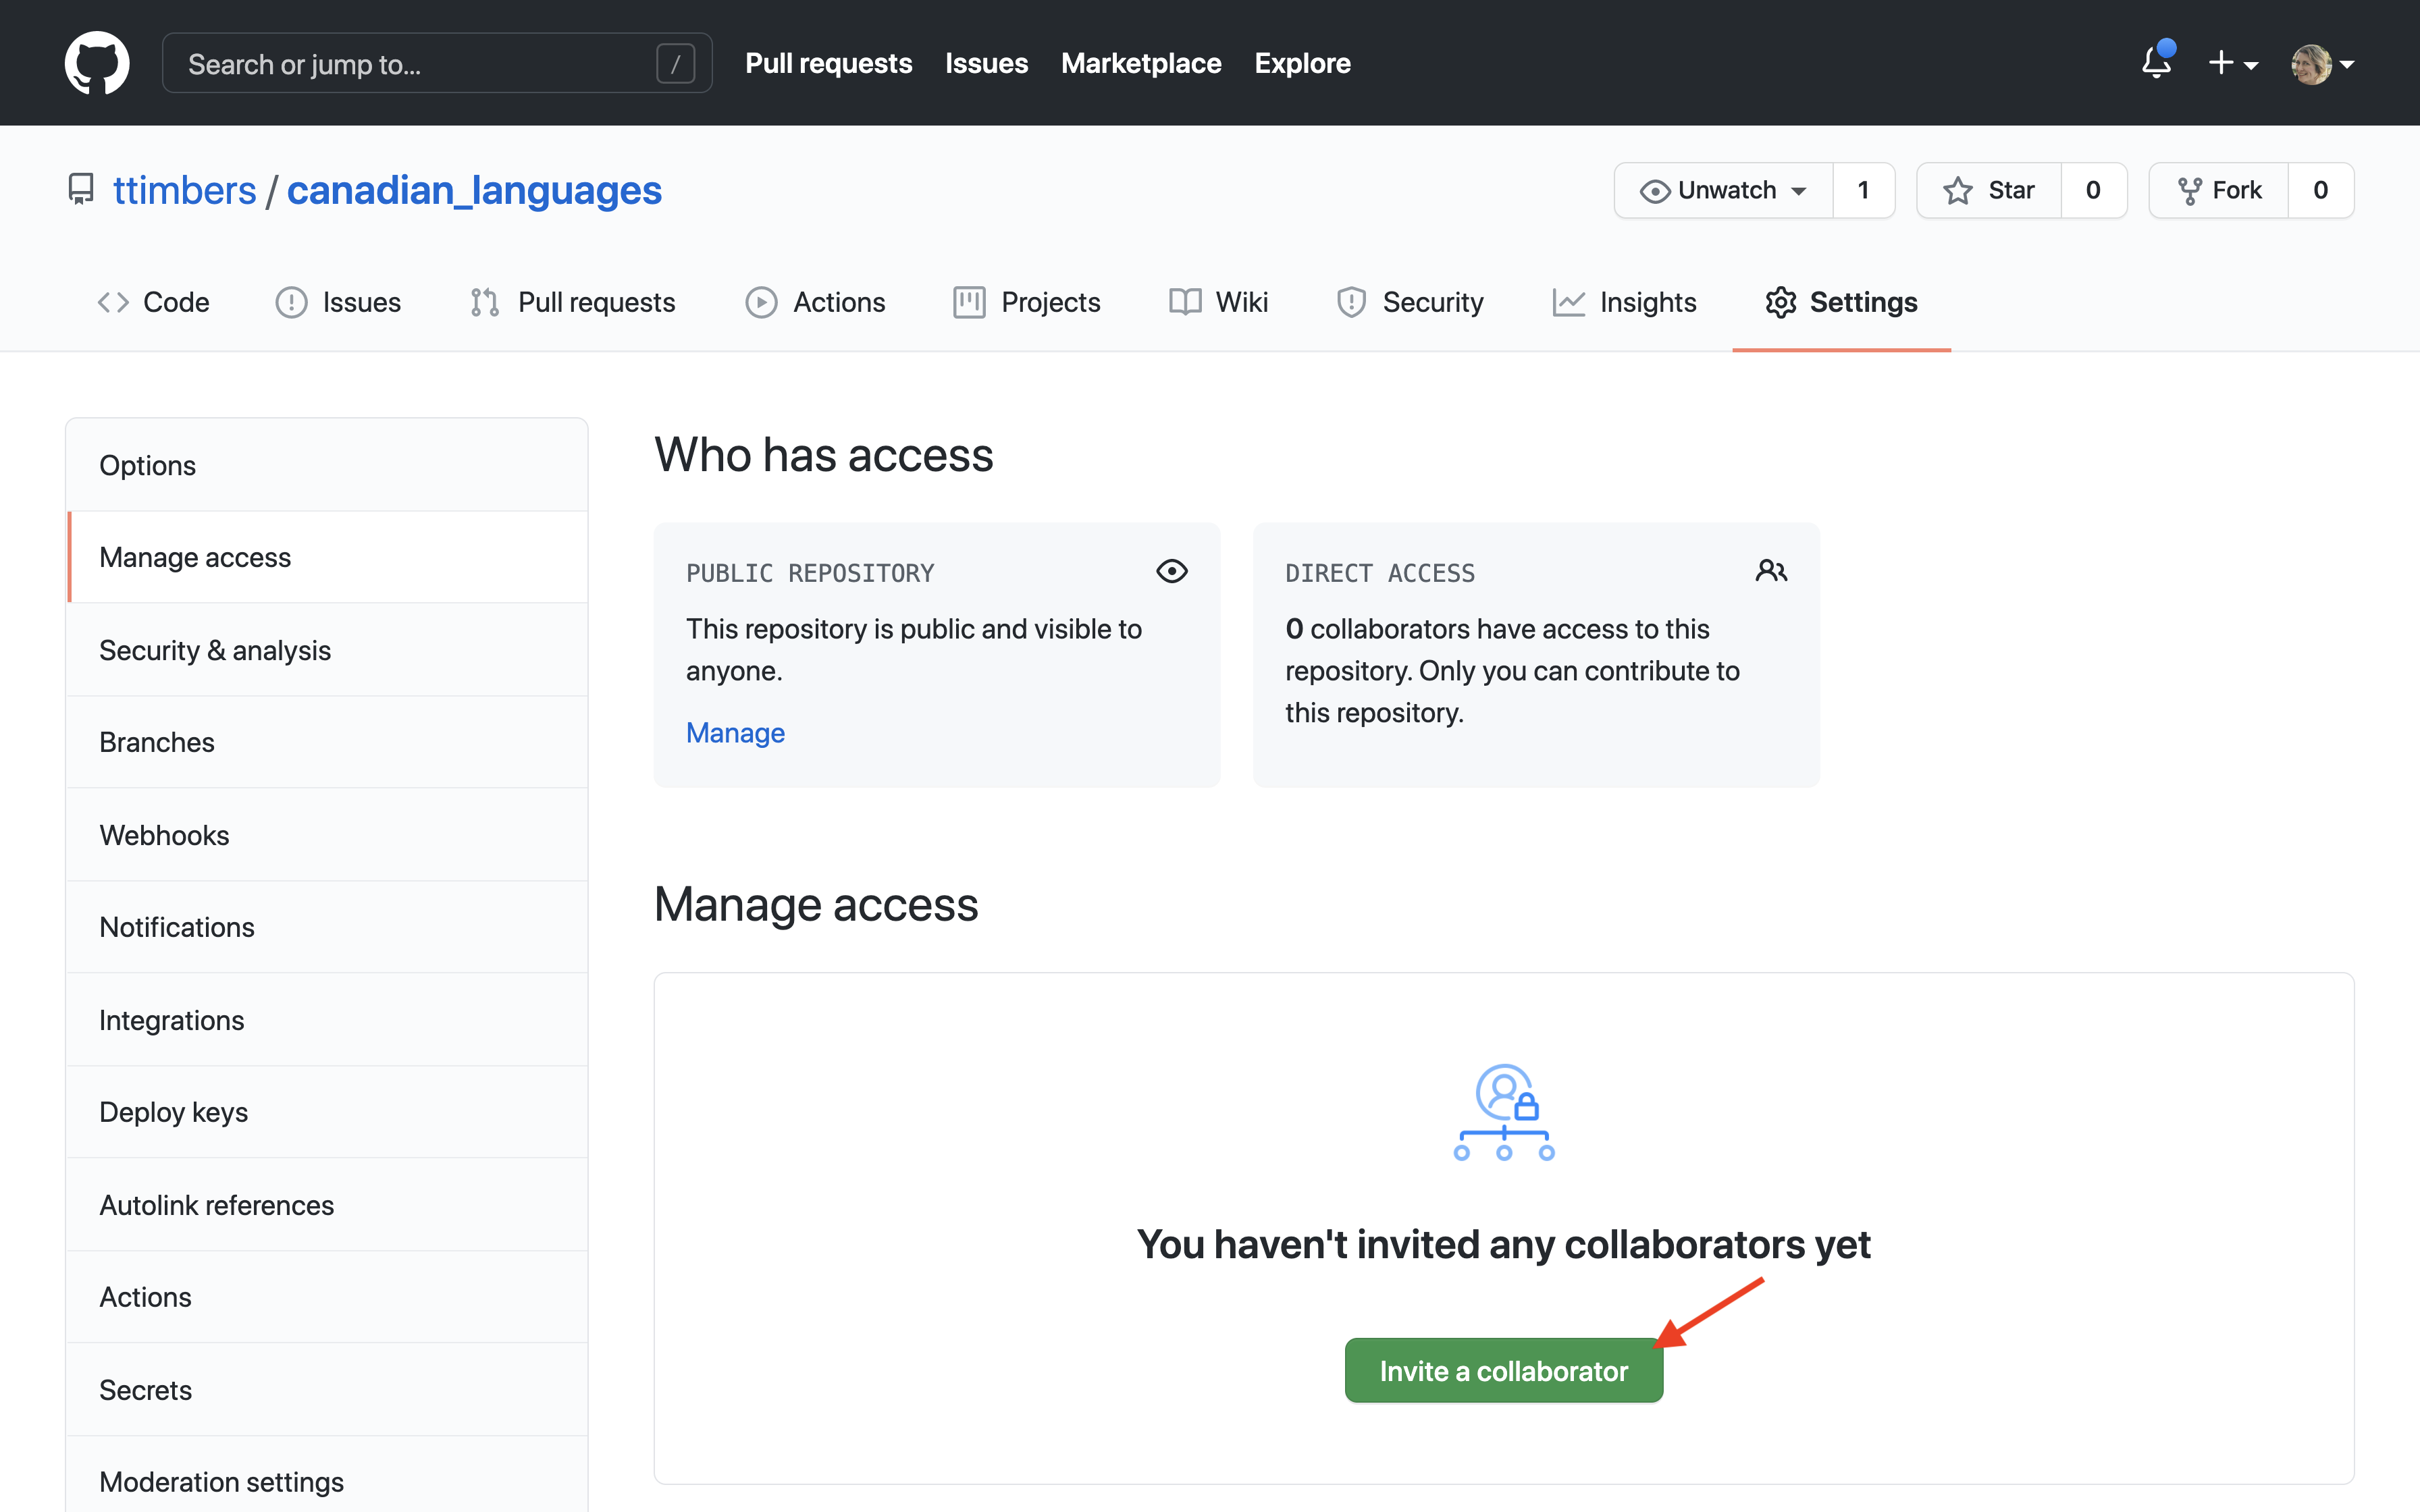
Then click the green "Invite a collaborator" button (Figure 12.8.3).
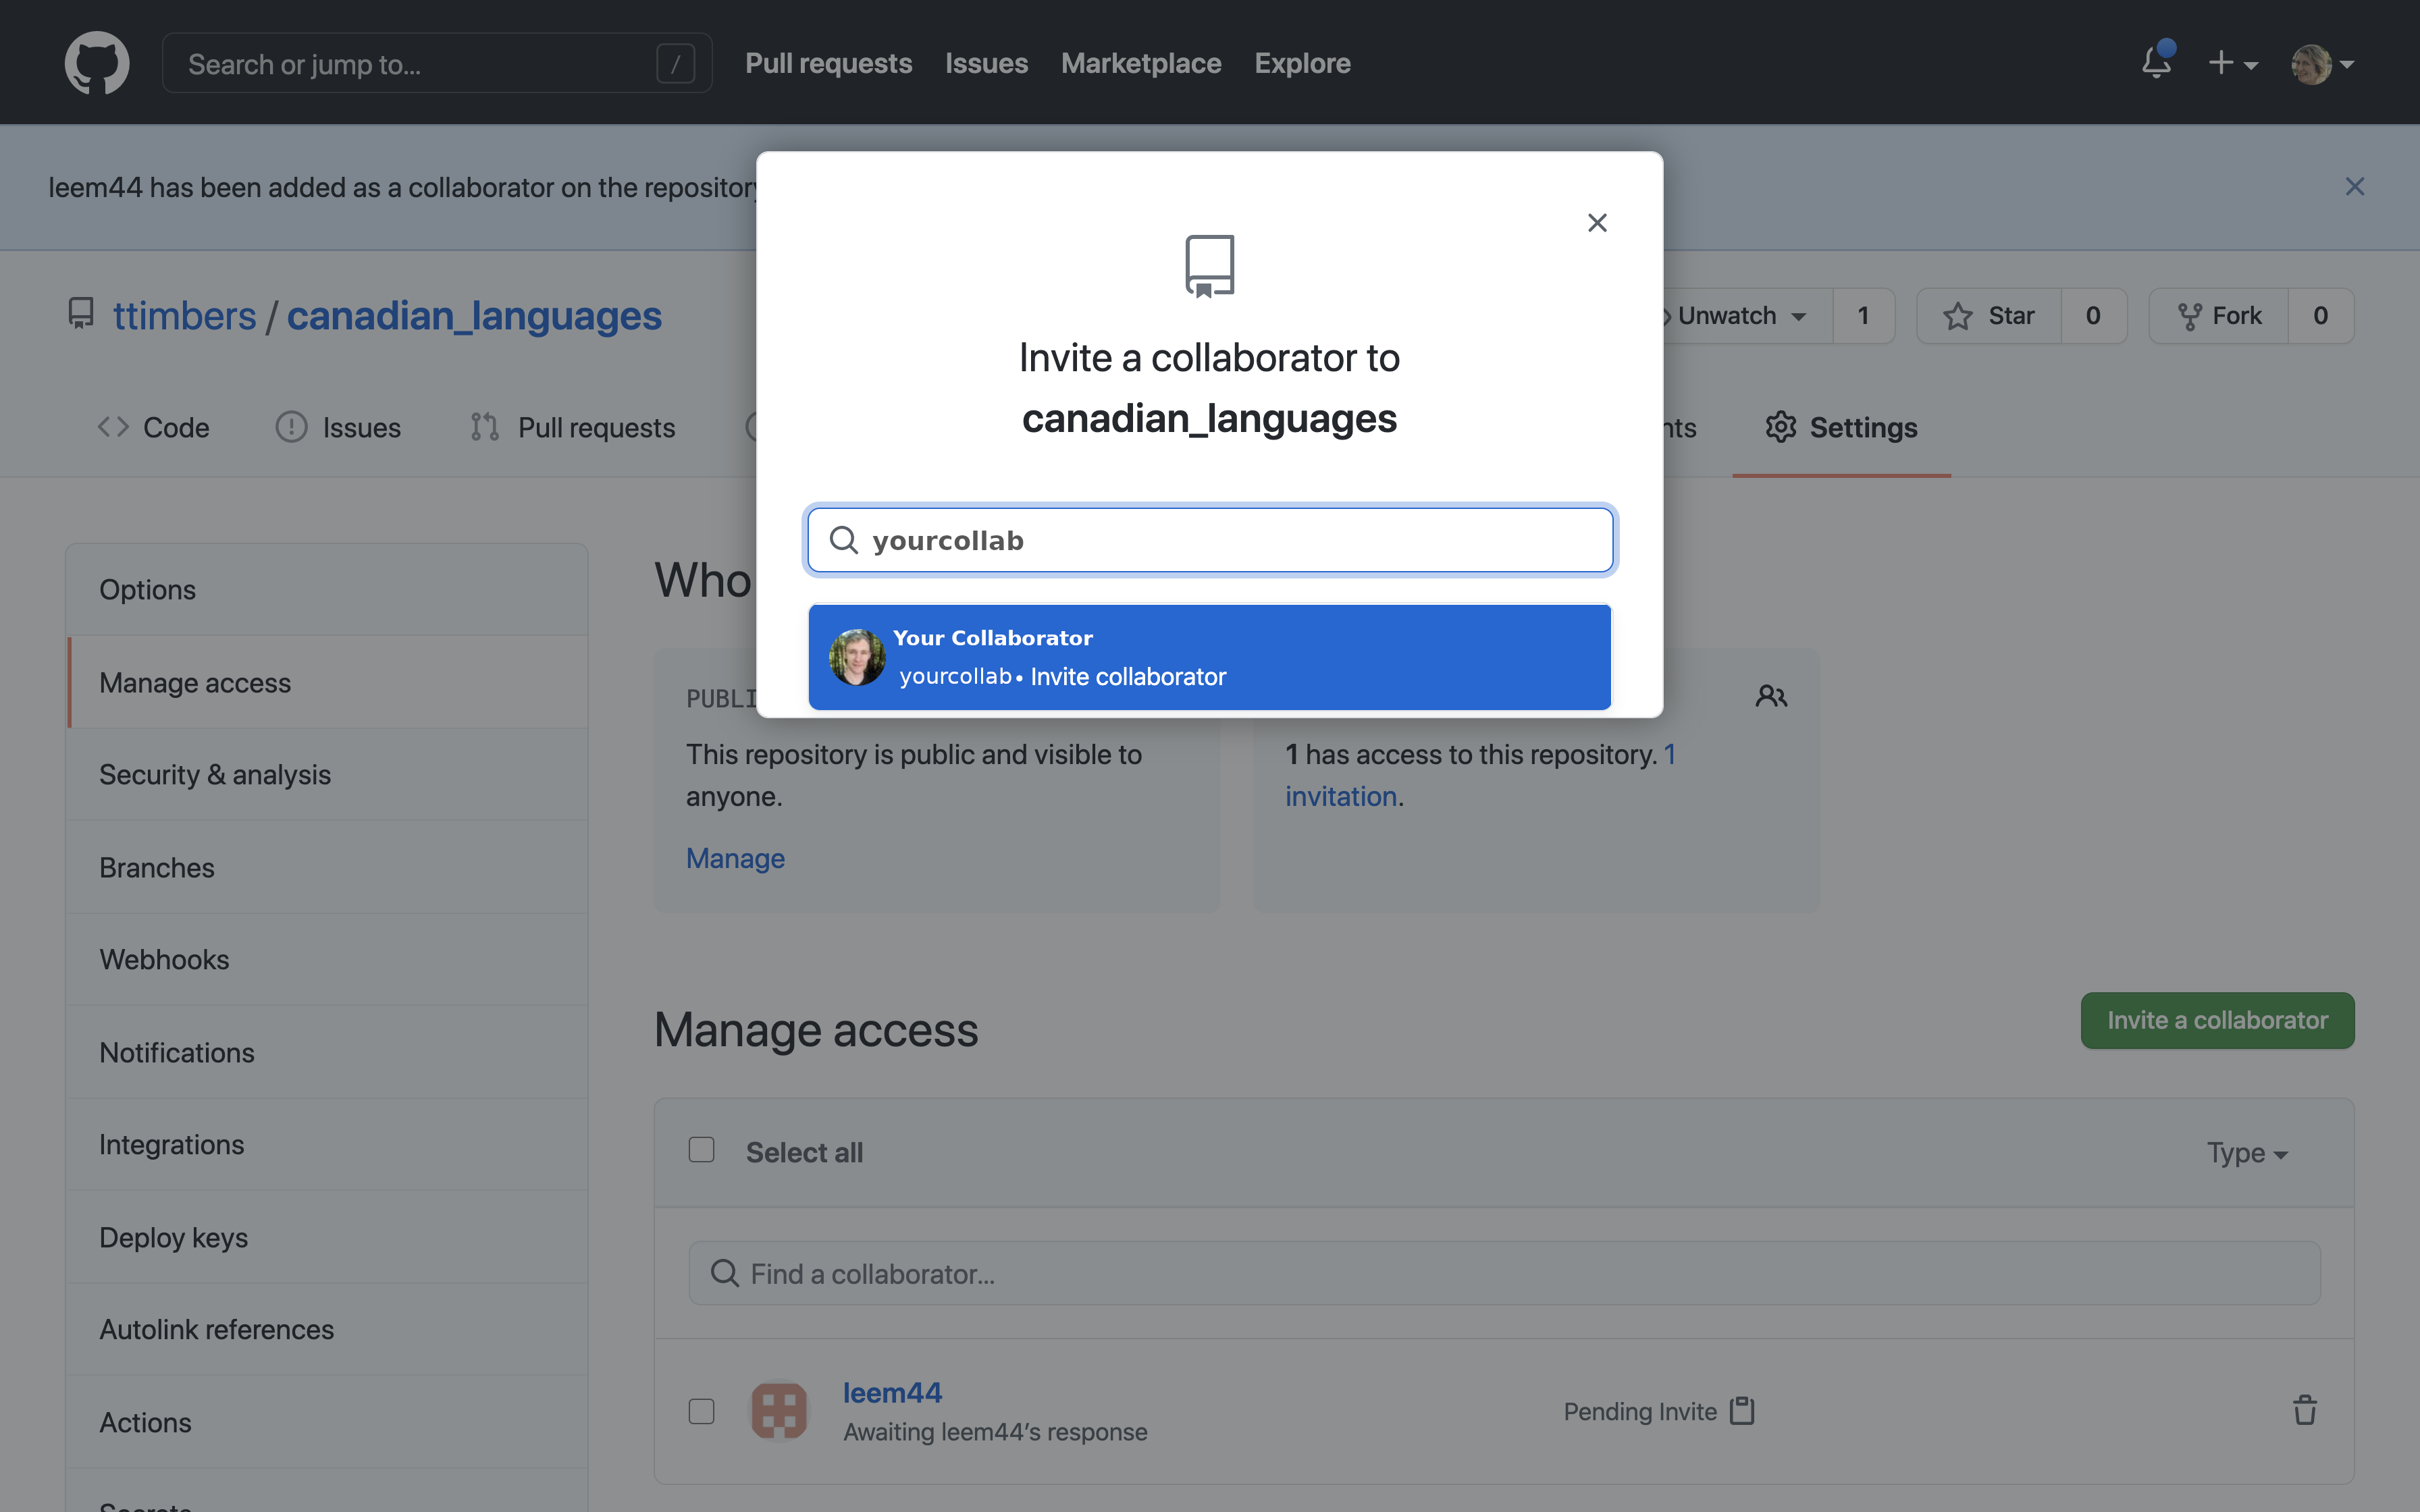
Type in the collaborator’s GitHub username or email, and select their name when it appears (Figure 12.8.4).
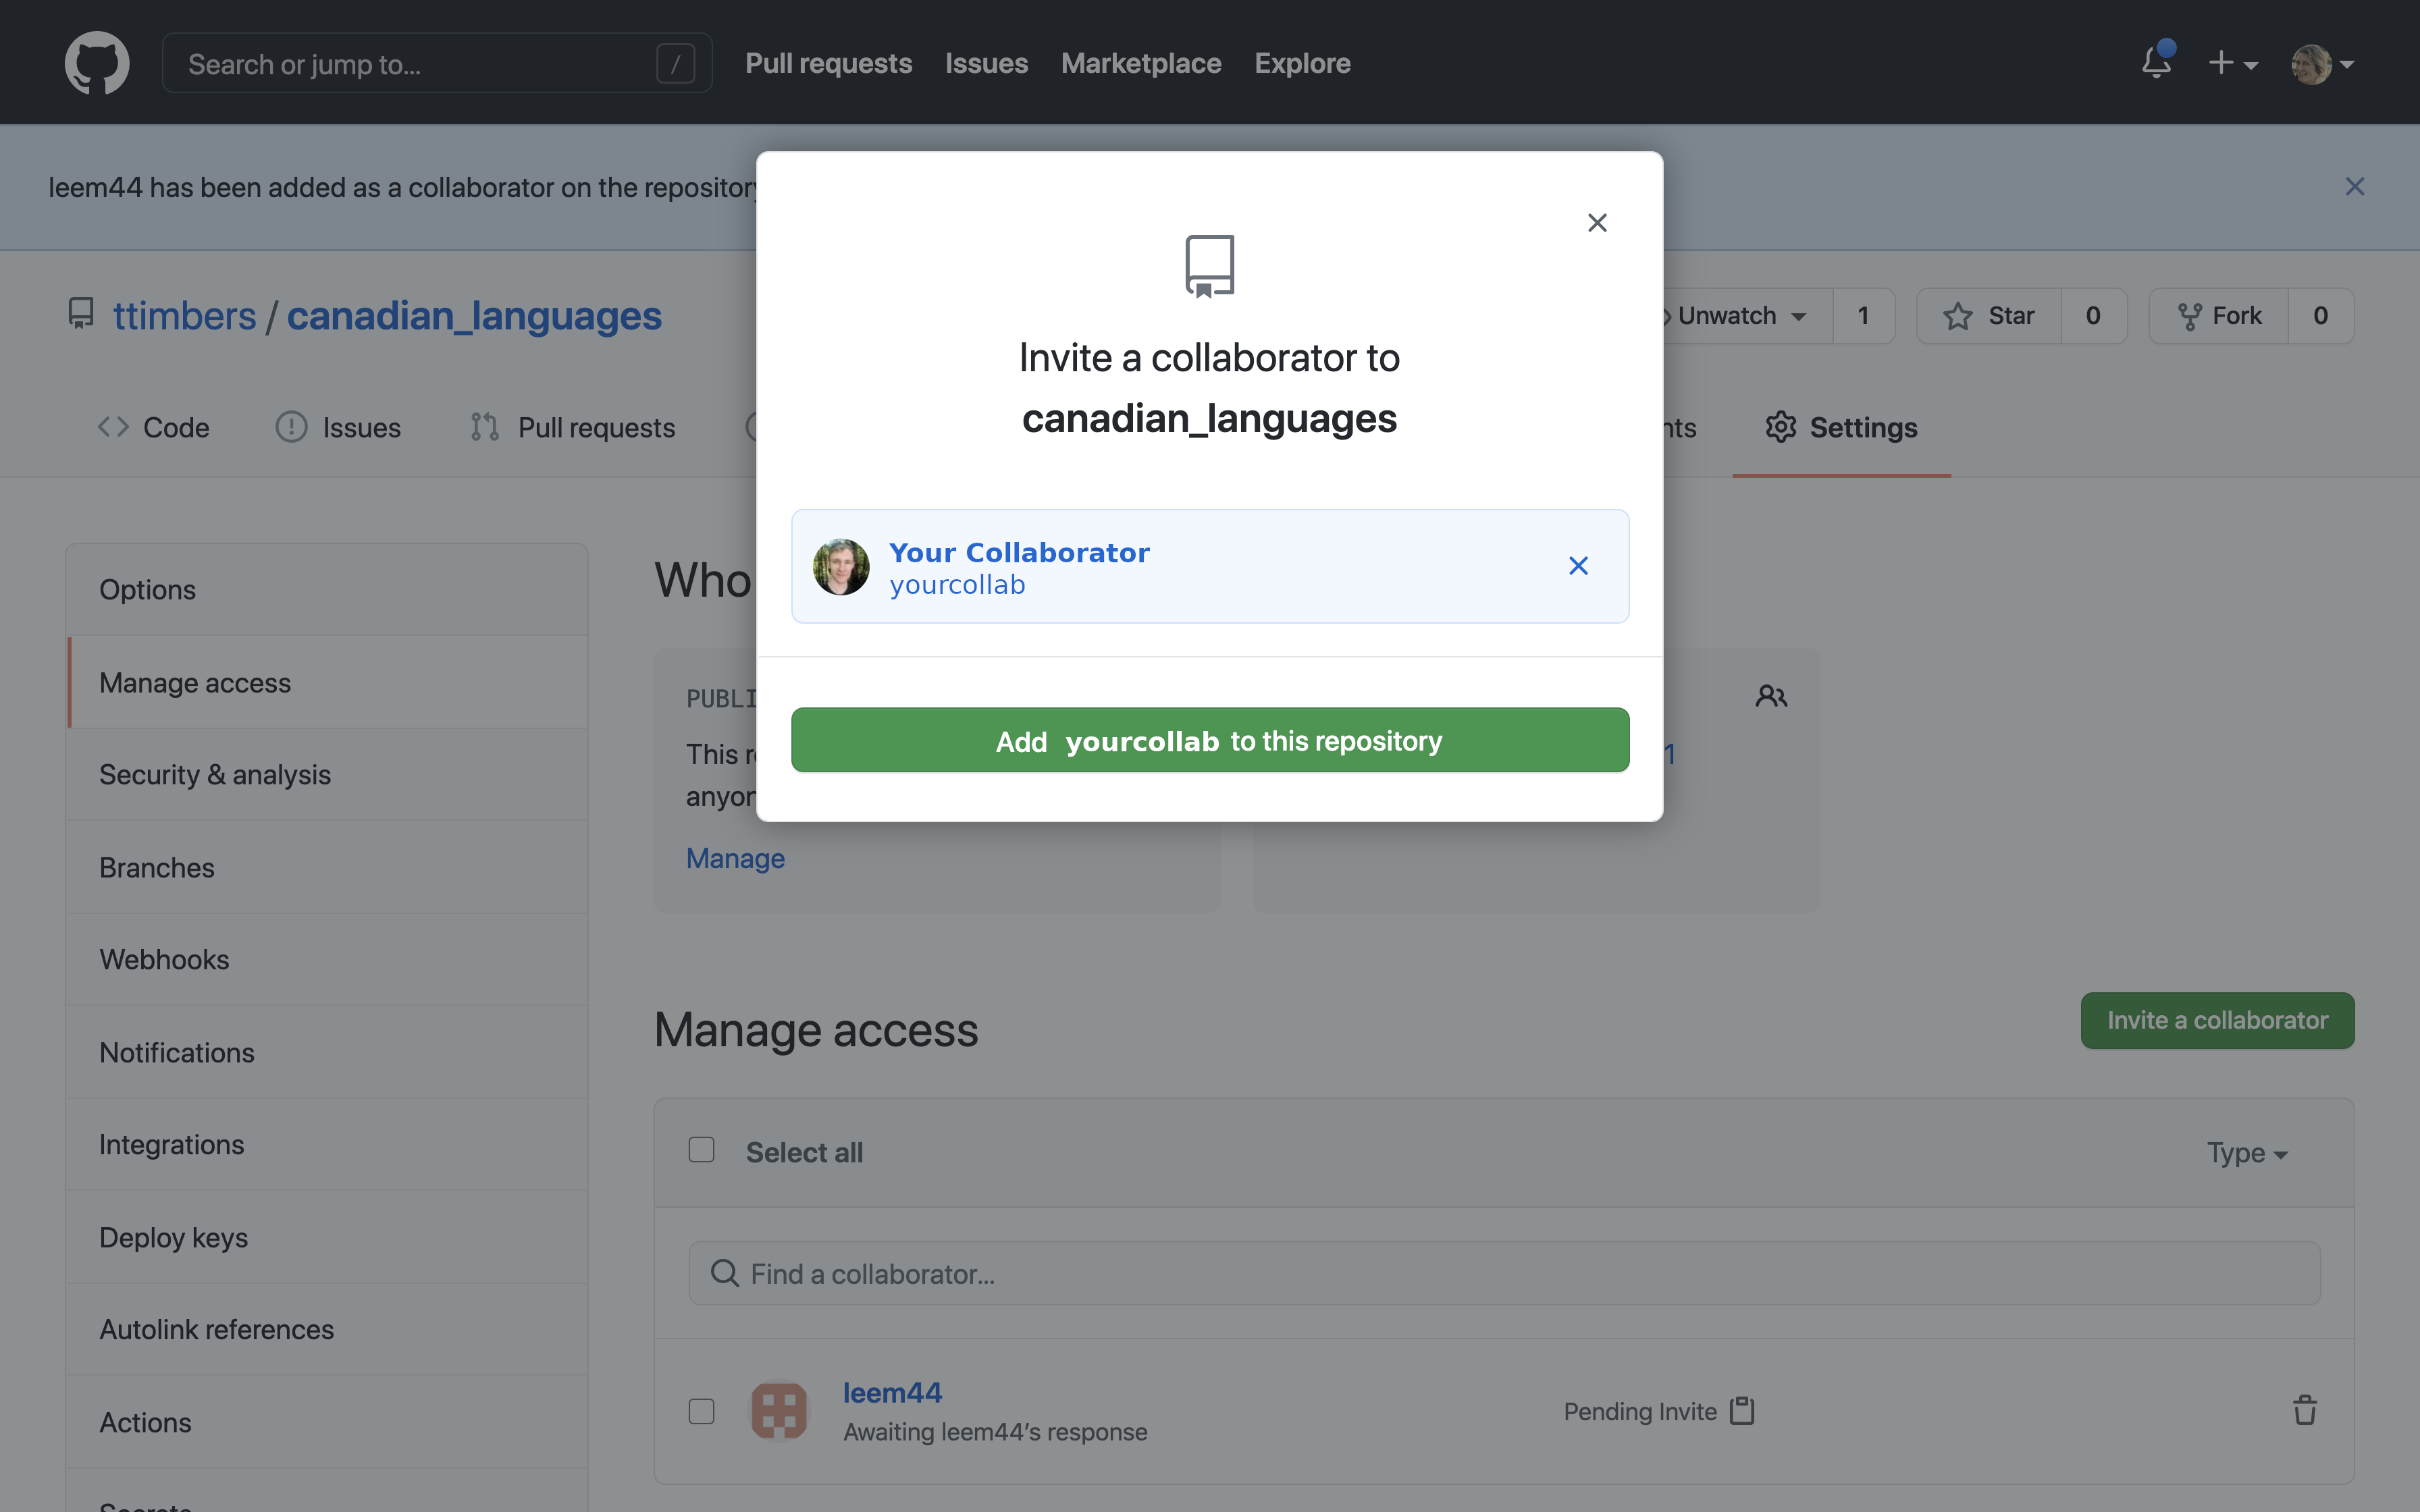
Finally, click the green "Add collaborator to this repository" button (Figure 12.8.5).
After this, you should see your newly added collaborator listed under the "Manage access" tab. They should receive an email invitation to join the GitHub repository as a collaborator. They need to accept this invitation to enable write access.
Subsection 12.8.2 Pulling changes from GitHub using Jupyter
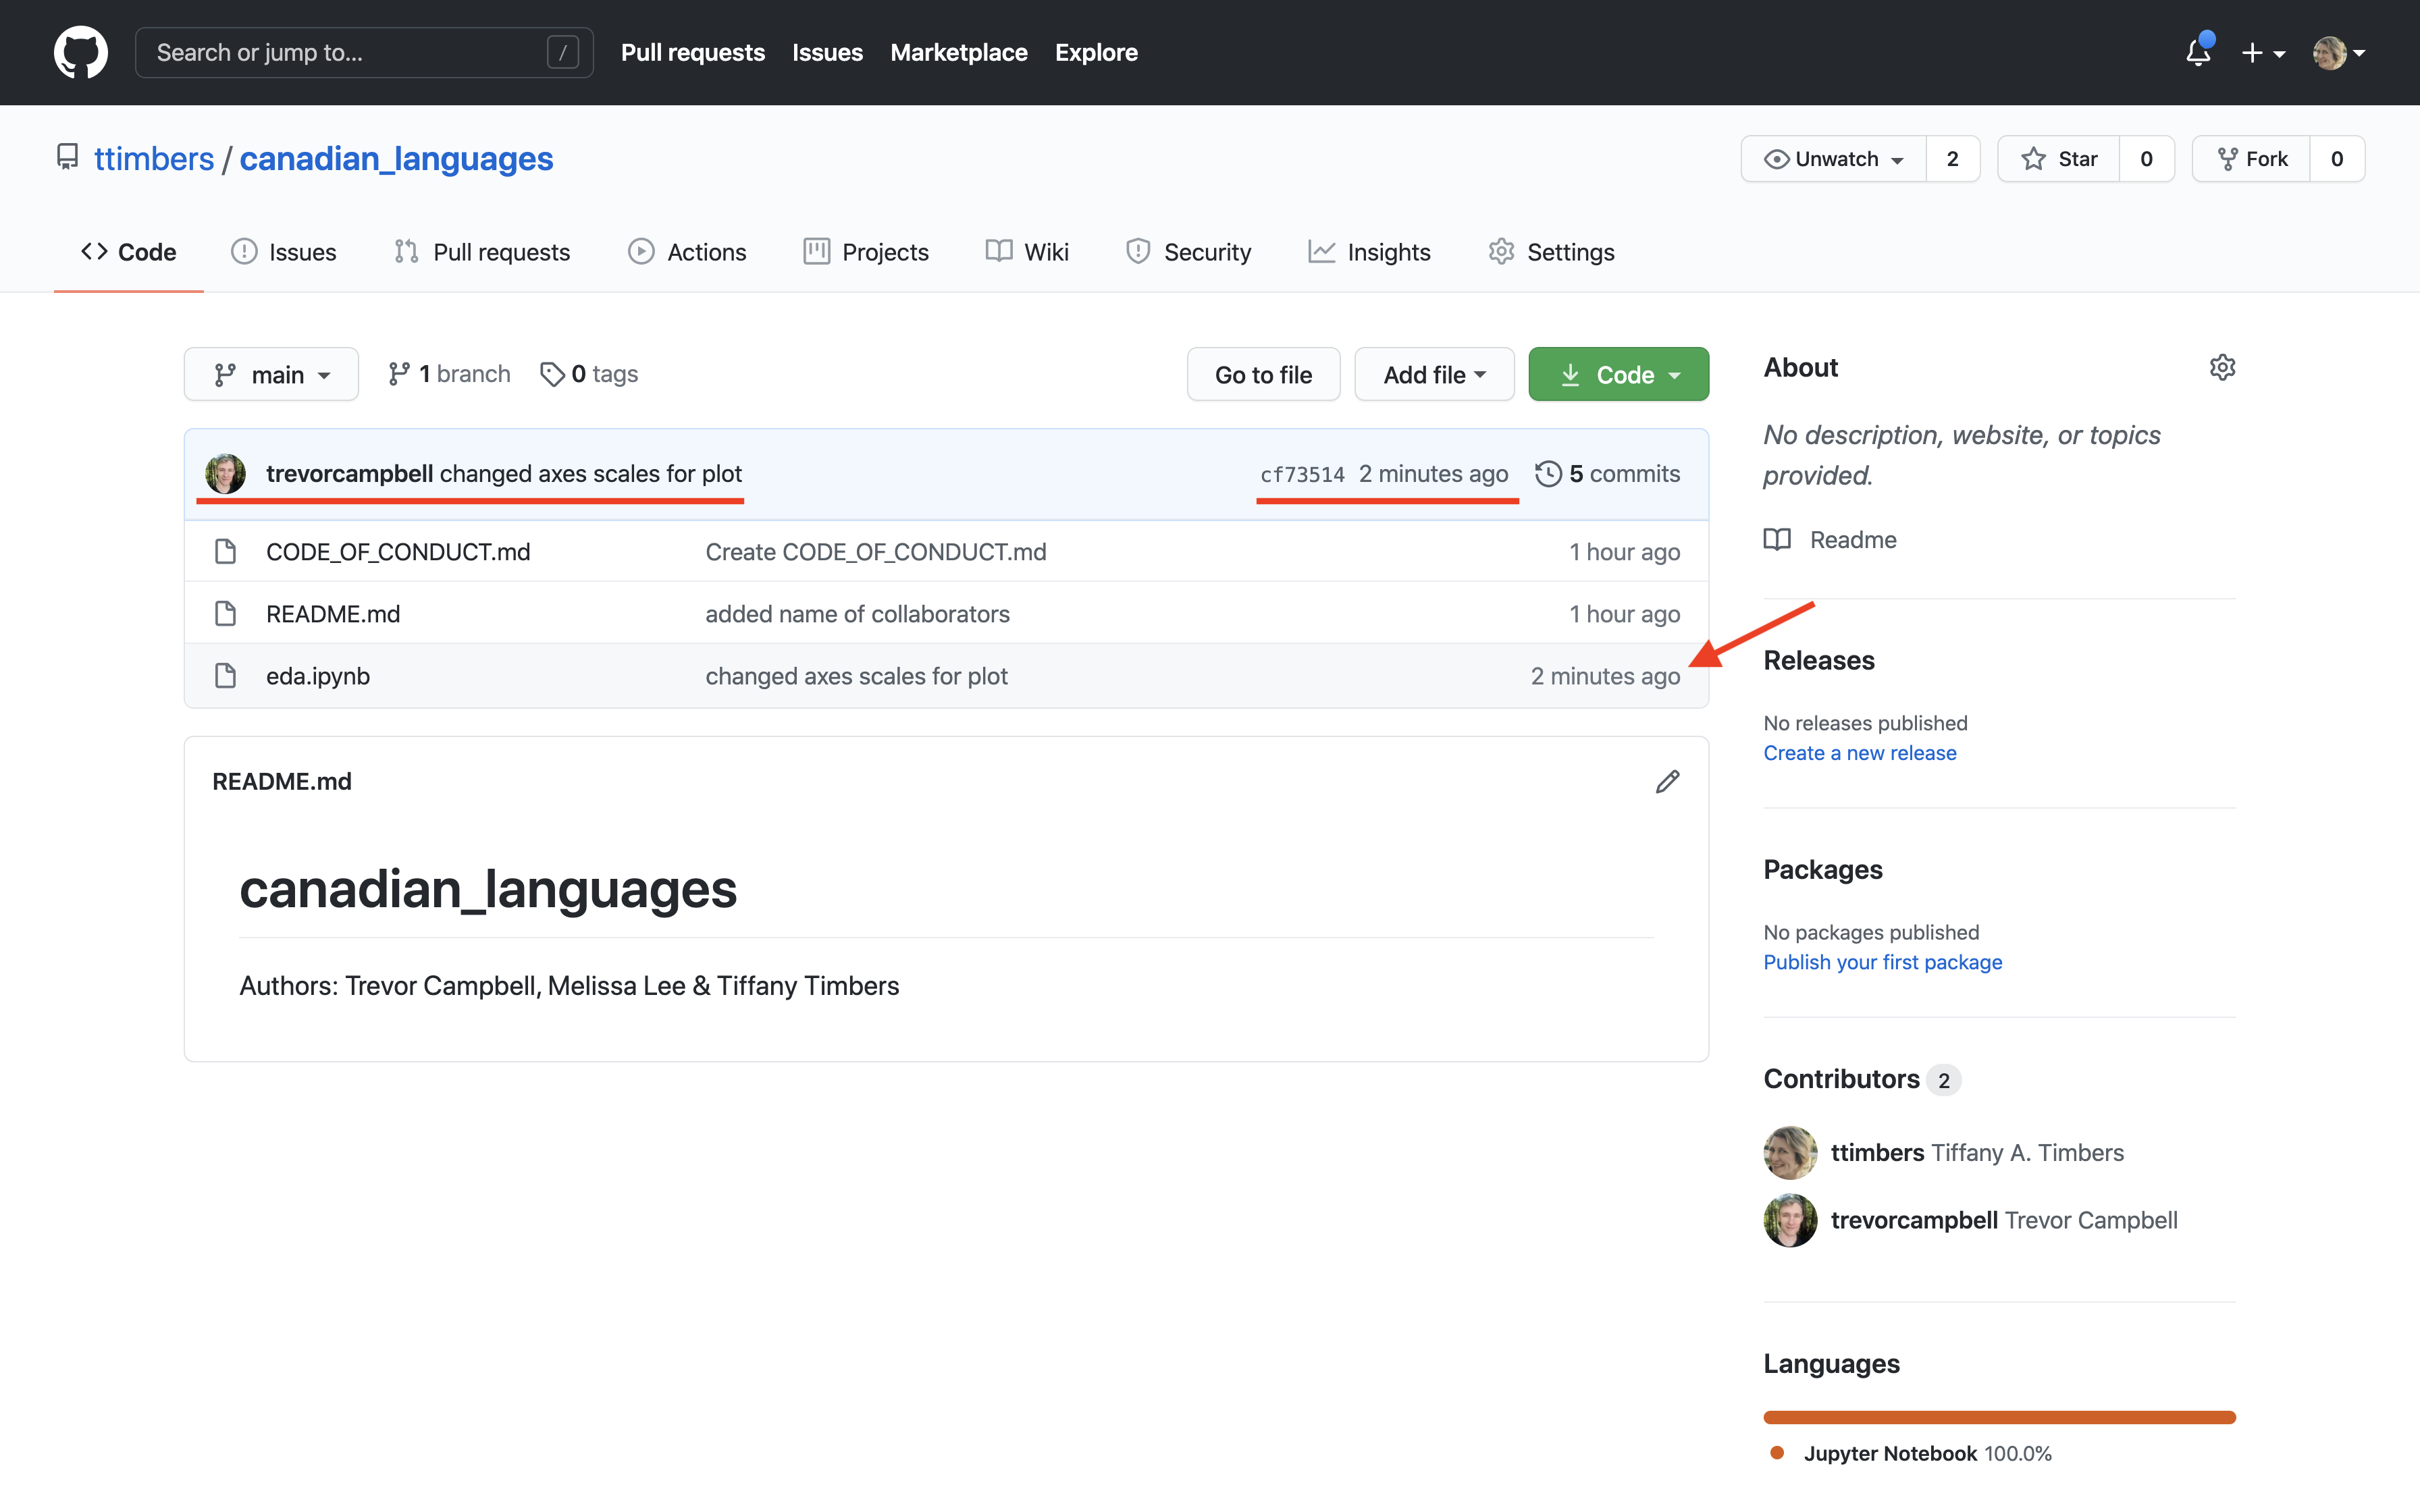
We will now walk through how to use the Jupyter Git extension tool to pull changes to our
eda.ipynb analysis file that were made by a collaborator (Figure 12.8.6).
You can tell Git to "pull" by clicking on the cloud icon with the down arrow in Jupyter (Figure 12.8.7).
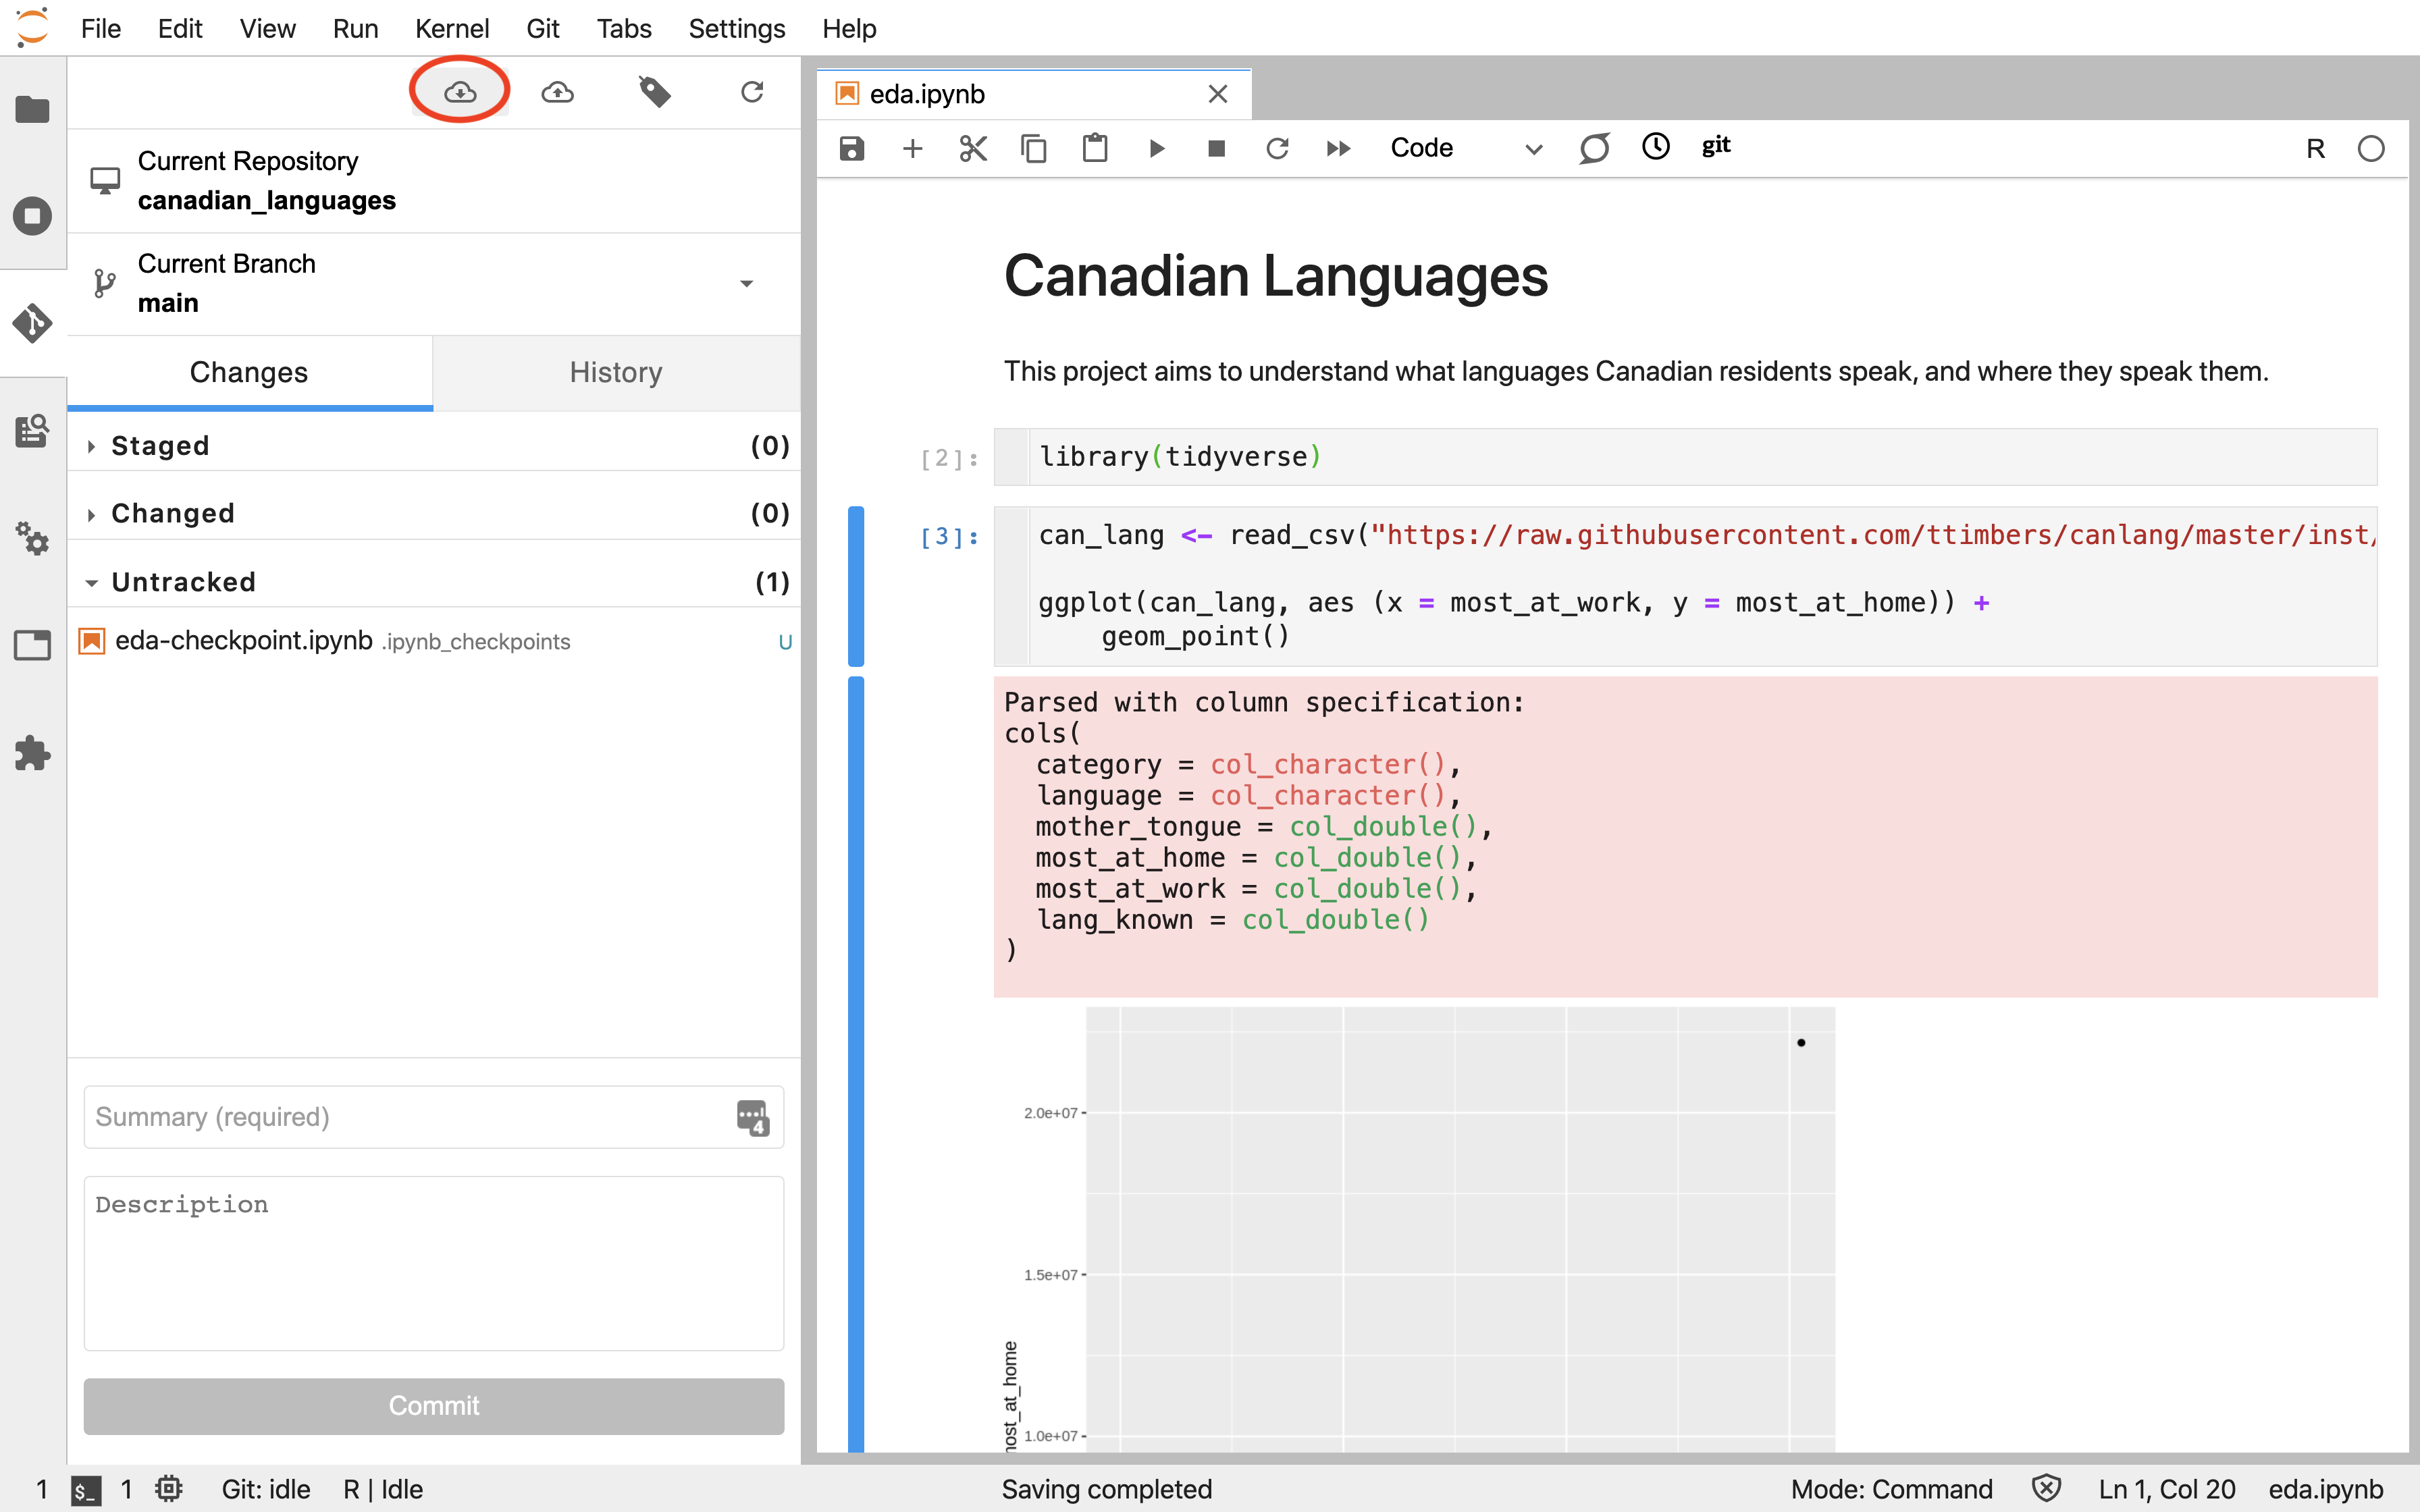
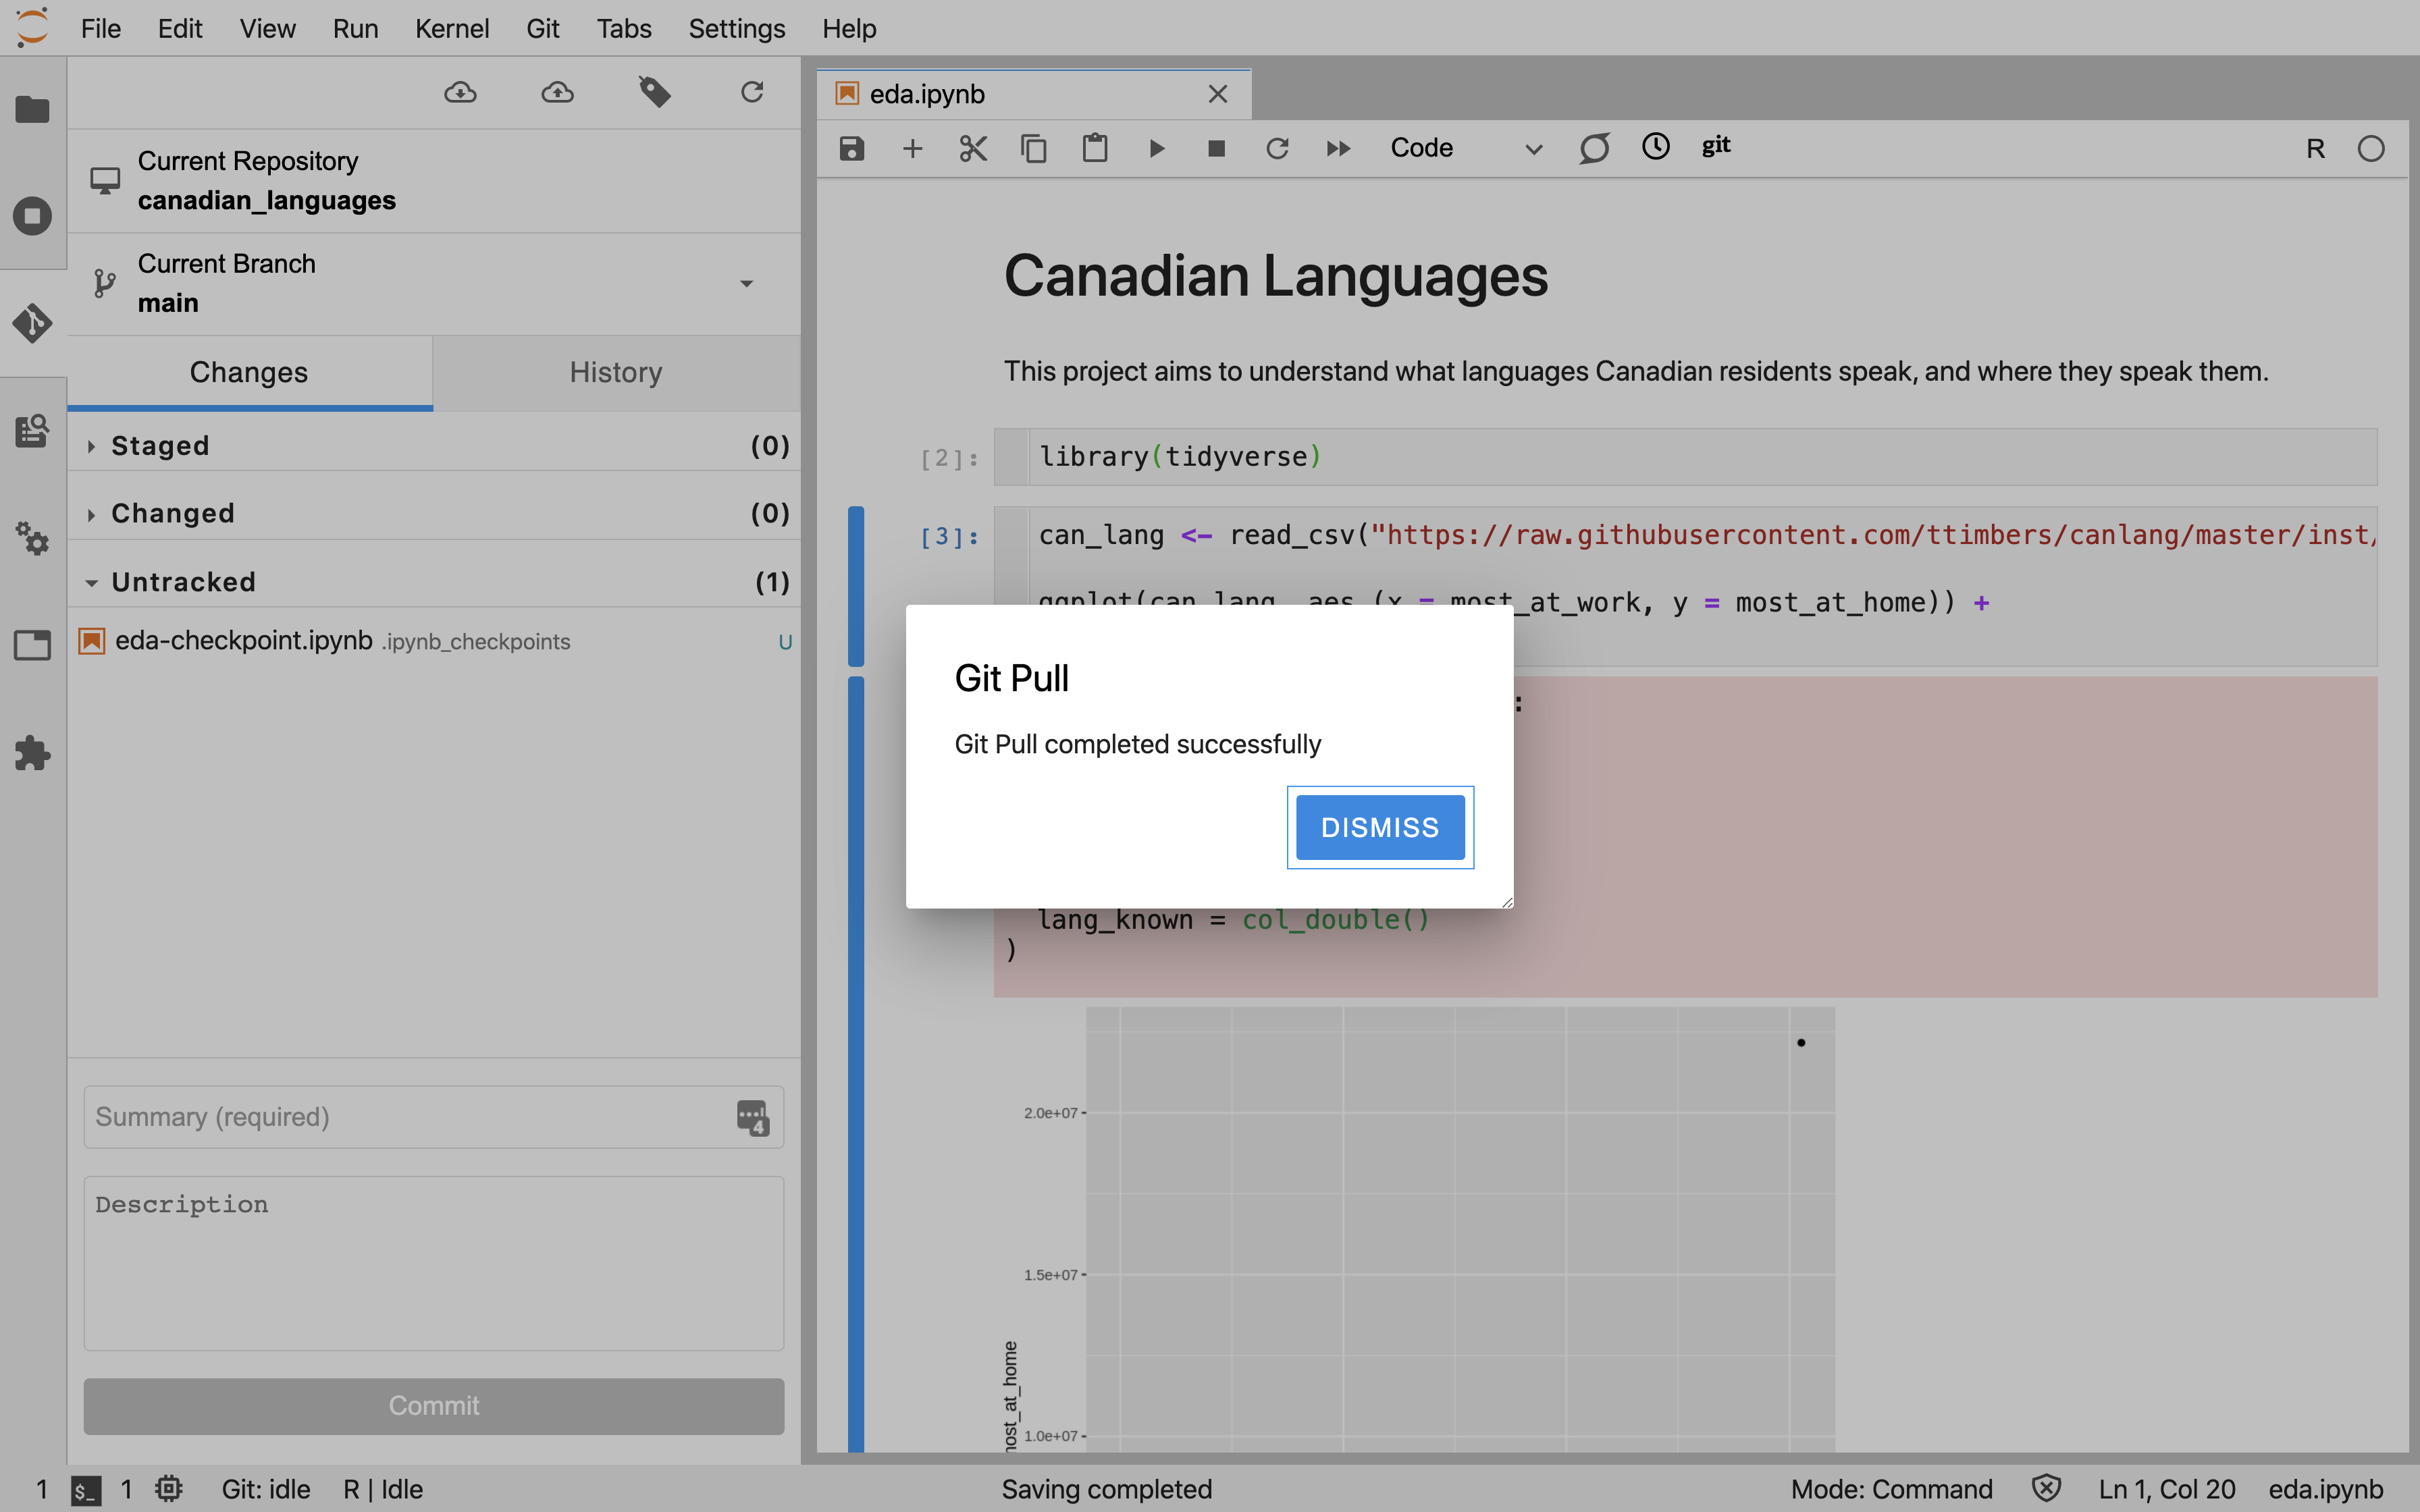
Once the files are successfully pulled from GitHub, you need to click "Dismiss" to keep working (Figure 12.8.8).
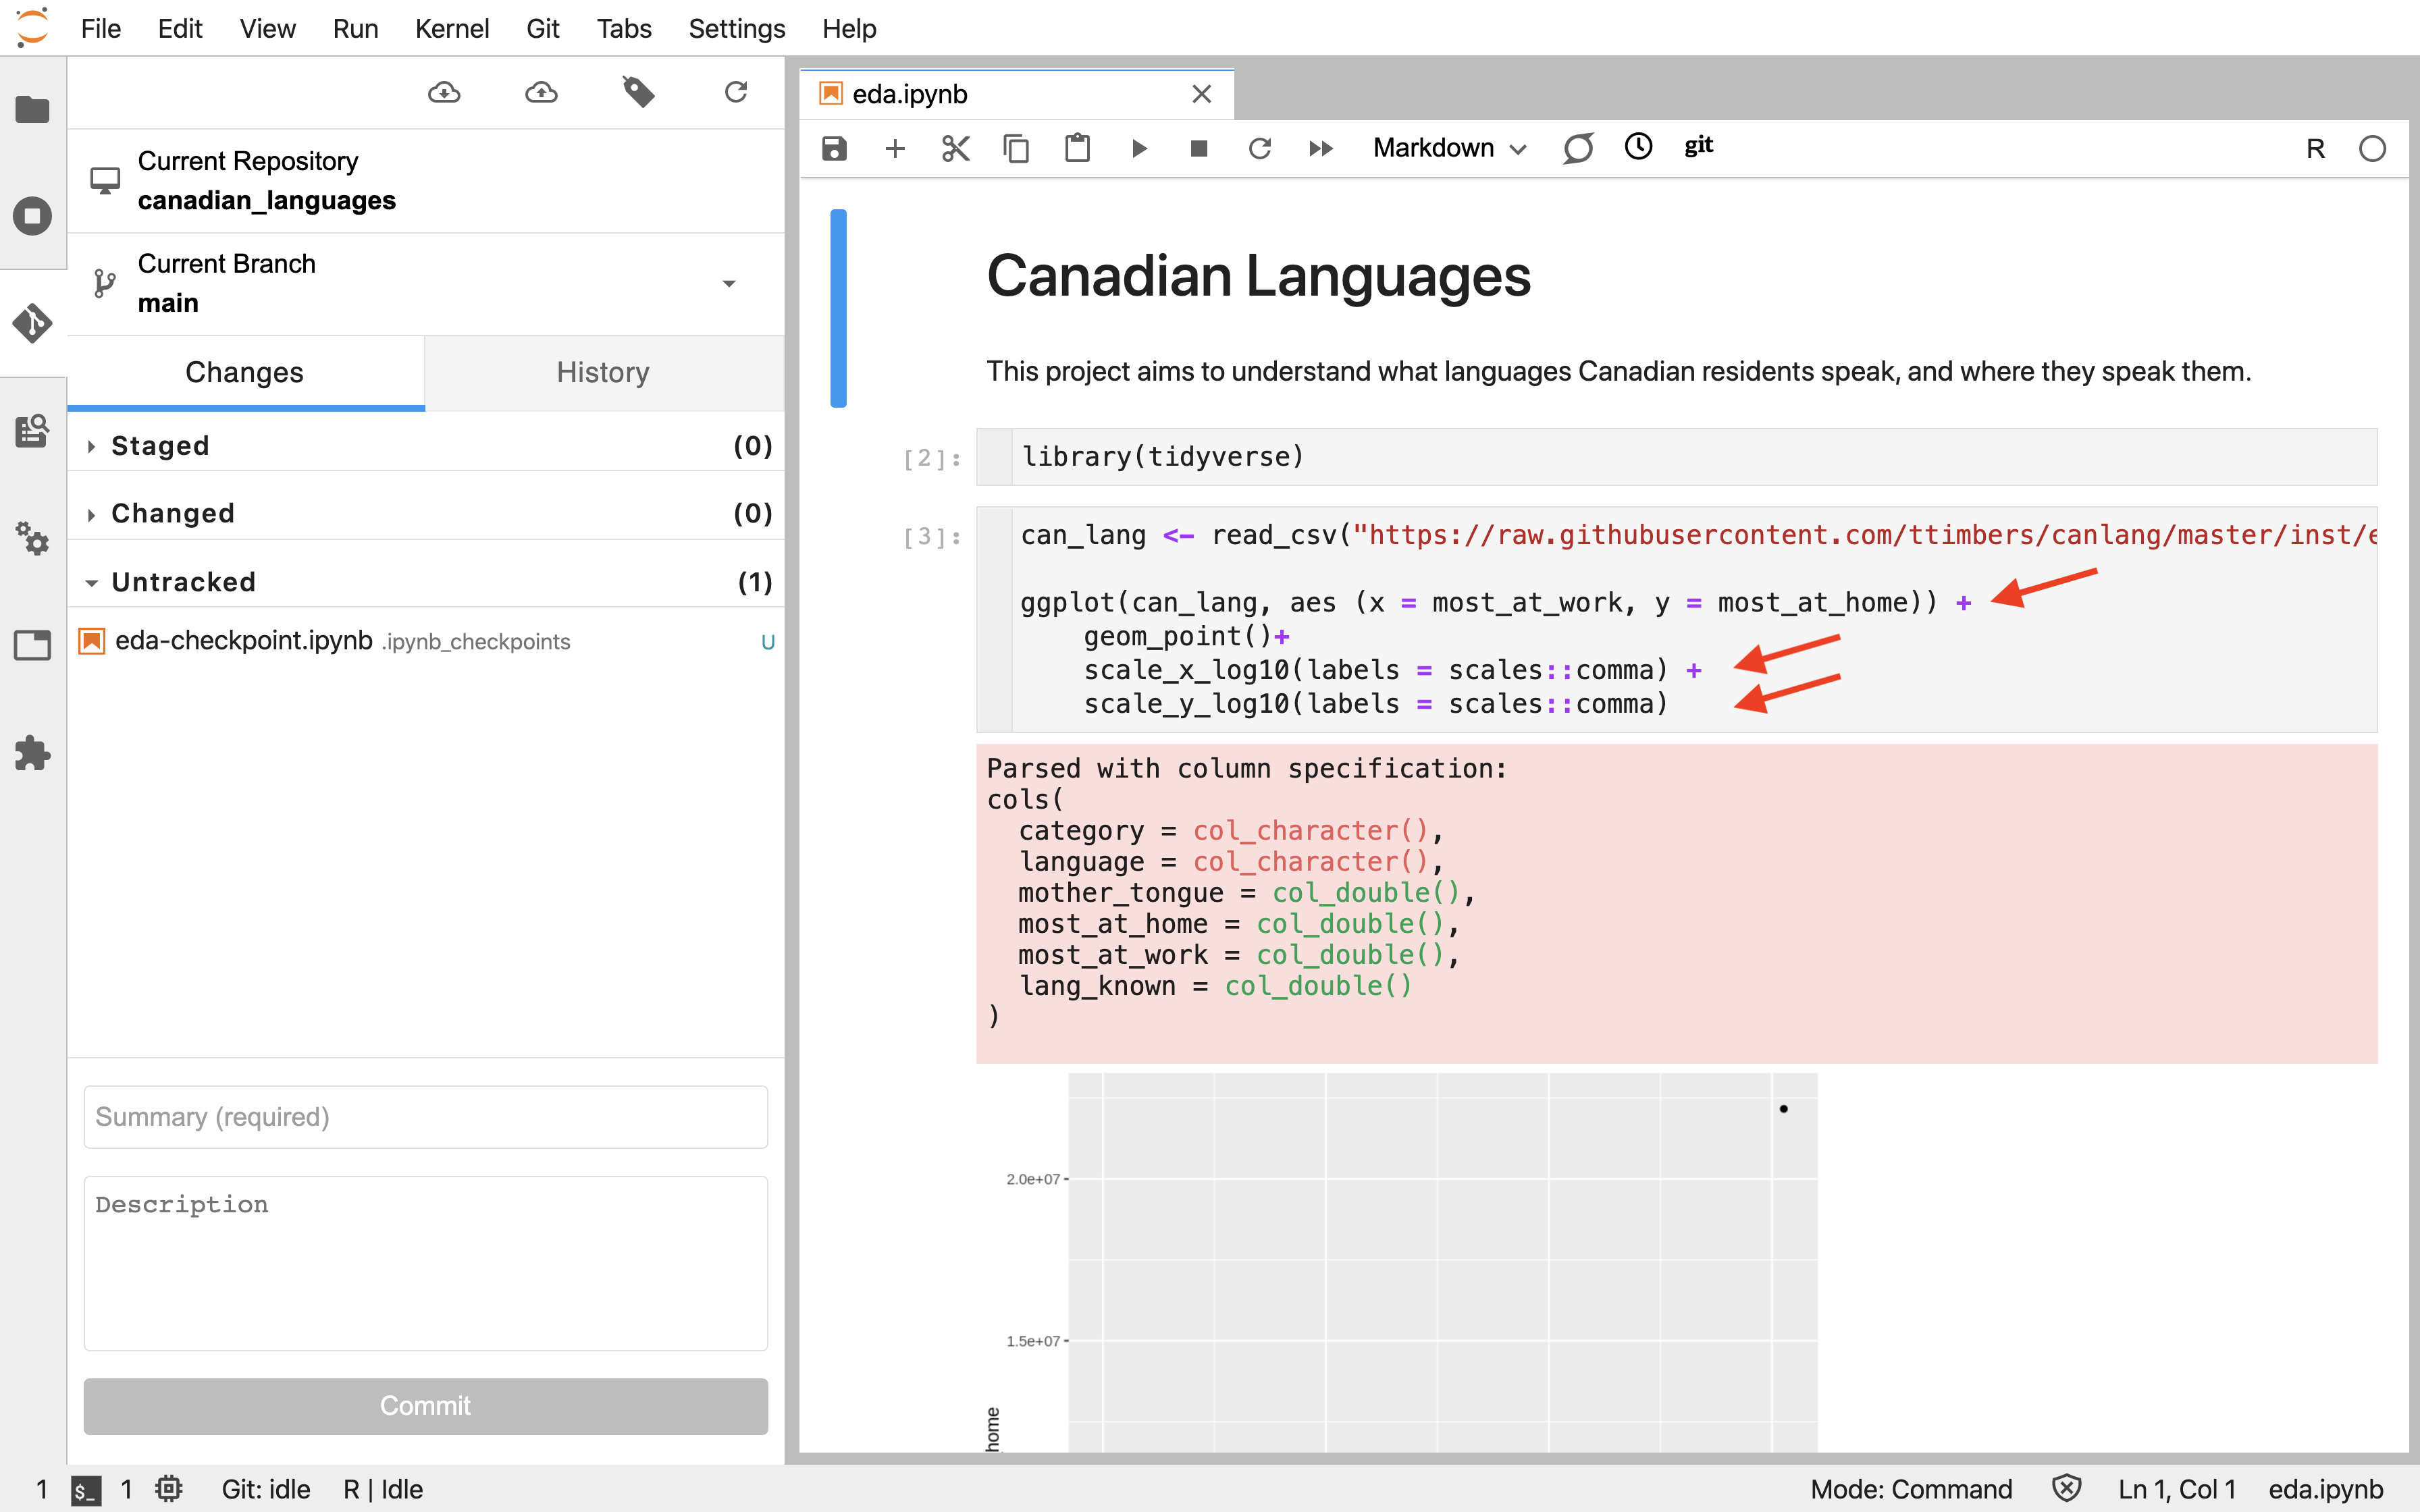
And then when you open (or refresh) the files whose changes you just pulled, you should be able to see them (Figure 12.8.9).
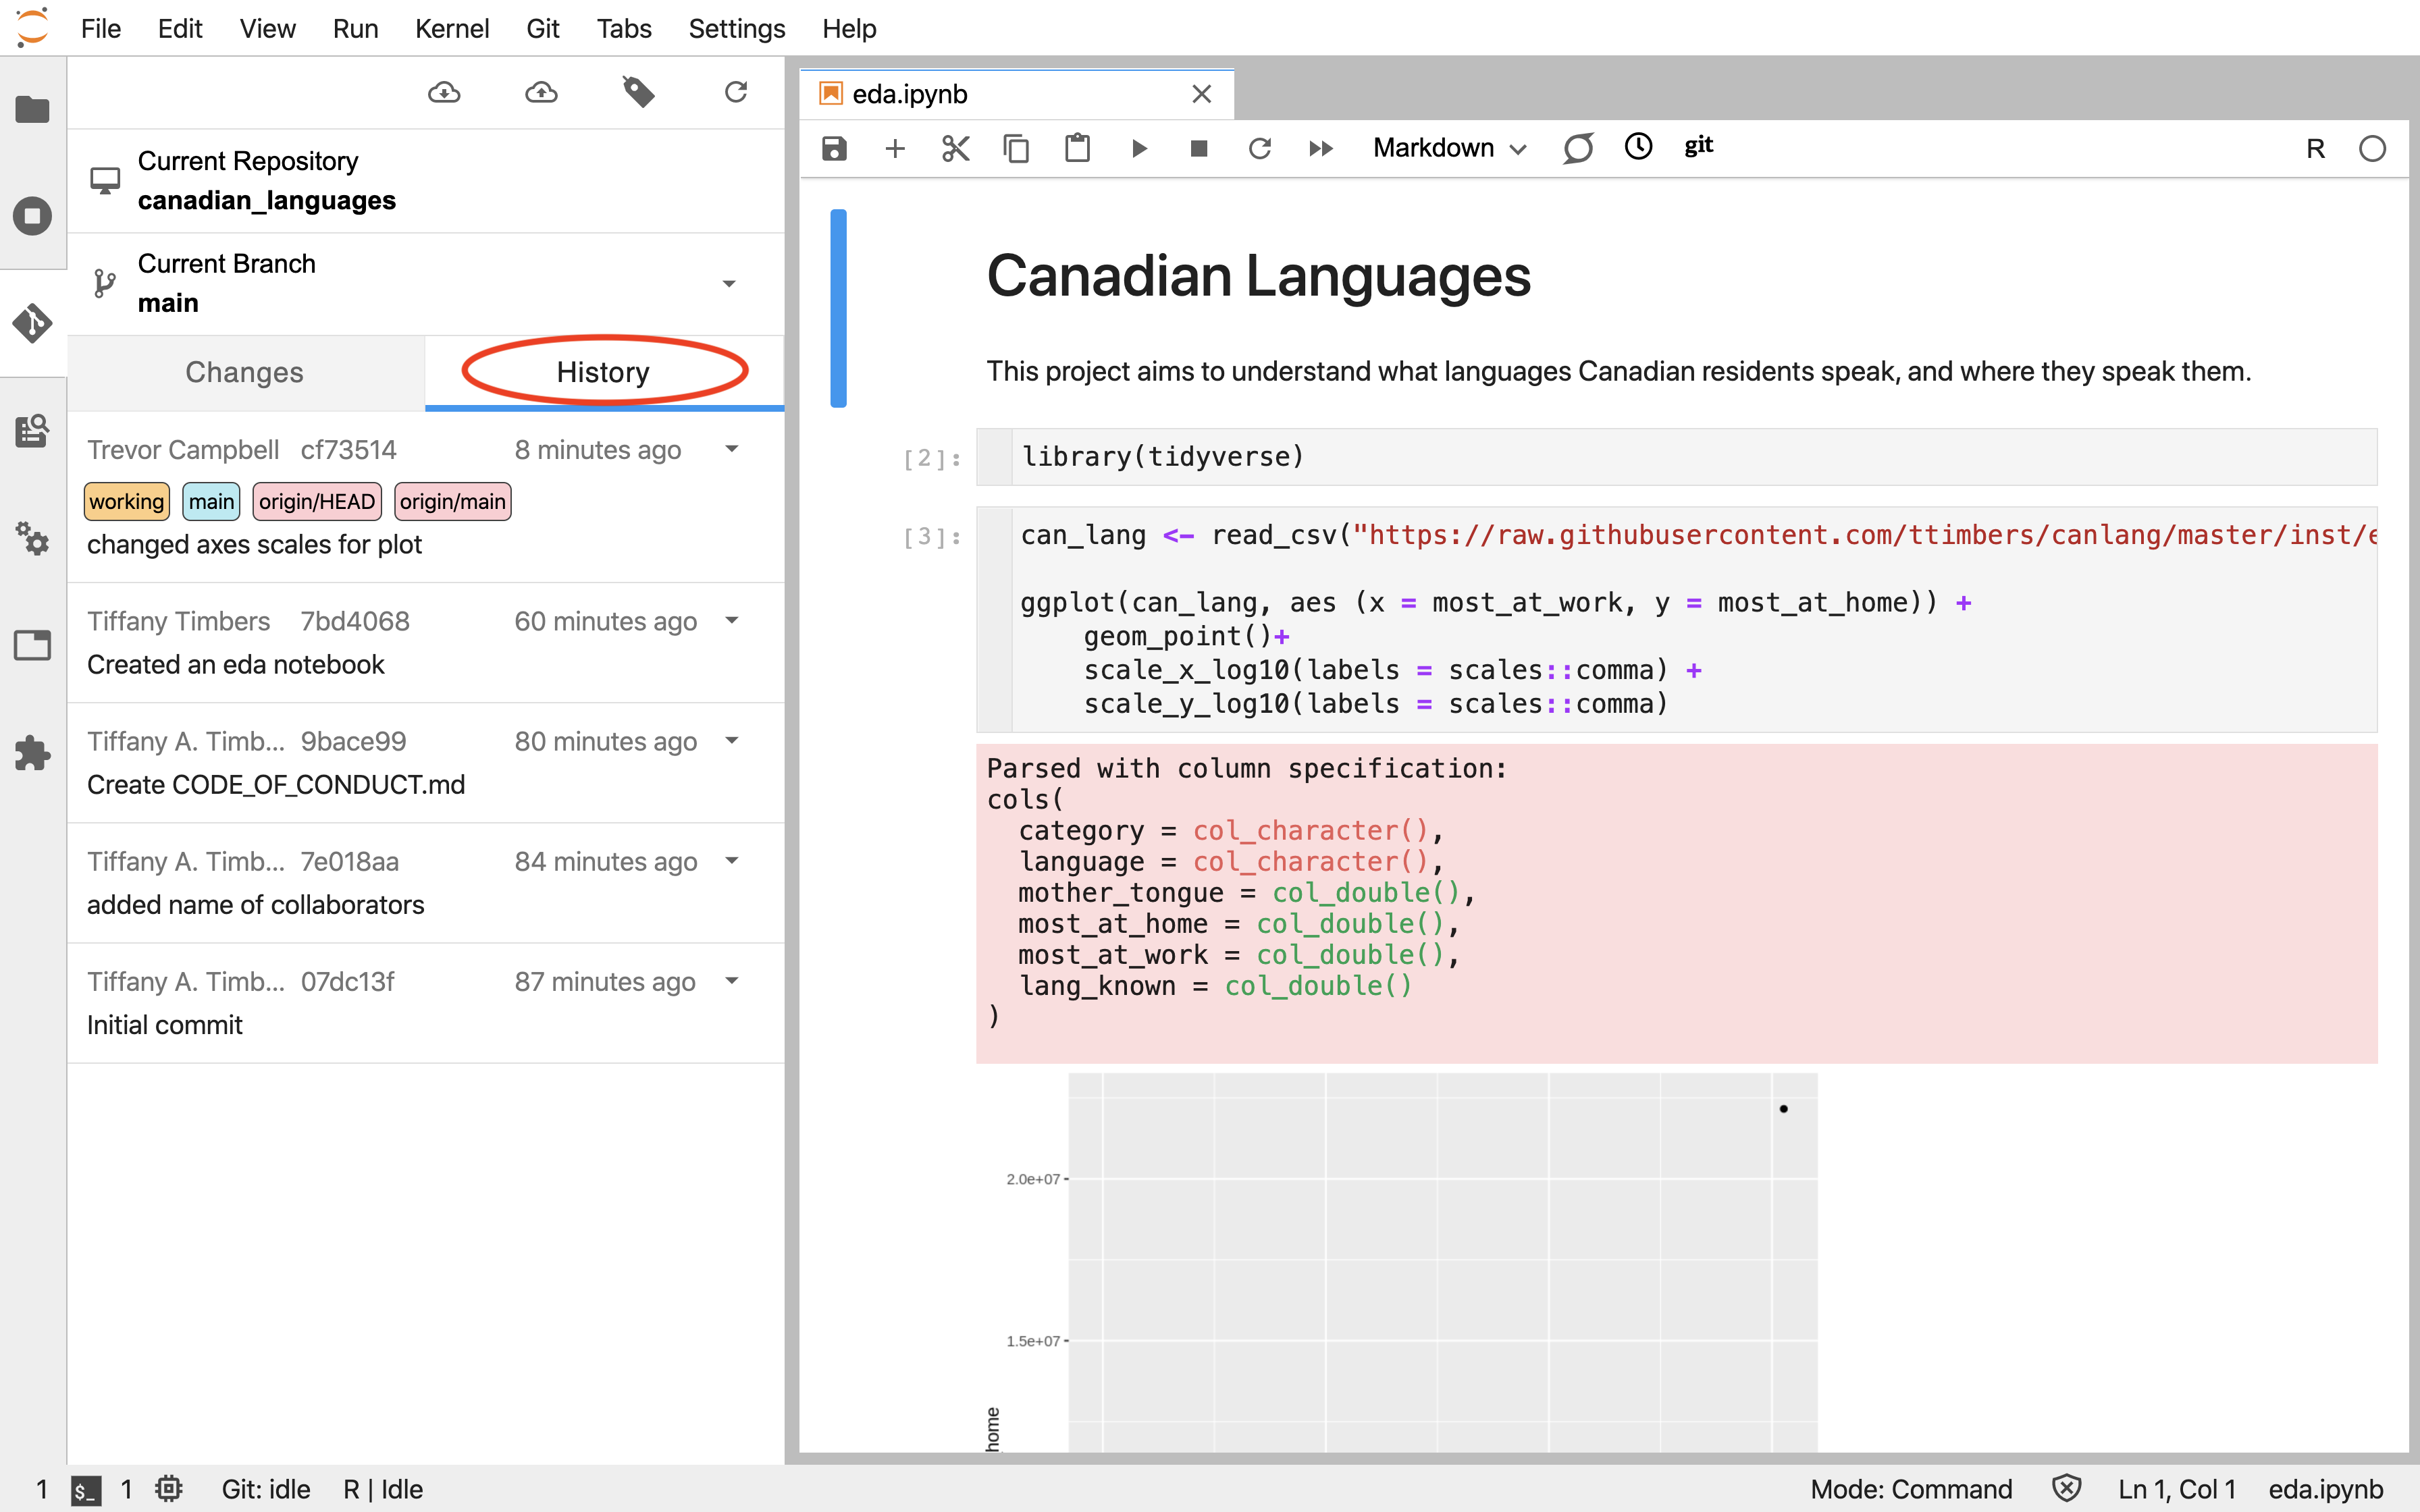
eda.ipynb (code highlighted by red arrows).It can be very useful to review the history of the changes to your project. You can do this directly in Jupyter by clicking "History" in the Git tab (Figure 12.8.10).
It is good practice to pull any changes at the start of every work session before you start working on your local copy. If you do not do this, and your collaborators have pushed some changes to the project to GitHub, then you will be unable to push your changes to GitHub until you pull. This situation can be recognized by the error message shown in Figure 12.8.11.
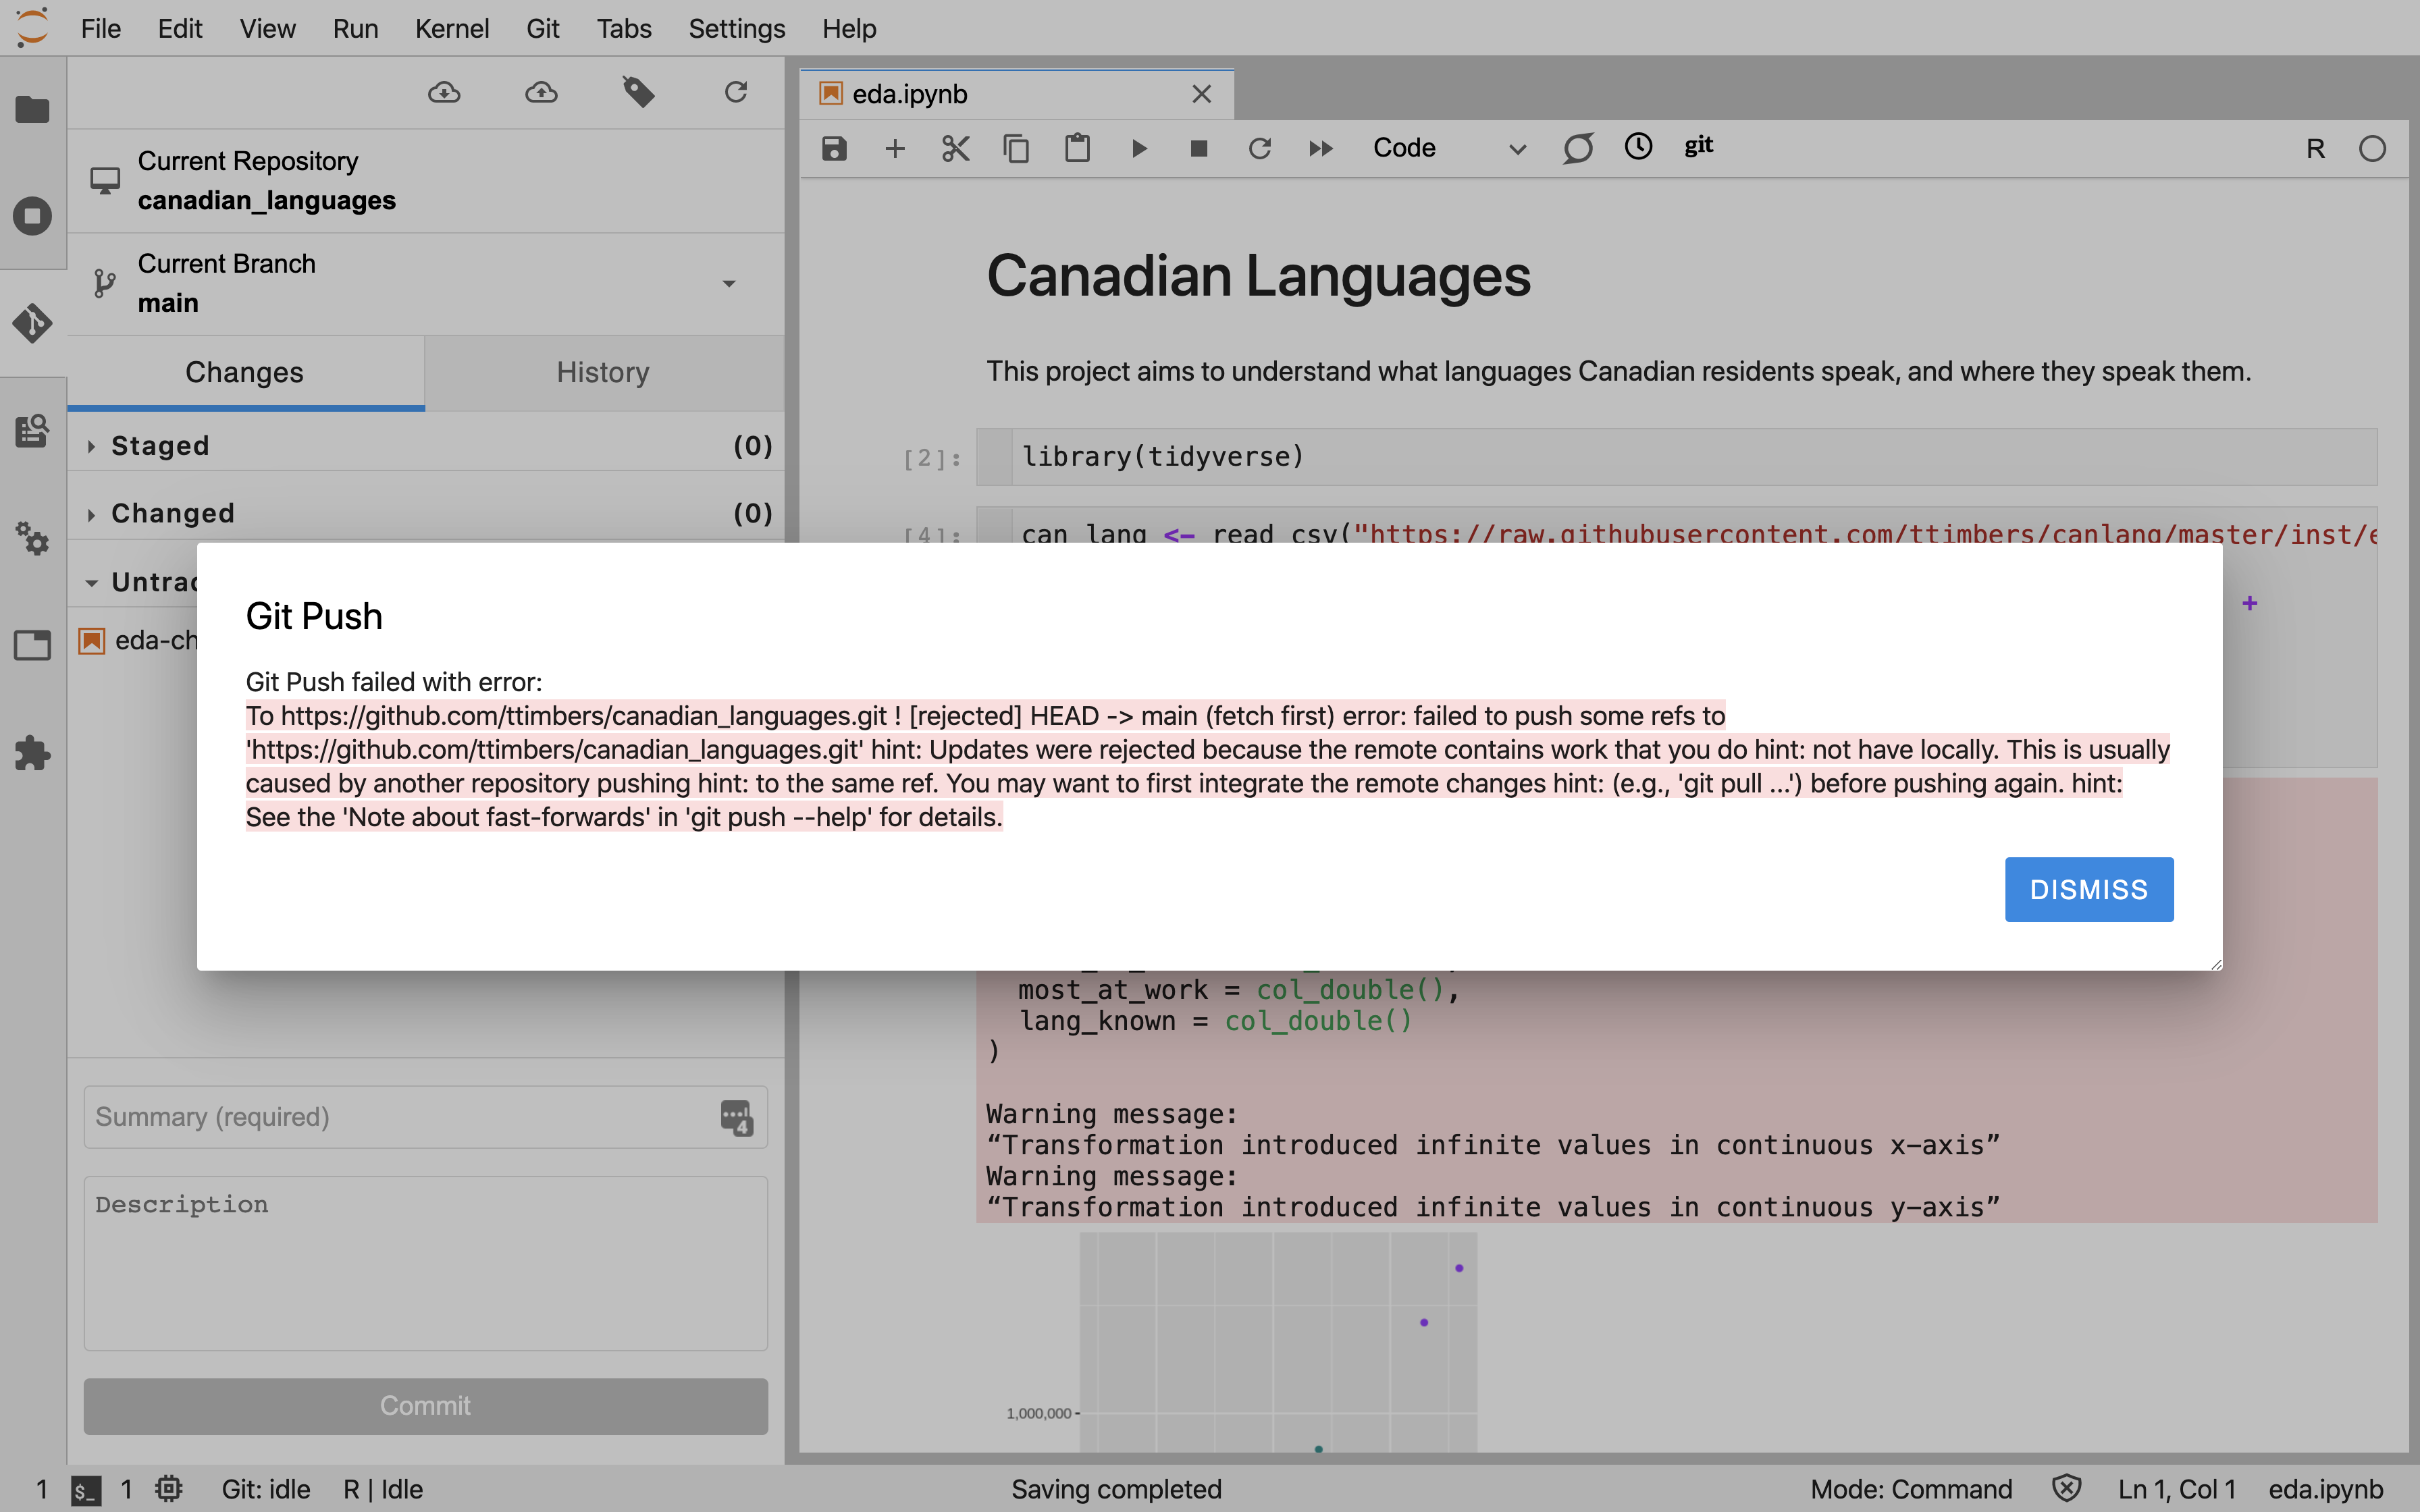
Usually, getting out of this situation is not too troublesome. First you need to pull the changes that exist on GitHub that you do not yet have in the local repository. Usually when this happens, Git can automatically merge the changes for you, even if you and your collaborators were working on different parts of the same file!
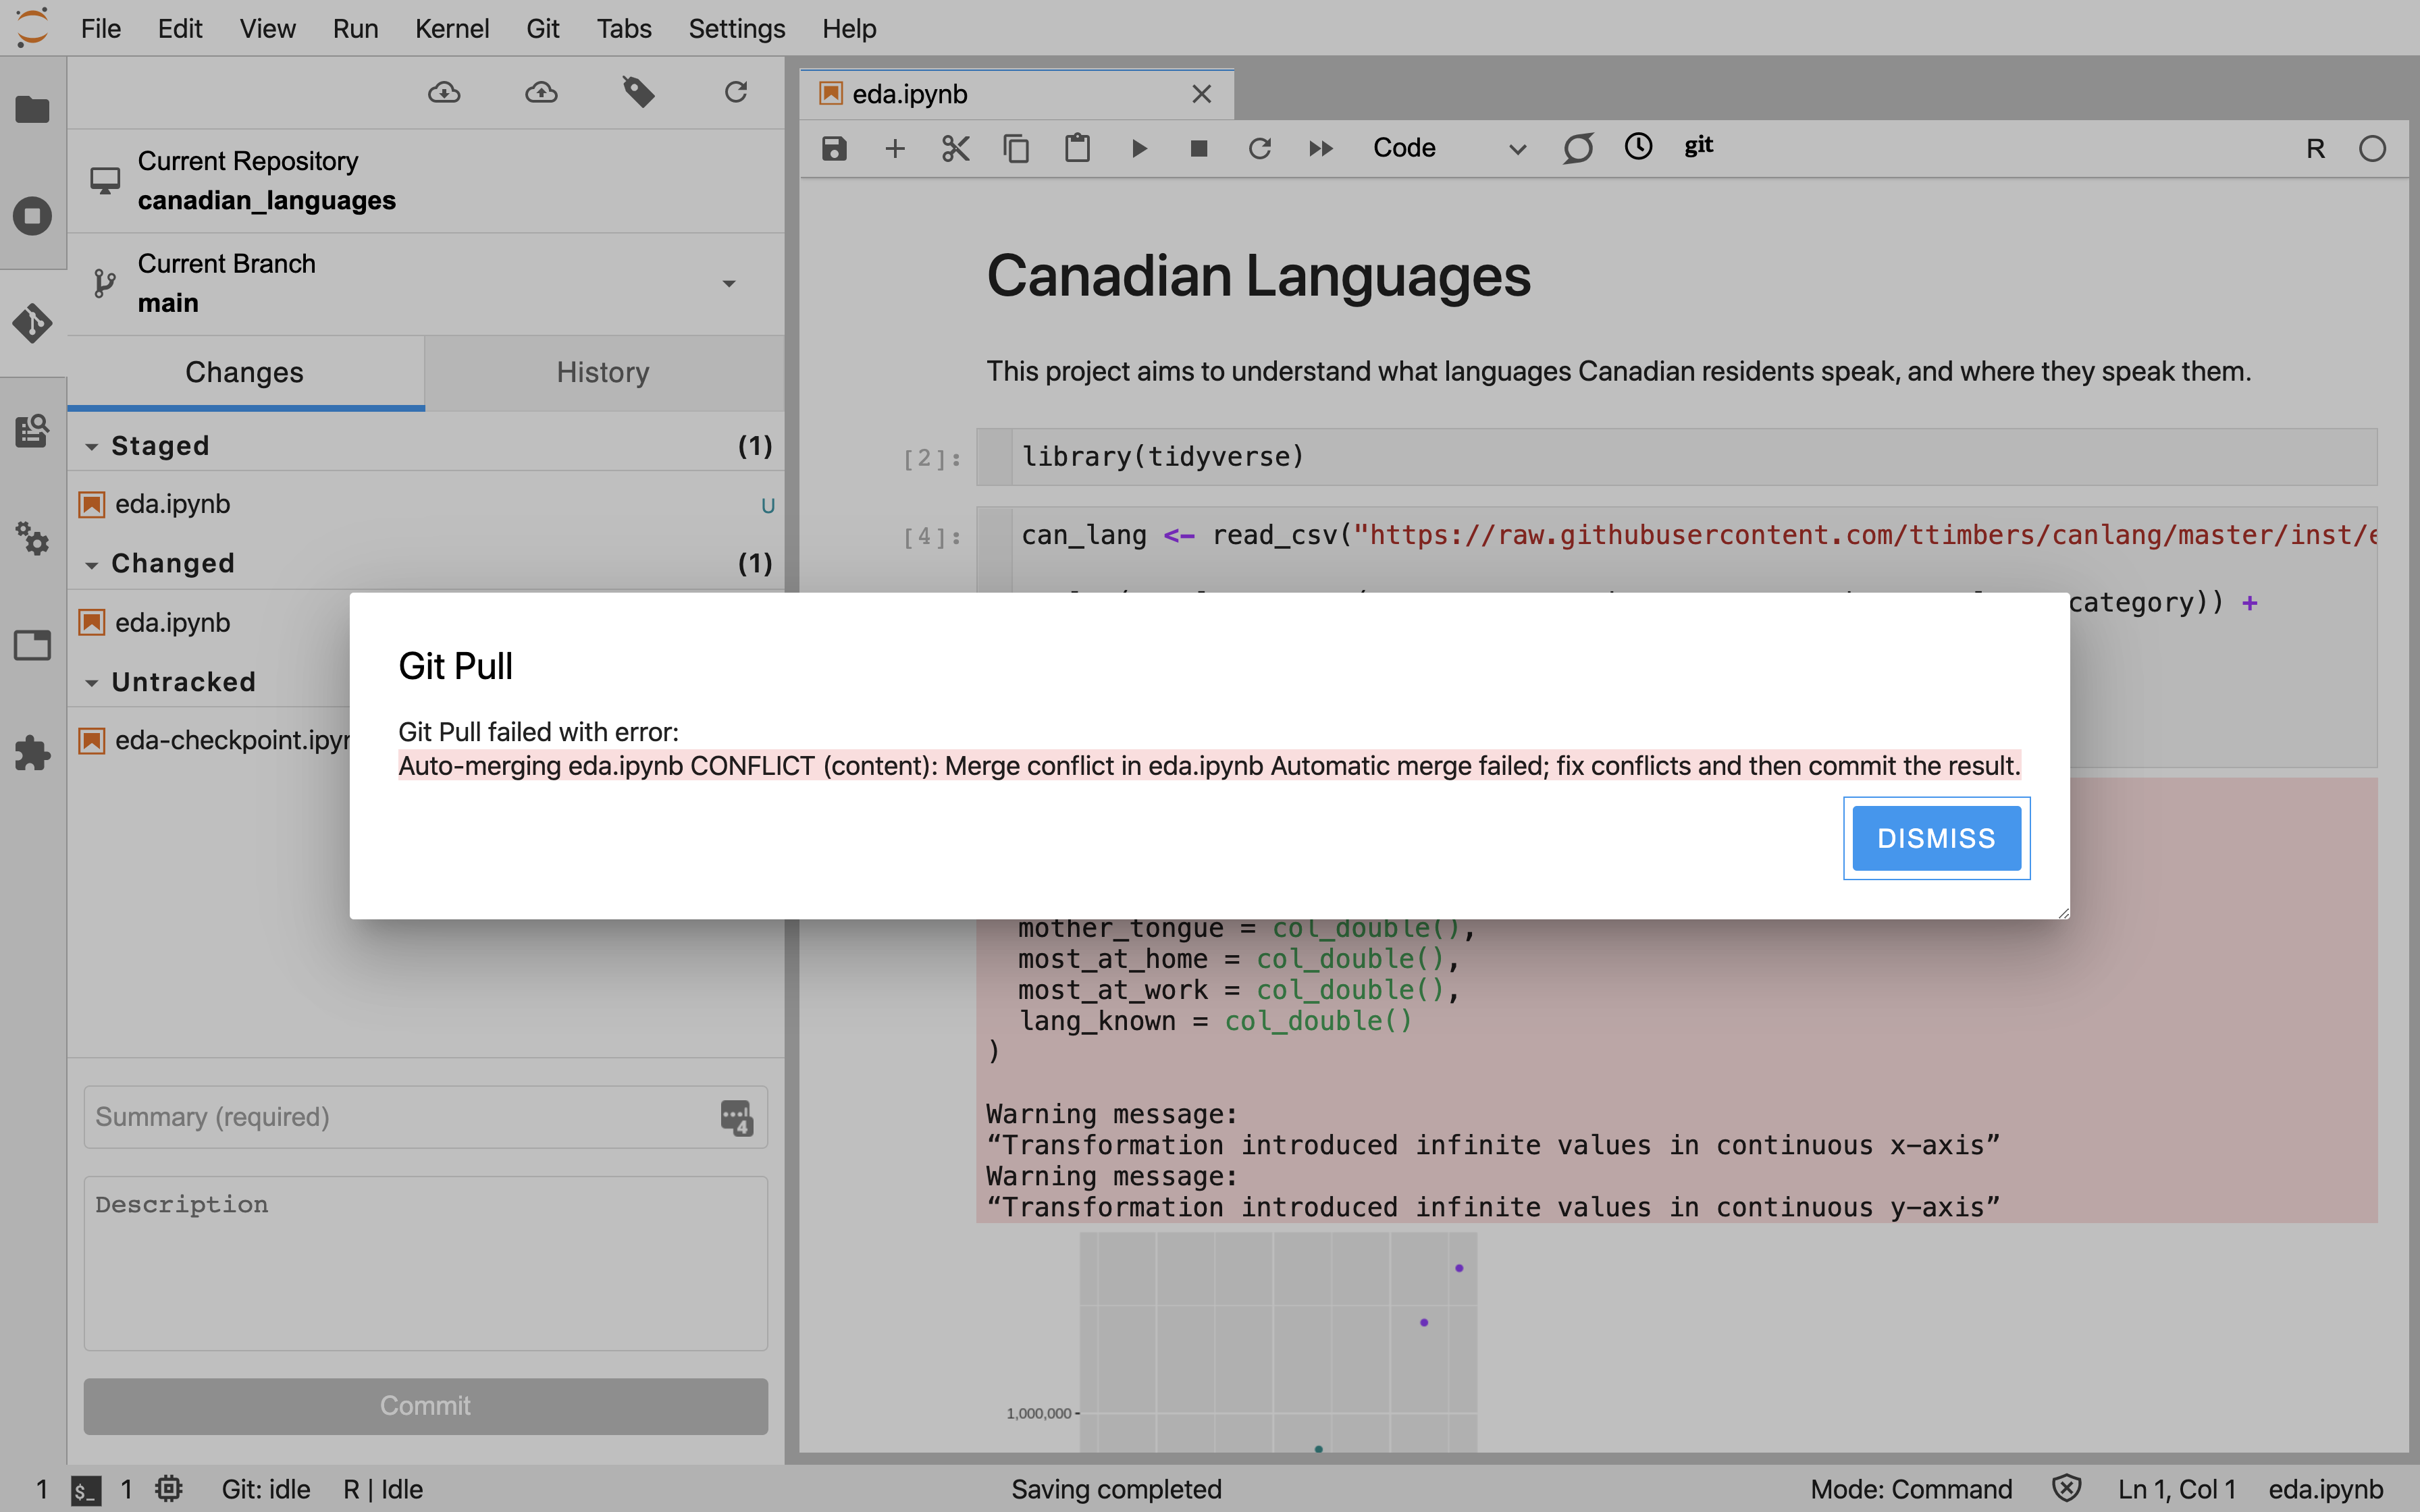
If, however, you and your collaborators made changes to the same line of the same file, Git will not be able to automatically merge the changes—it will not know whether to keep your version of the line(s), your collaborators version of the line(s), or some blend of the two. When this happens, Git will tell you that you have a merge conflict in certain file(s) (Figure 12.8.12).
Subsection 12.8.3 Handling merge conflicts
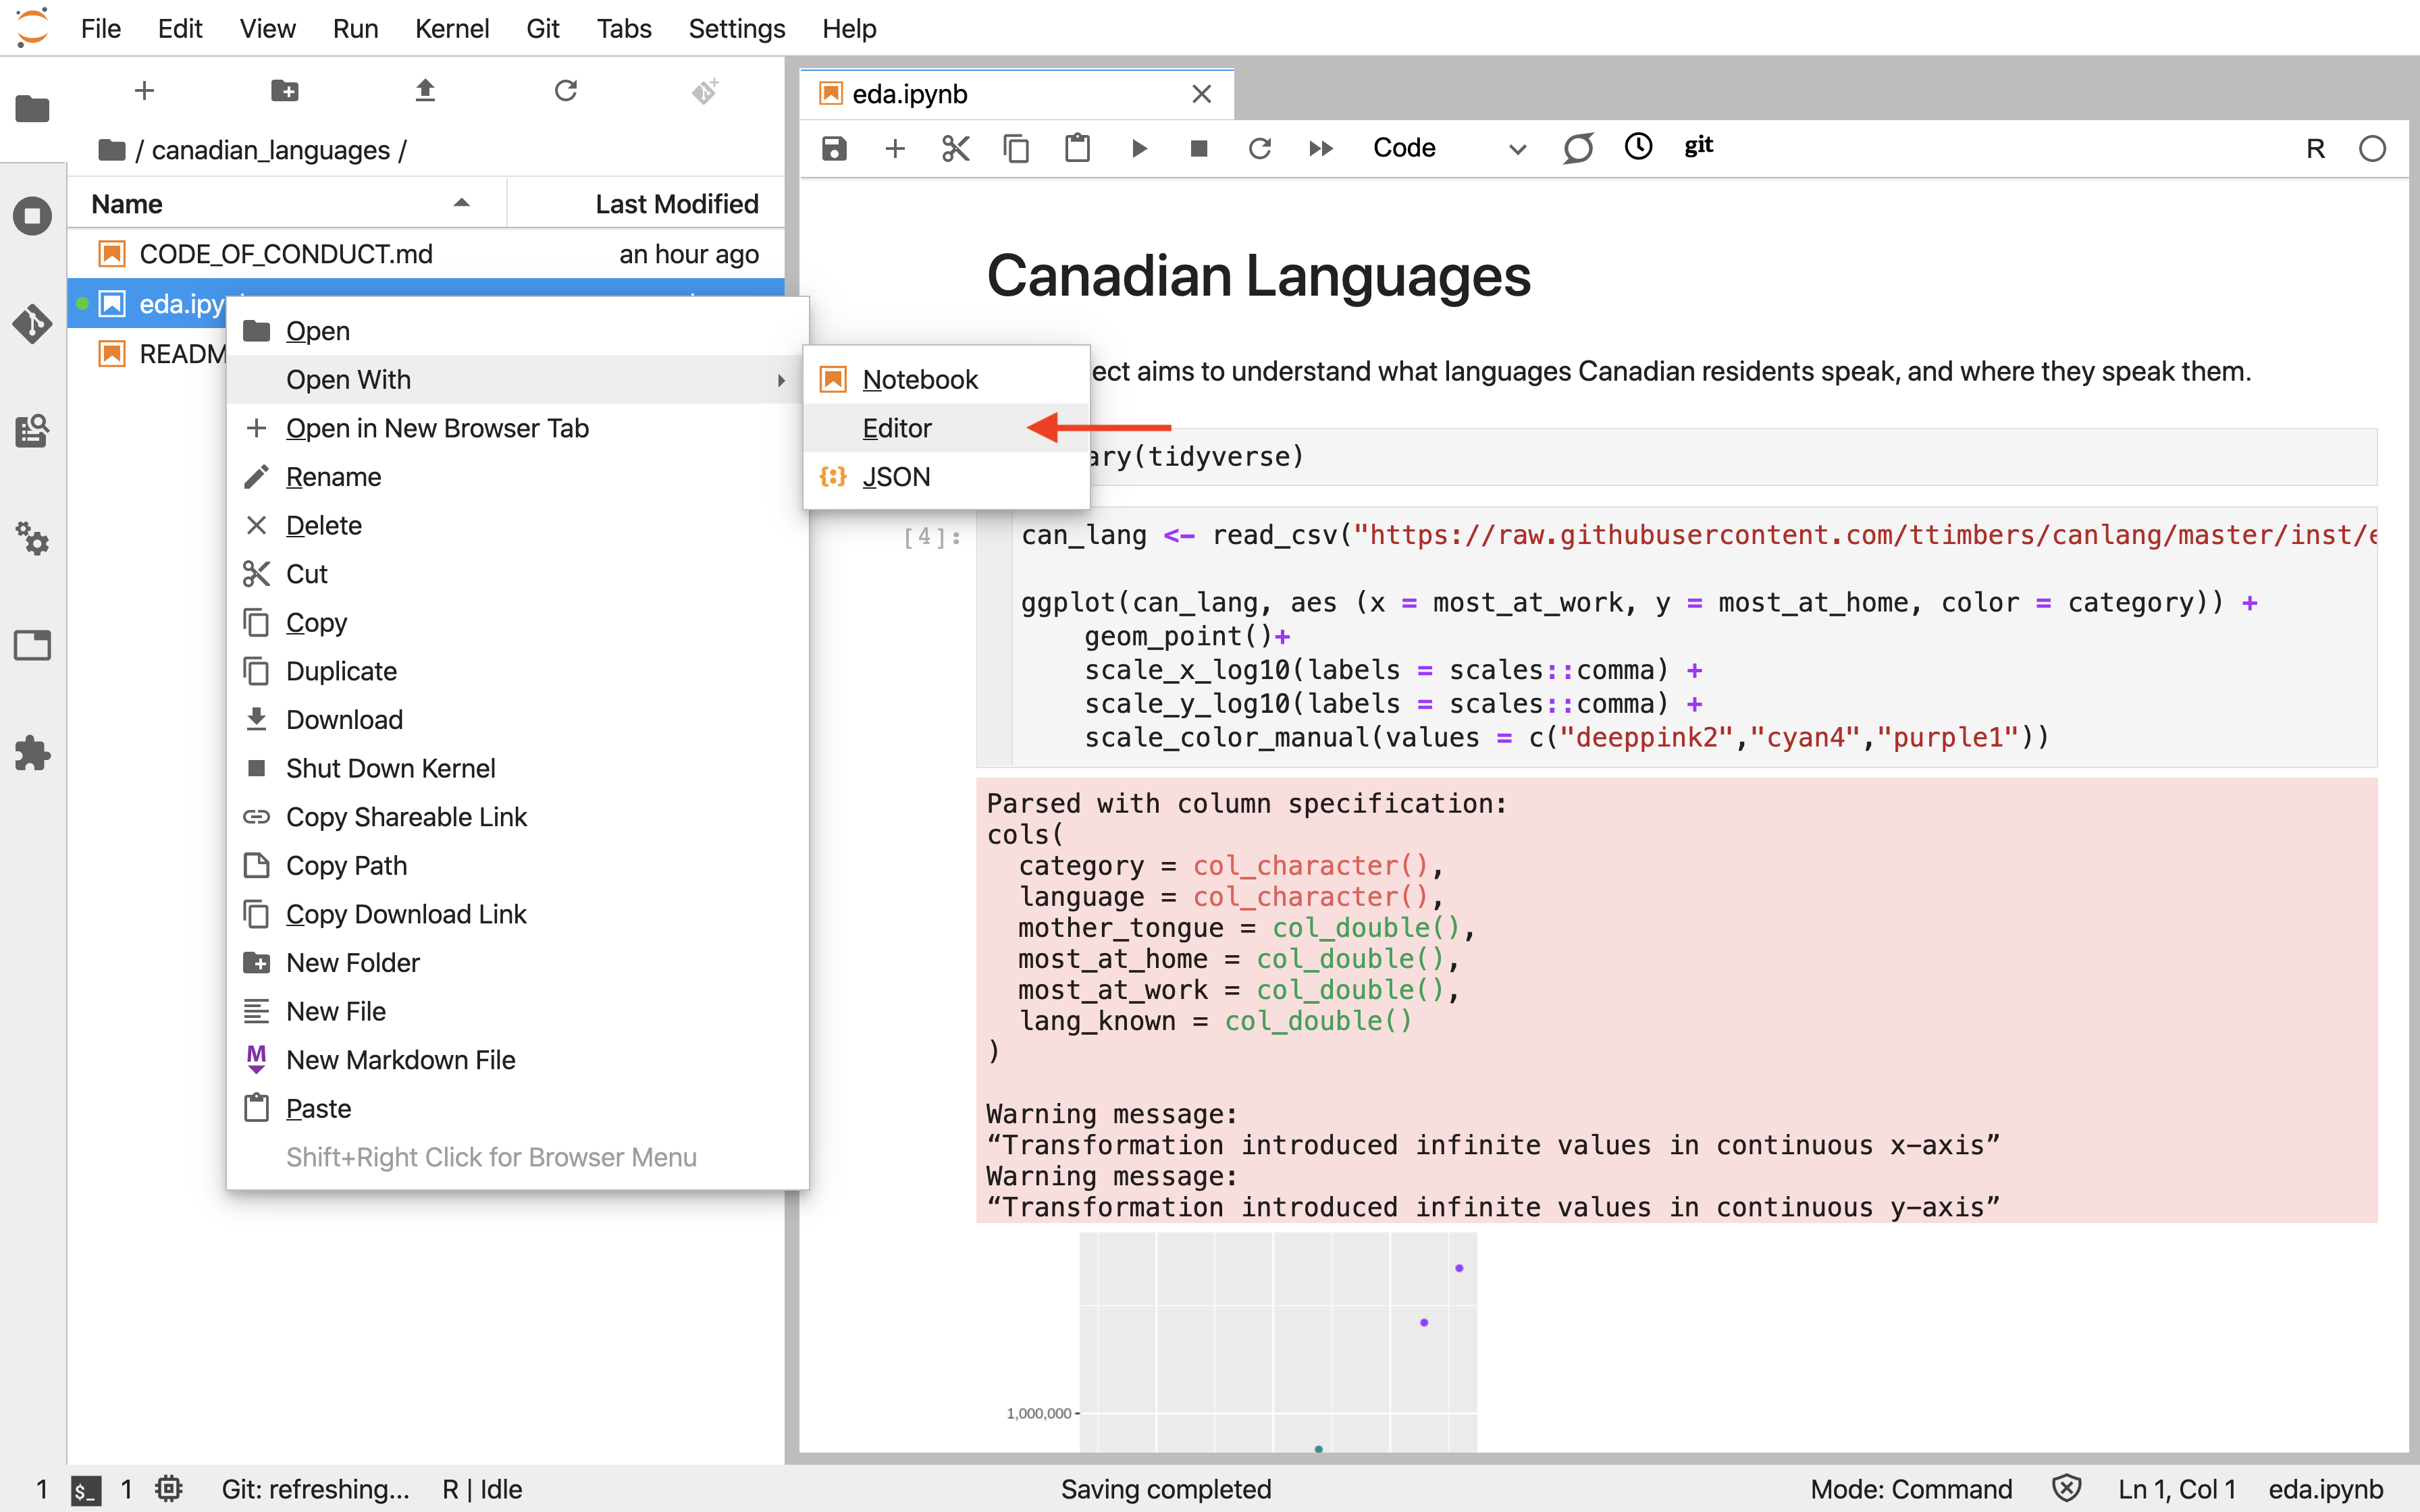
To fix the merge conflict, you need to open the offending file in a plain text editor and look for special marks that Git puts in the file to tell you where the merge conflict occurred (Figure 12.8.13).
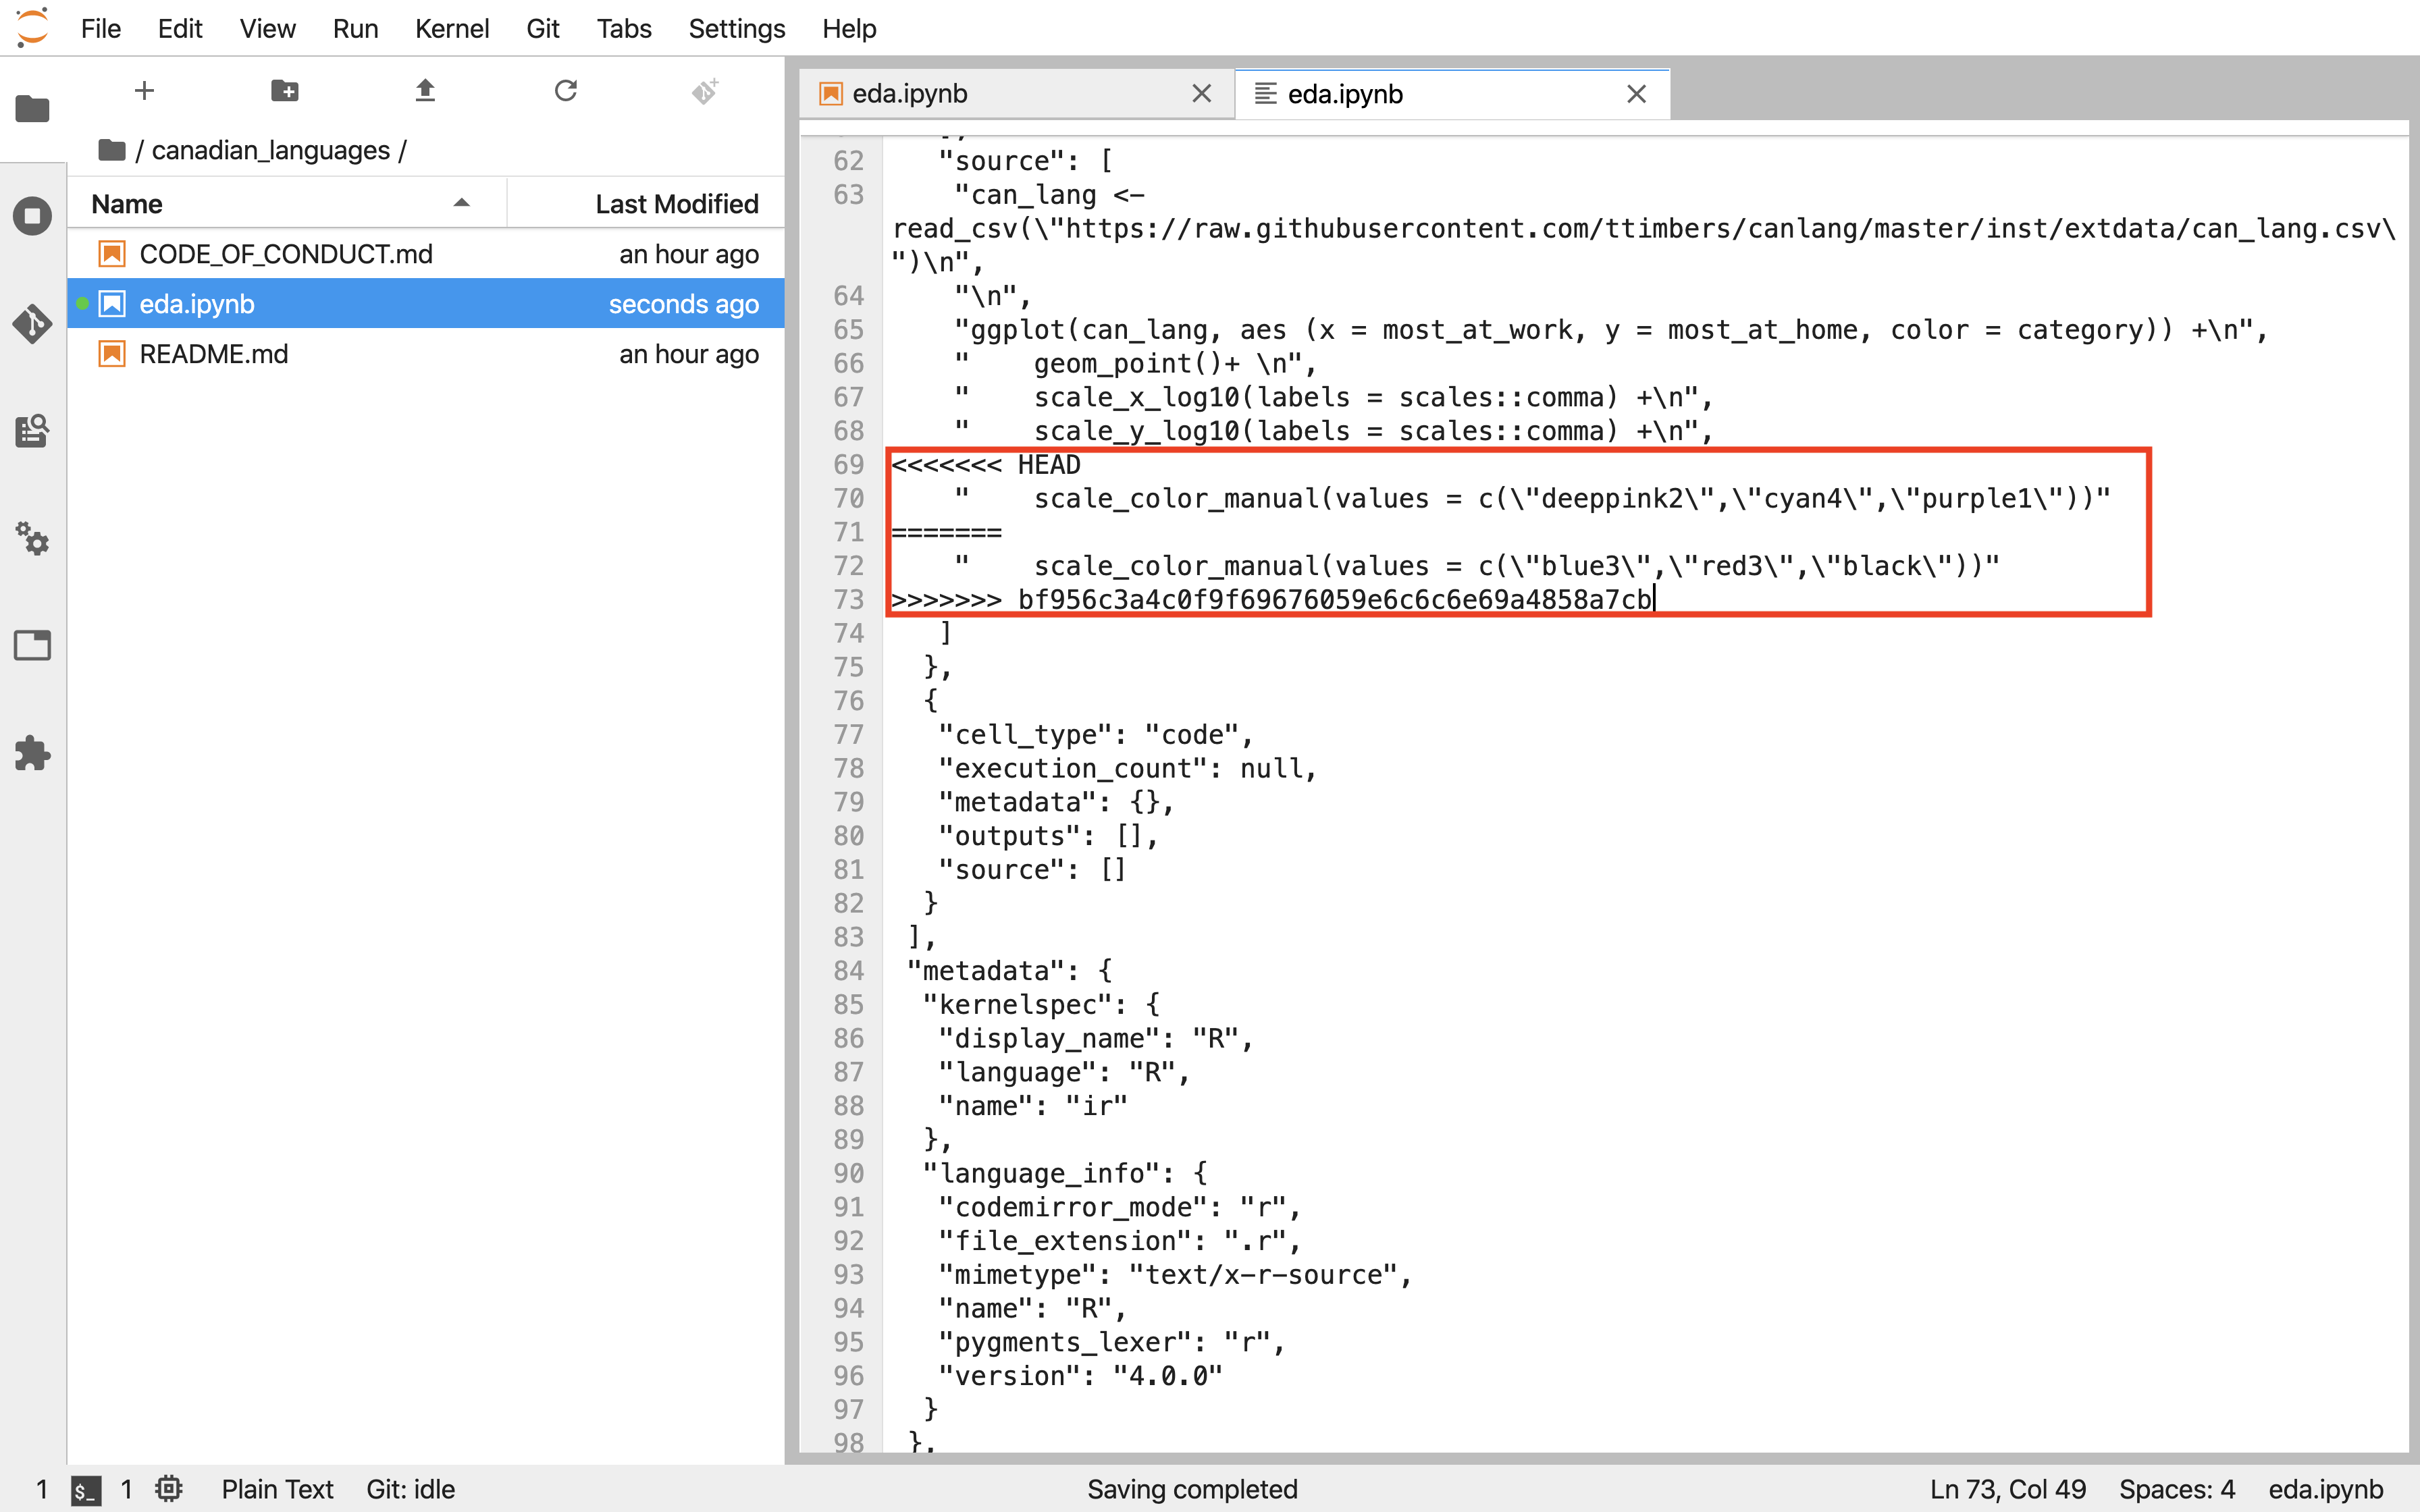
The beginning of the merge conflict is preceded by
<<<<<<< HEAD and the end of the merge conflict is marked by >>>>>>>. Between these markings, Git also inserts a separator (=======). The version of the change before the separator is your change, and the version that follows the separator was the change that existed on GitHub. In Figure 12.8.14, you can see that in your local repository there is a line of code that calls scale_color_manual with three color values (deeppink2, cyan4, and purple1). It looks like your collaborator made an edit to that line too, except with different colors (to blue3, red3, and black)!
Once you have decided which version of the change (or what combination!) to keep, you need to use the plain text editor to remove the special marks that Git added (Figure 12.8.15).
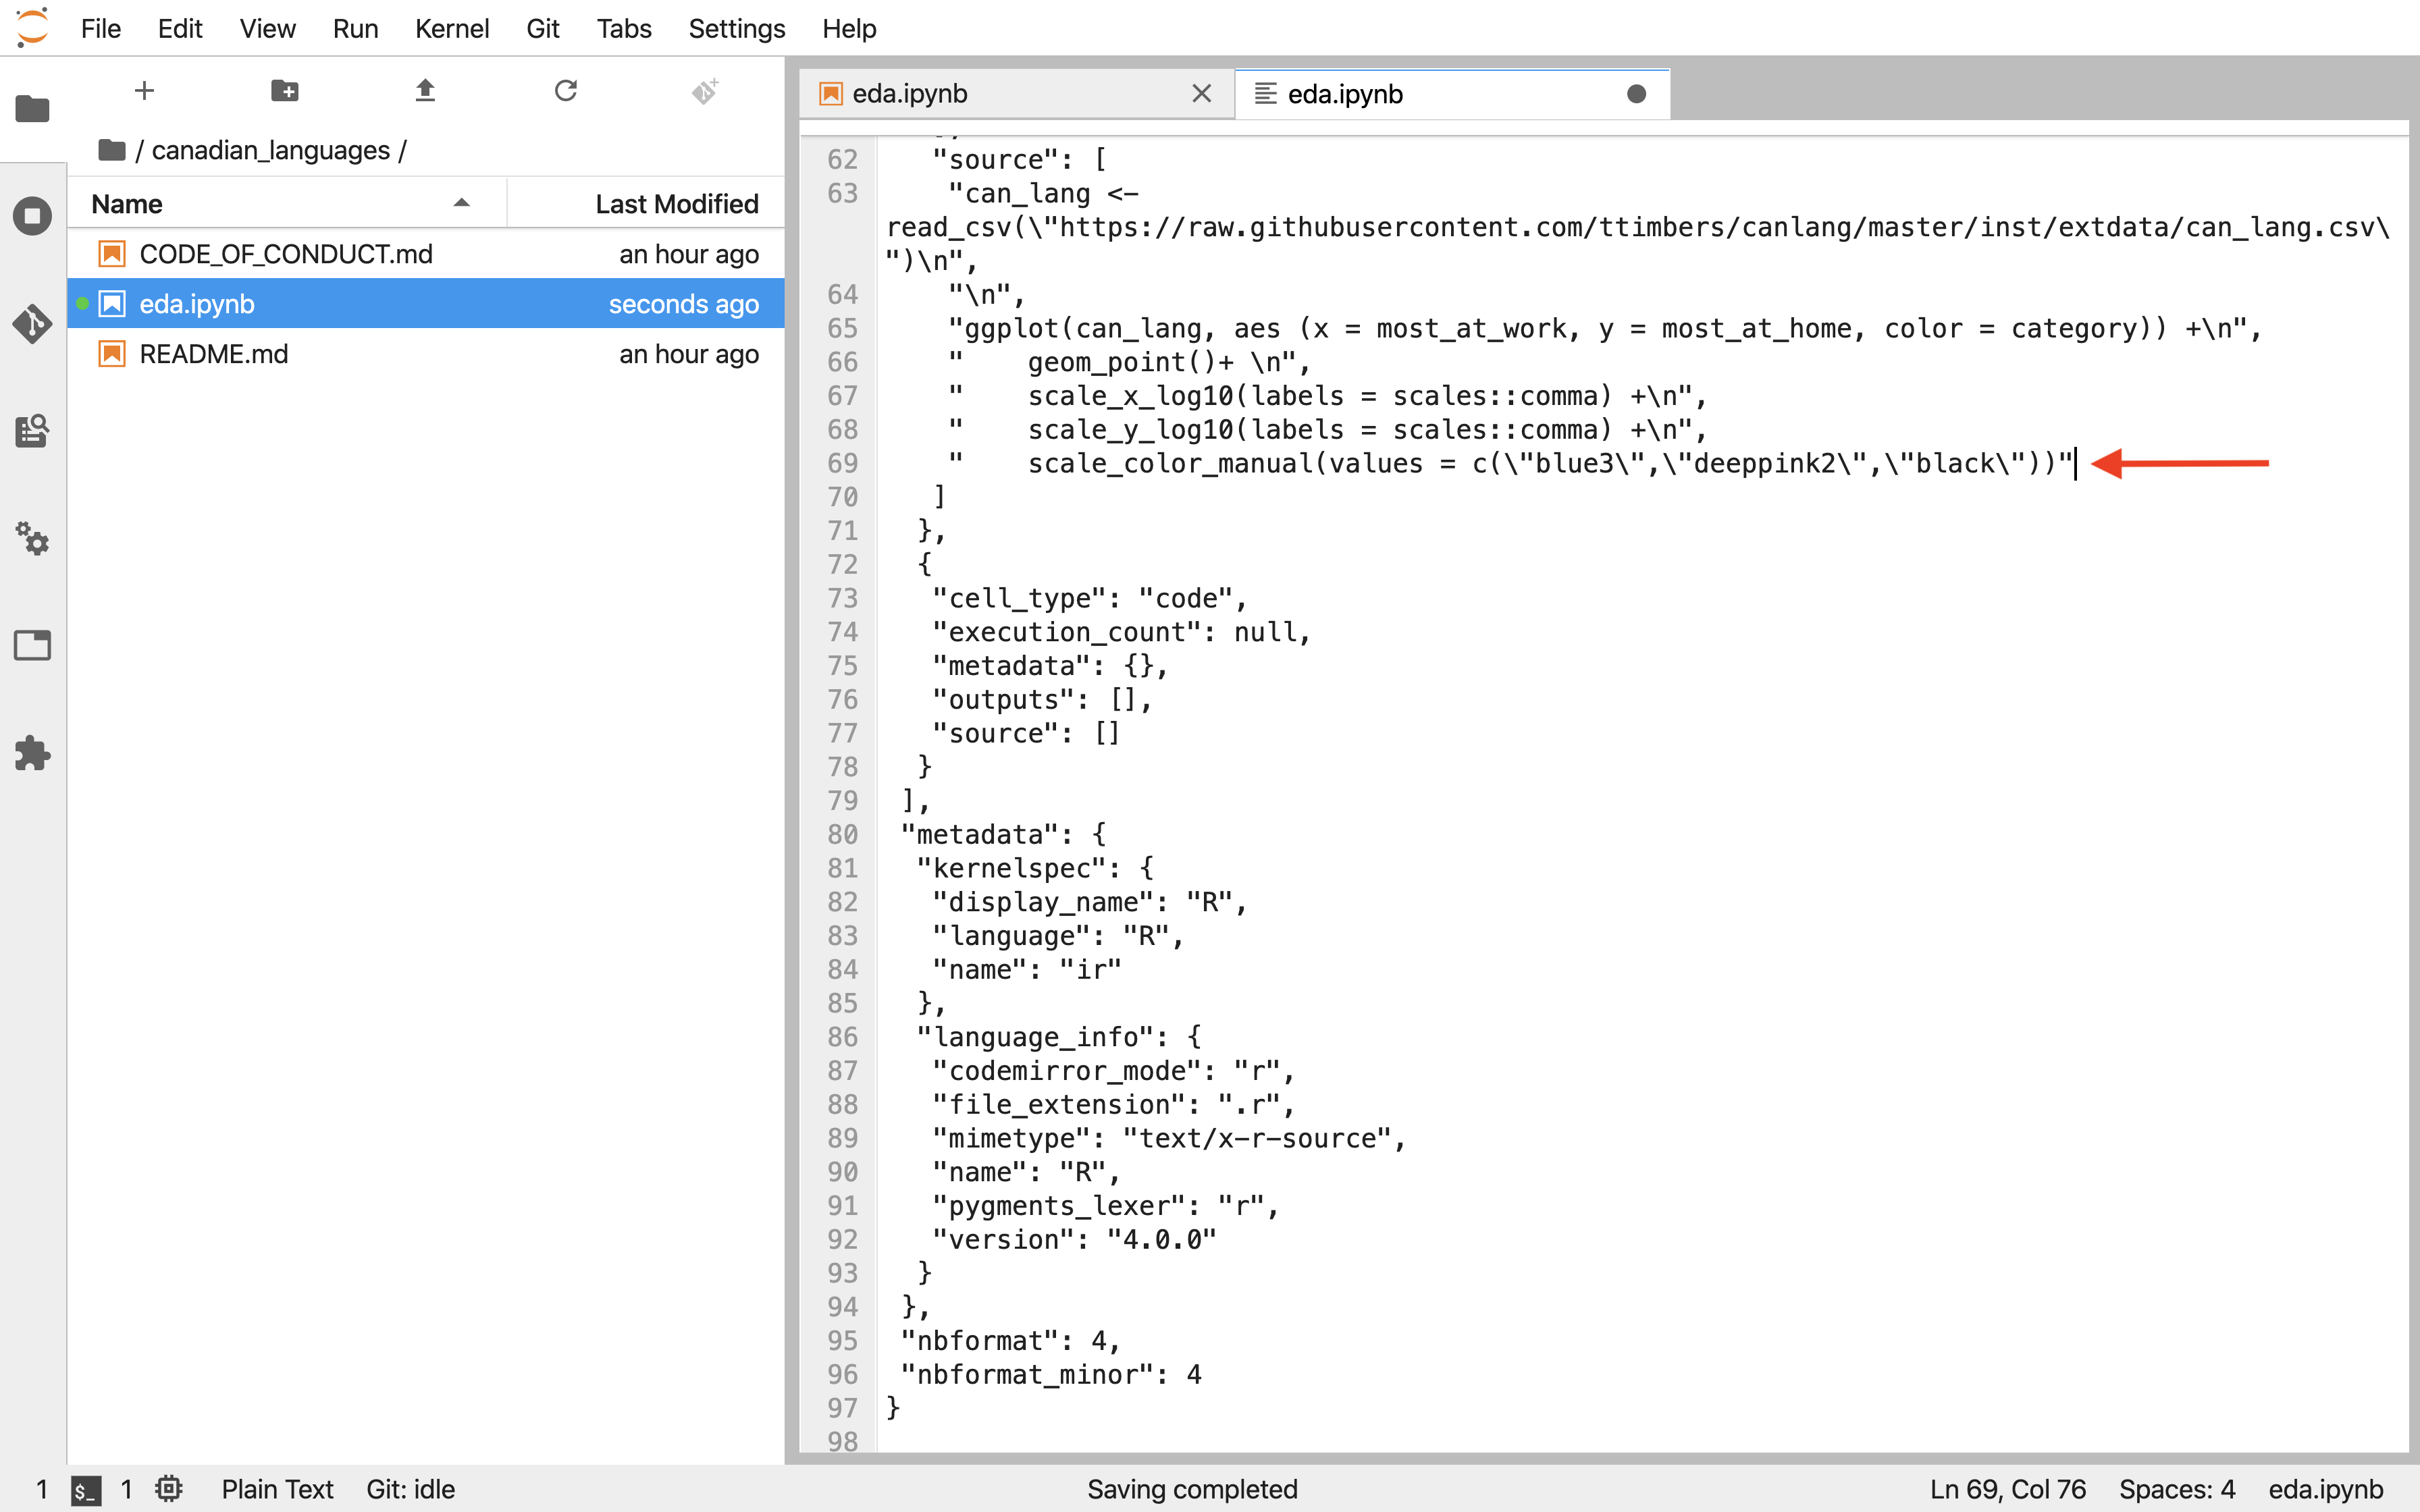
The file must be saved, added to the staging area, and then committed before you will be able to push your changes to GitHub.
Subsection 12.8.4 Communicating using GitHub issues
When working on a project in a team, you don’t just want a historical record of who changed what file and when in the project—you also want a record of decisions that were made, ideas that were floated, problems that were identified and addressed, and all other communication surrounding the project. Email and messaging apps are both very popular for general communication, but are not designed for project-specific communication: they both generally do not have facilities for organizing conversations by project subtopics, searching for conversations related to particular bugs or software versions, etc.
GitHub issues are an alternative written communication medium to email and messaging apps, and were designed specifically to facilitate project-specific communication. Issues are opened from the "Issues" tab on the project’s GitHub page, and they persist there even after the conversation is over and the issue is closed (in contrast to email, issues are not usually deleted). One issue thread is usually created per topic, and they are easily searchable using GitHub’s search tools. All issues are accessible to all project collaborators, so no one is left out of the conversation. Finally, issues can be set up so that team members get email notifications when a new issue is created or a new post is made in an issue thread. Replying to issues from email is also possible. Given all of these advantages, we highly recommend the use of issues for project-related communication.
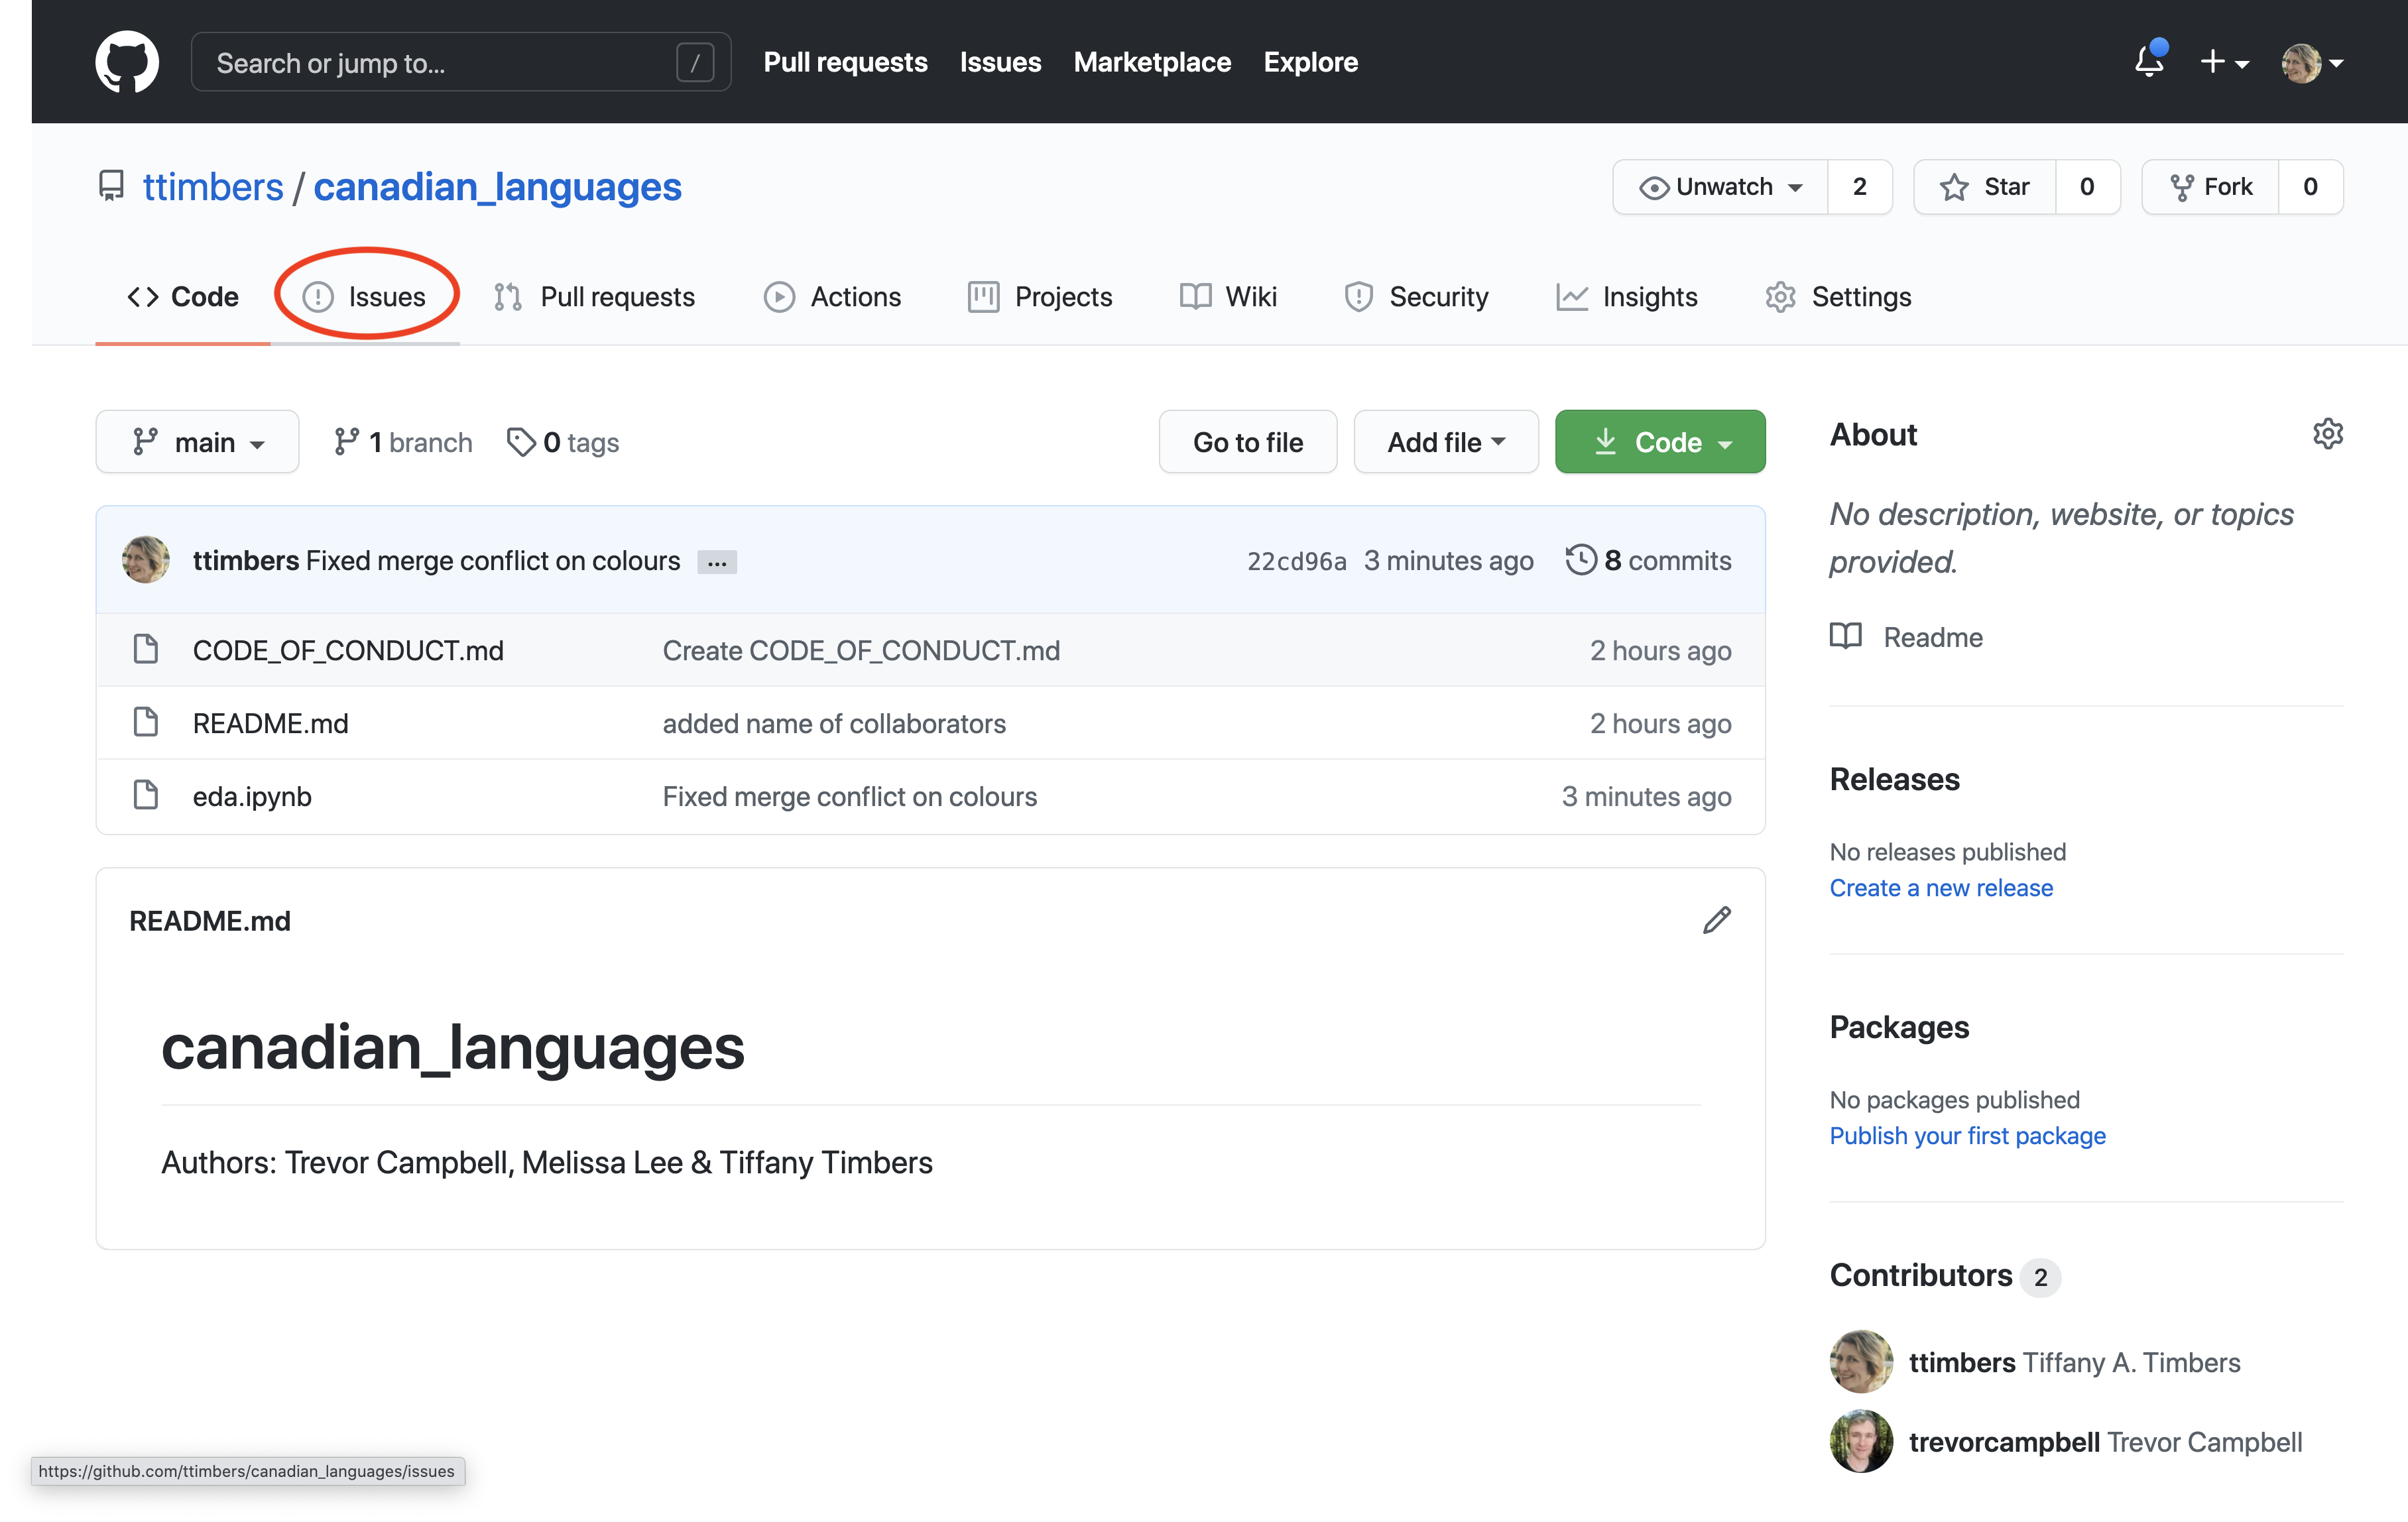
To open a GitHub issue, first click on the "Issues" tab (Figure 12.8.16).
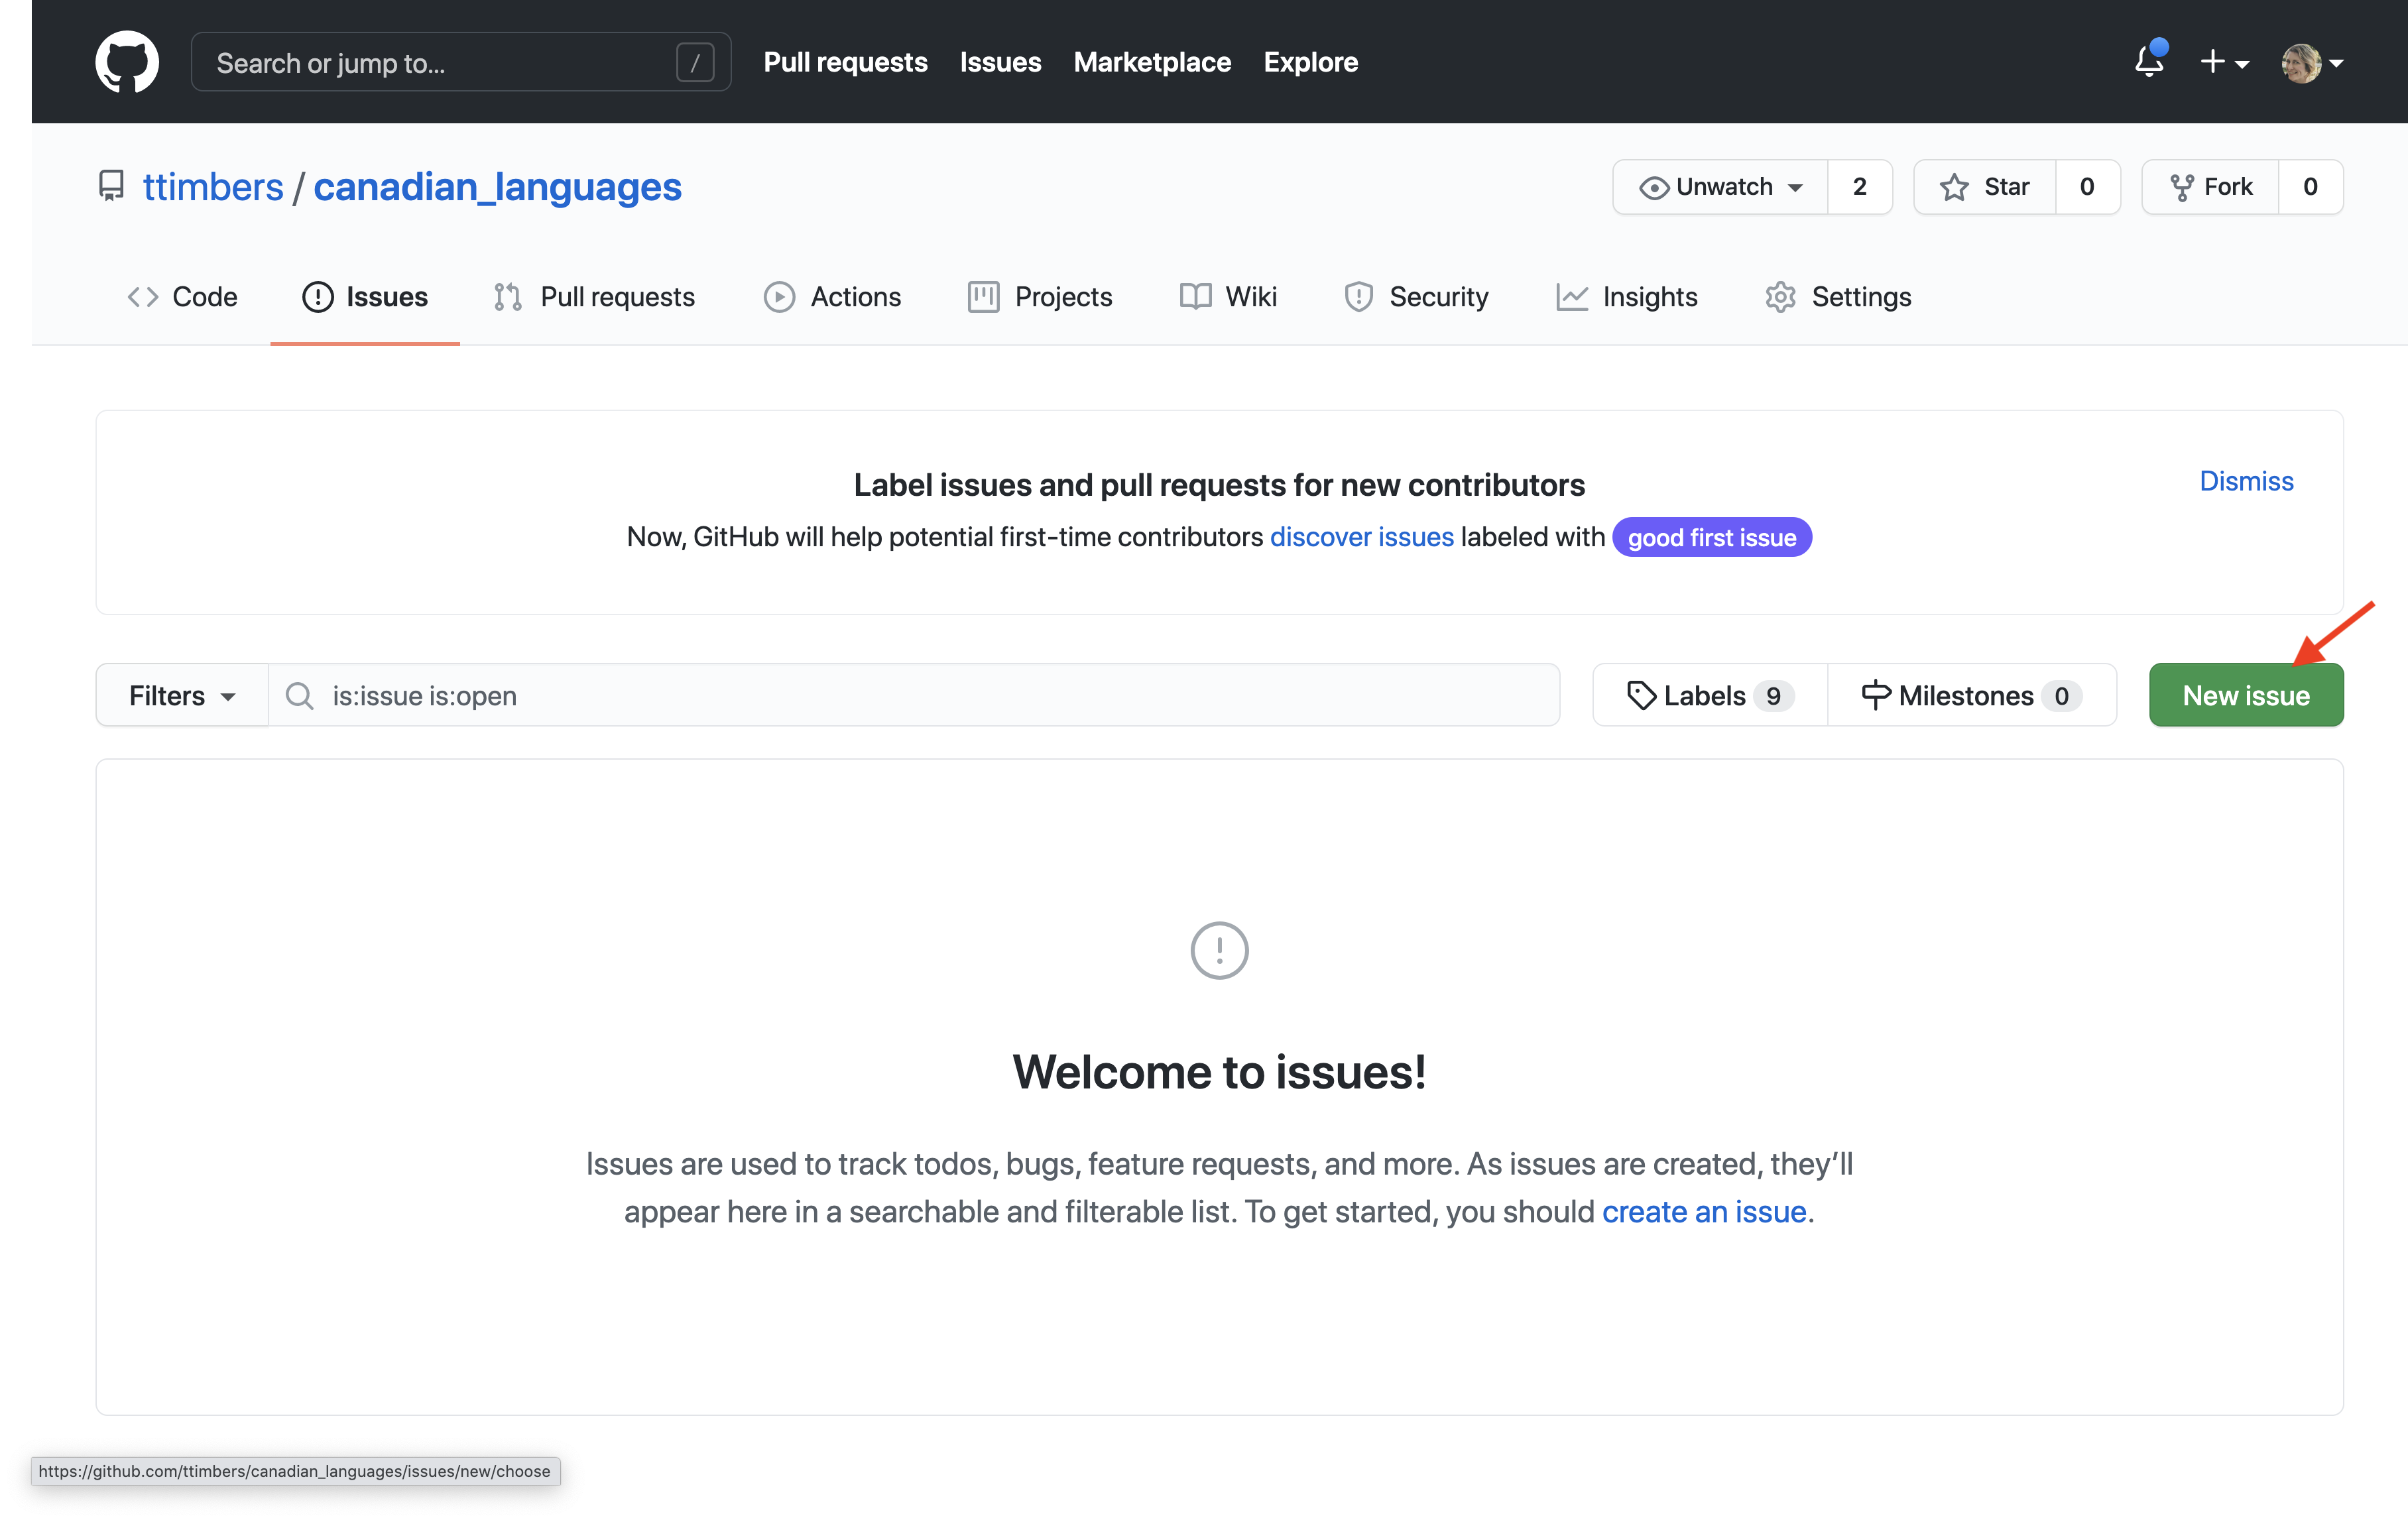
Next click the "New issue" button (Figure 12.8.17).
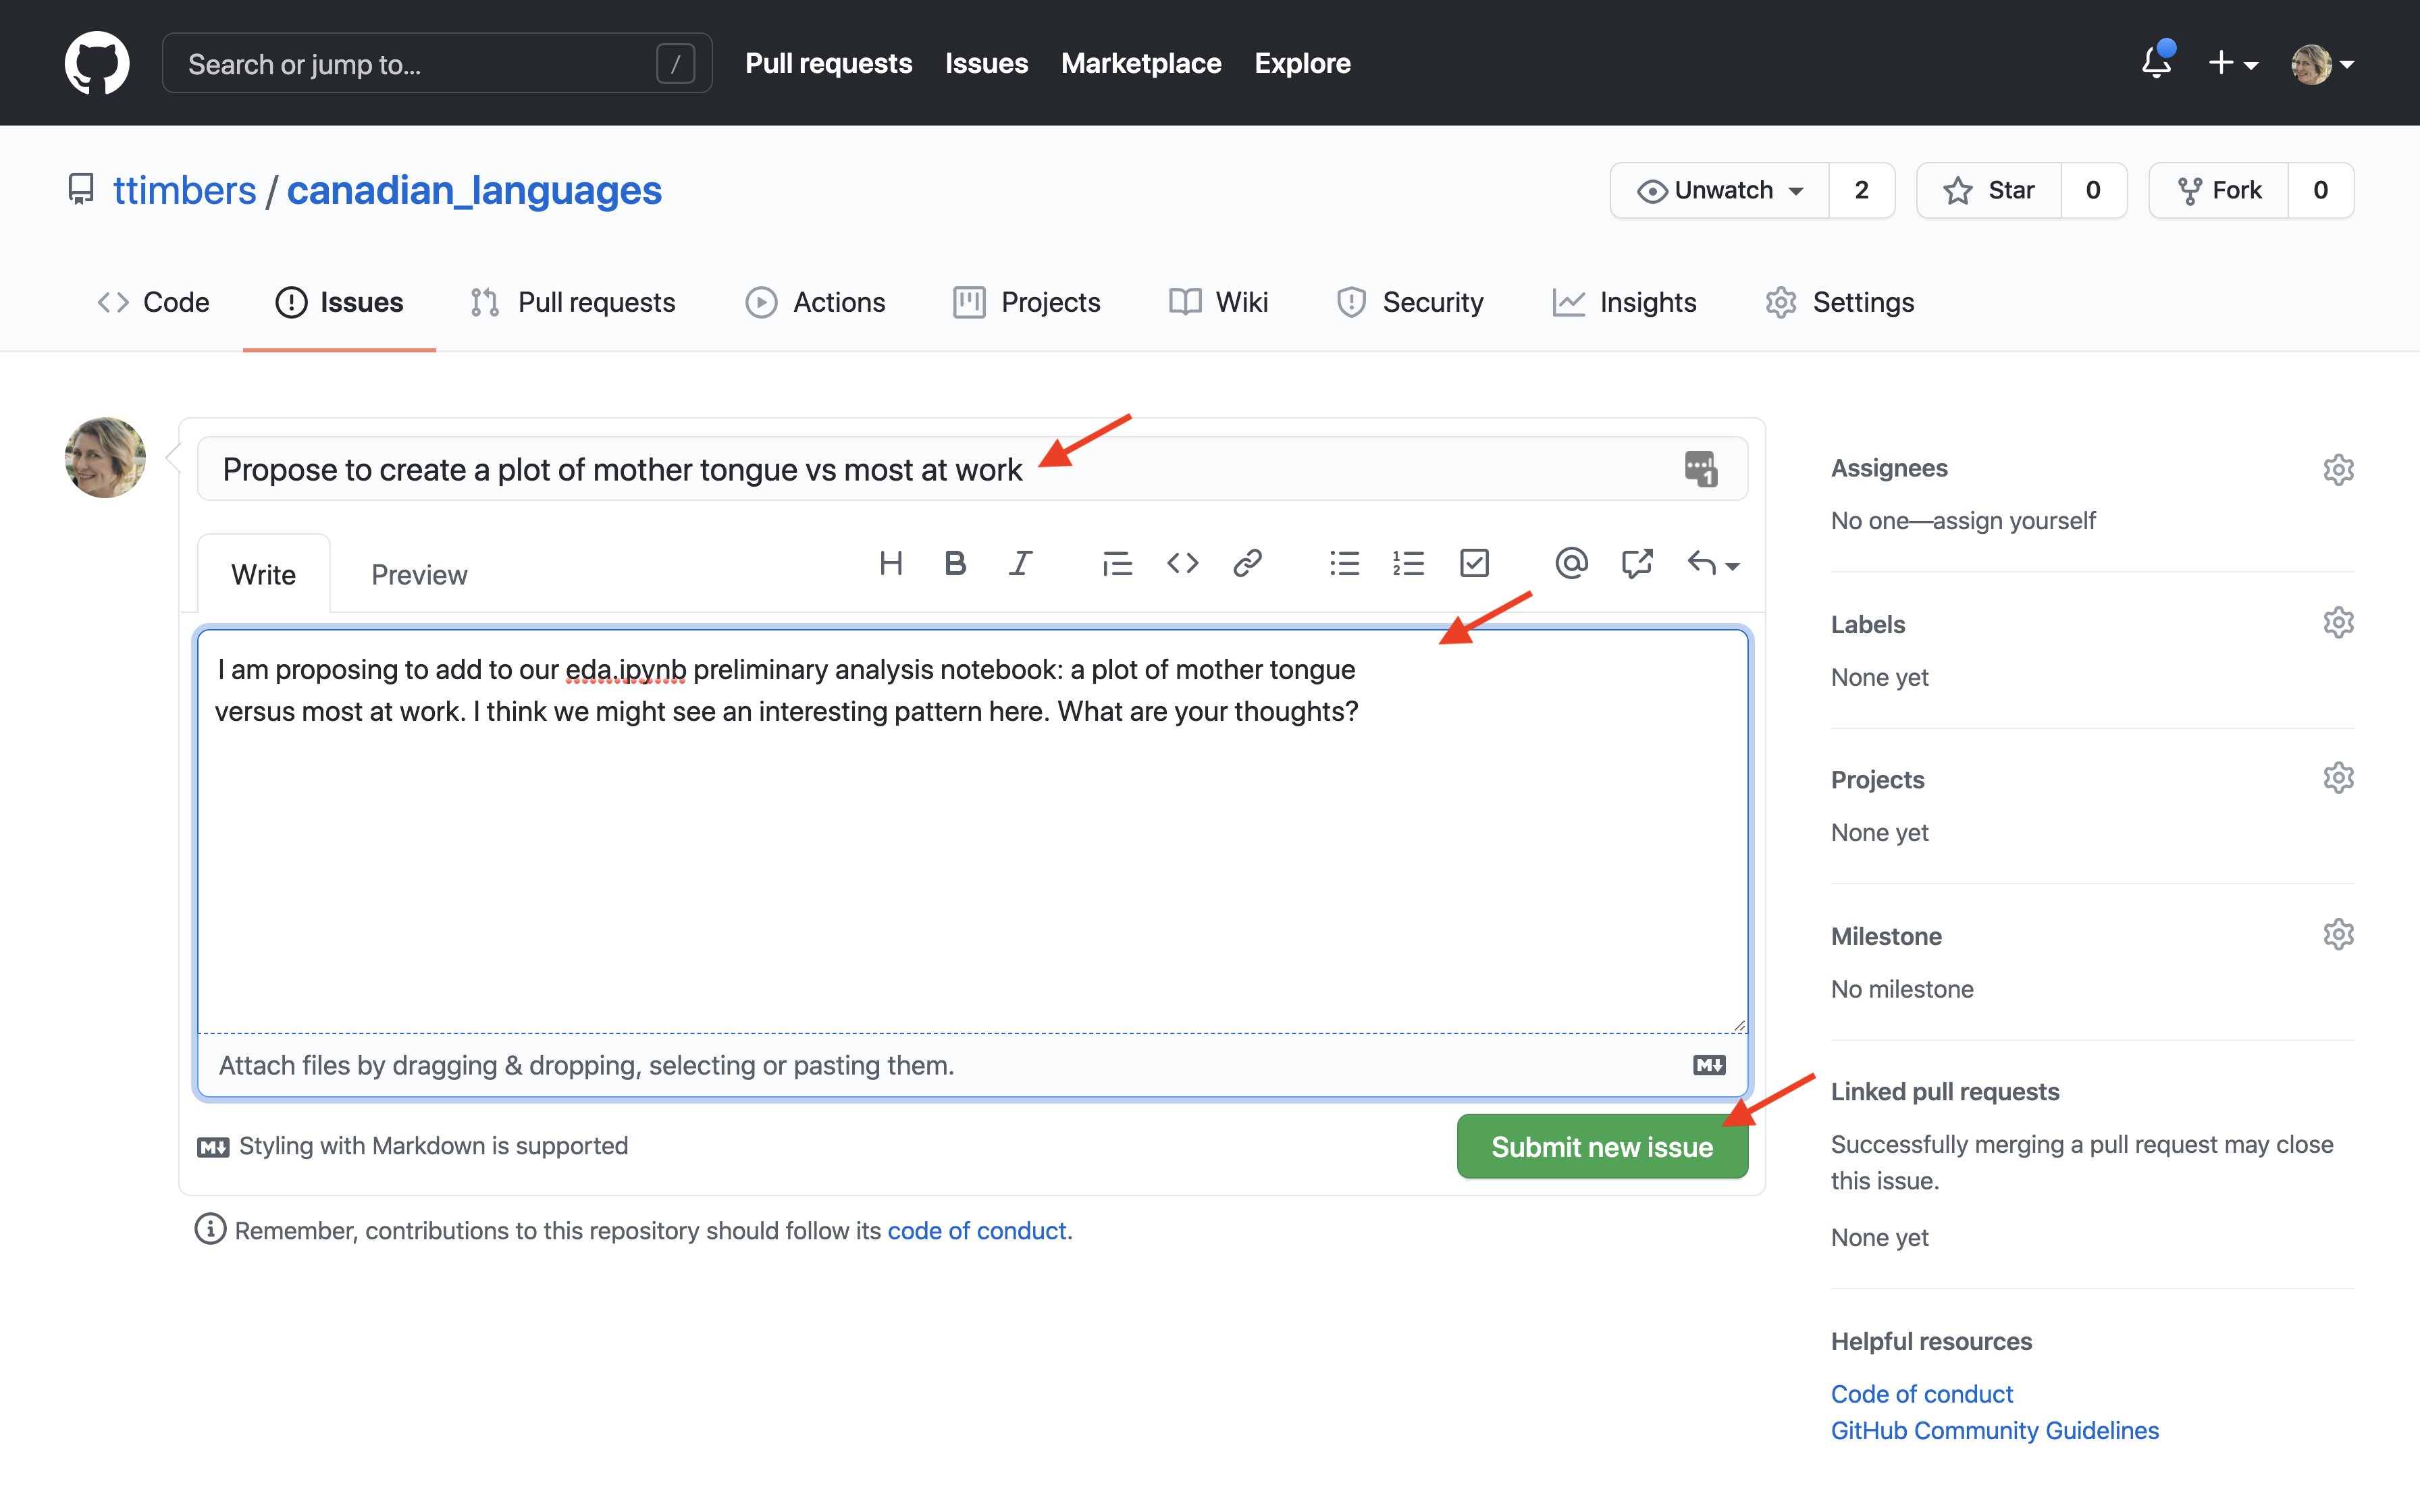
Add an issue title (which acts like an email subject line), and then put the body of the message in the larger text box. Finally, click "Submit new issue" to post the issue to share with others (Figure 12.8.18).
You can reply to an issue that someone opened by adding your written response to the large text box and clicking comment (Figure 12.8.19).
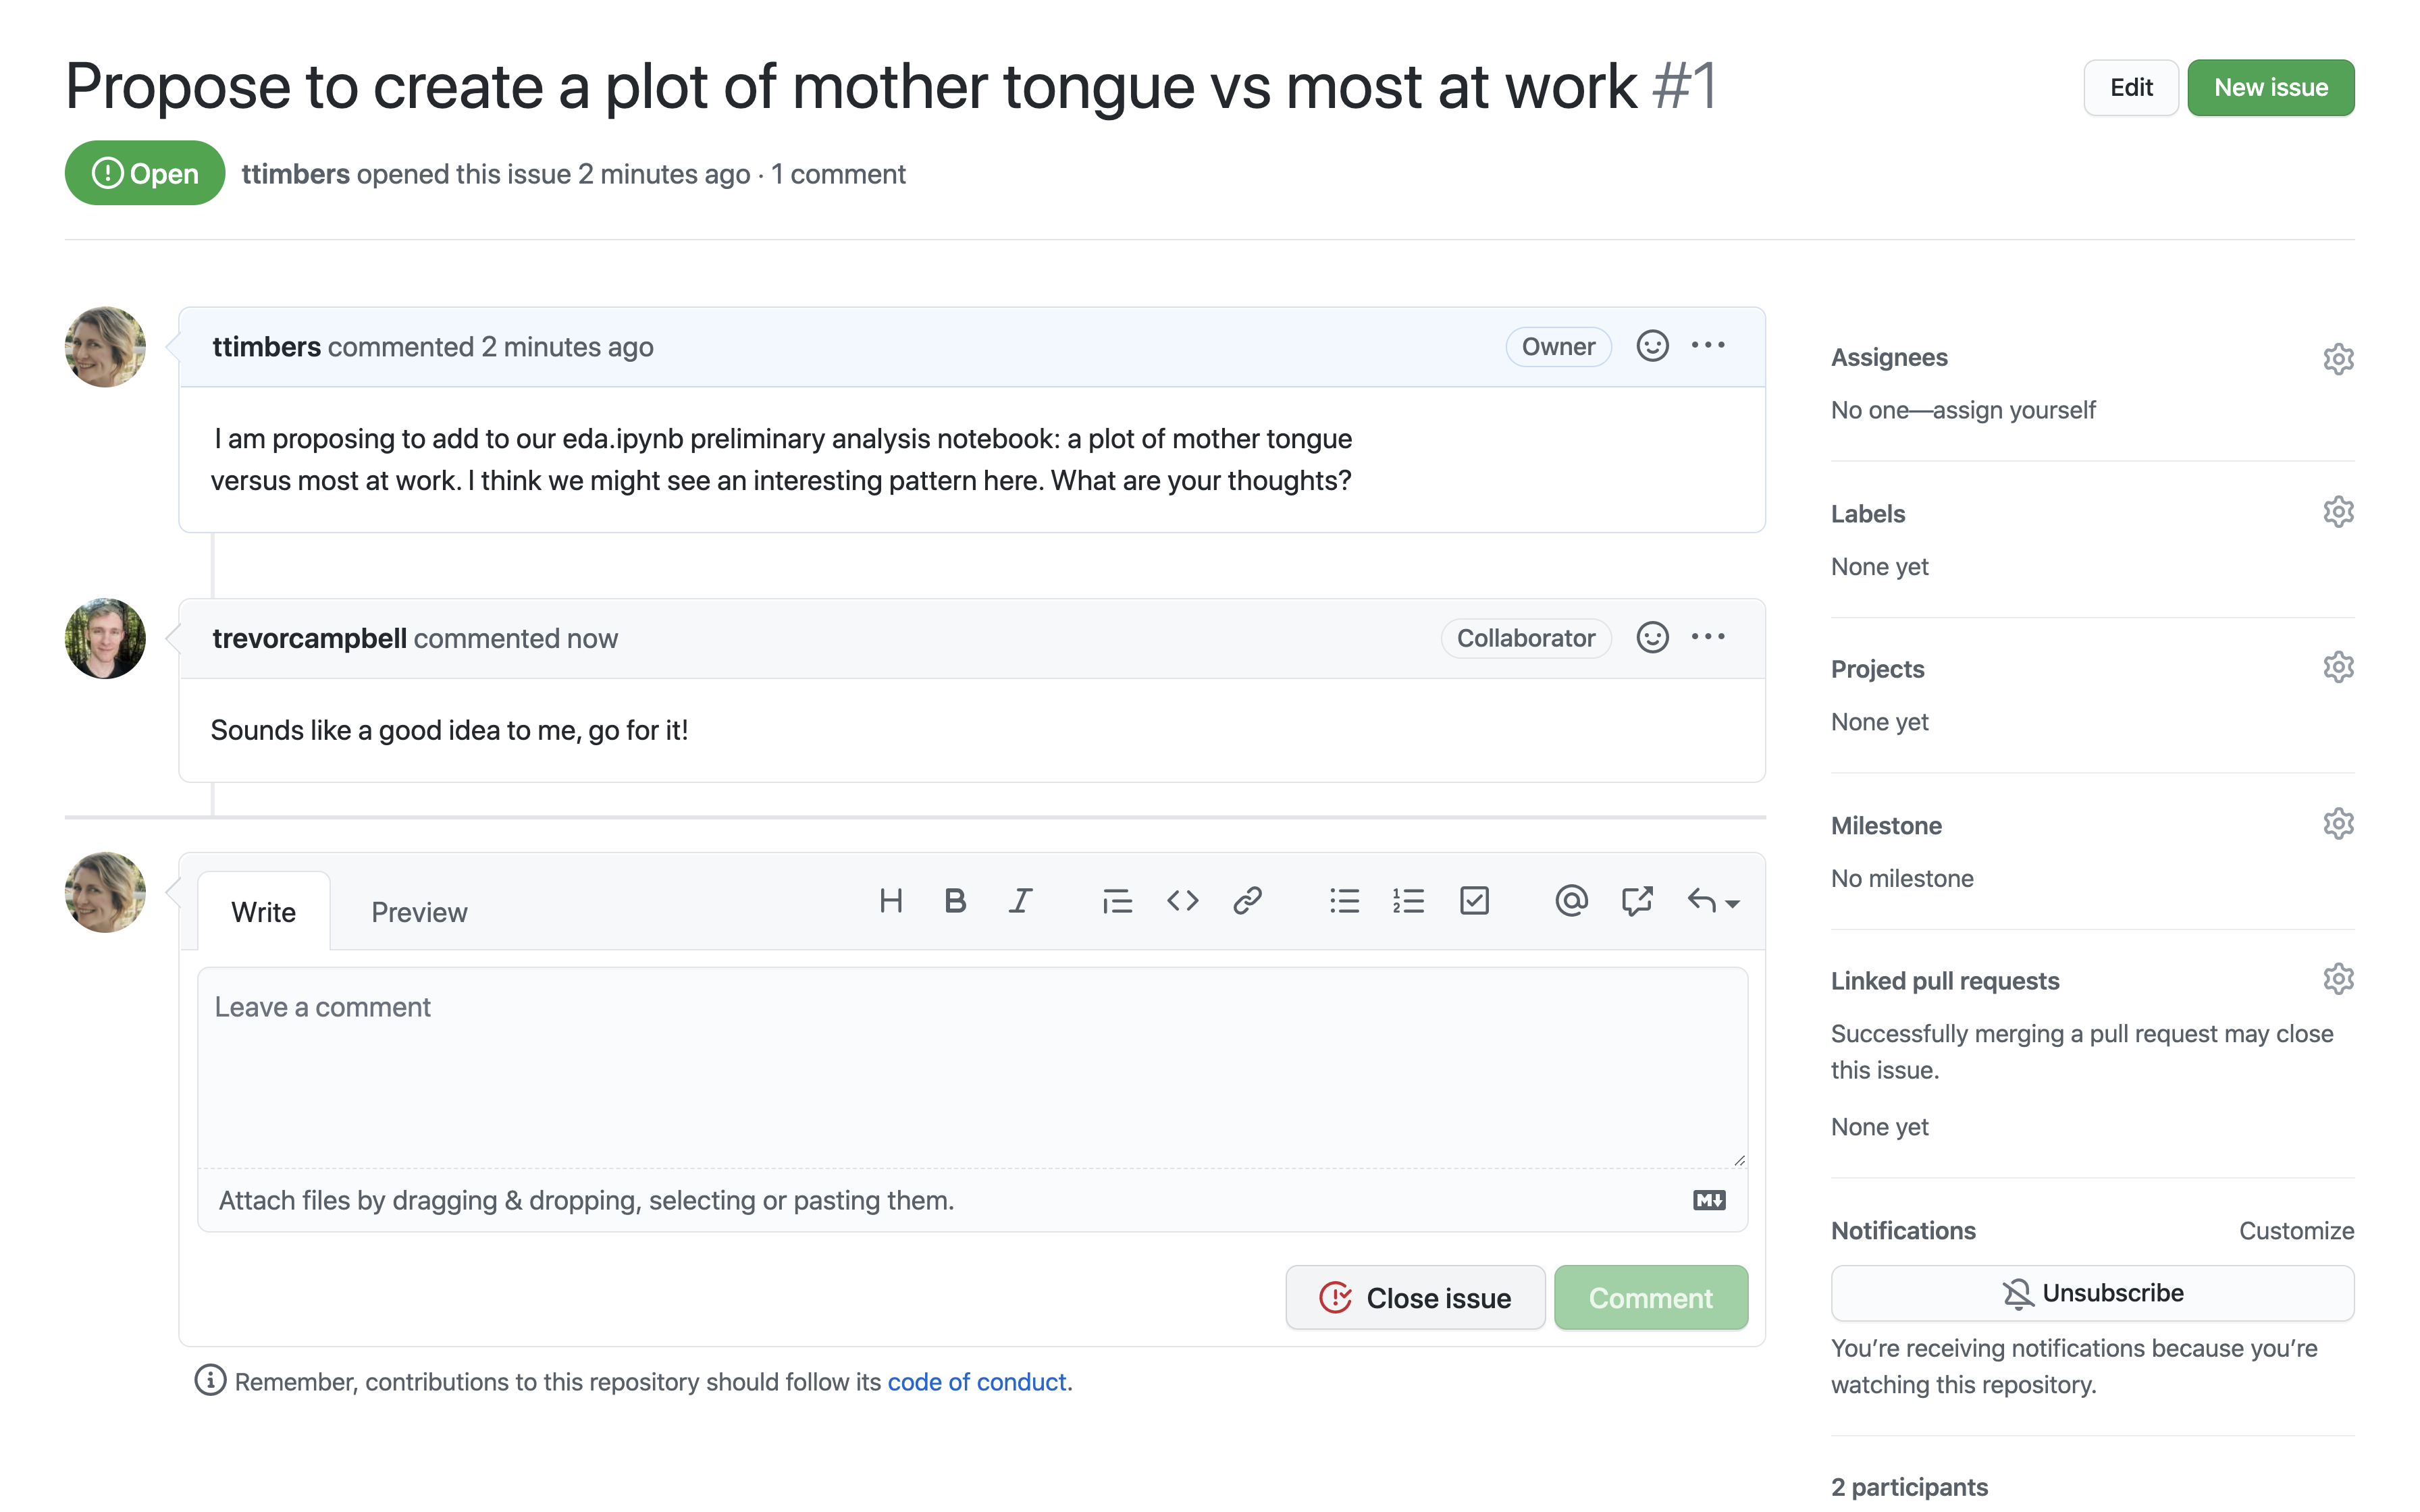
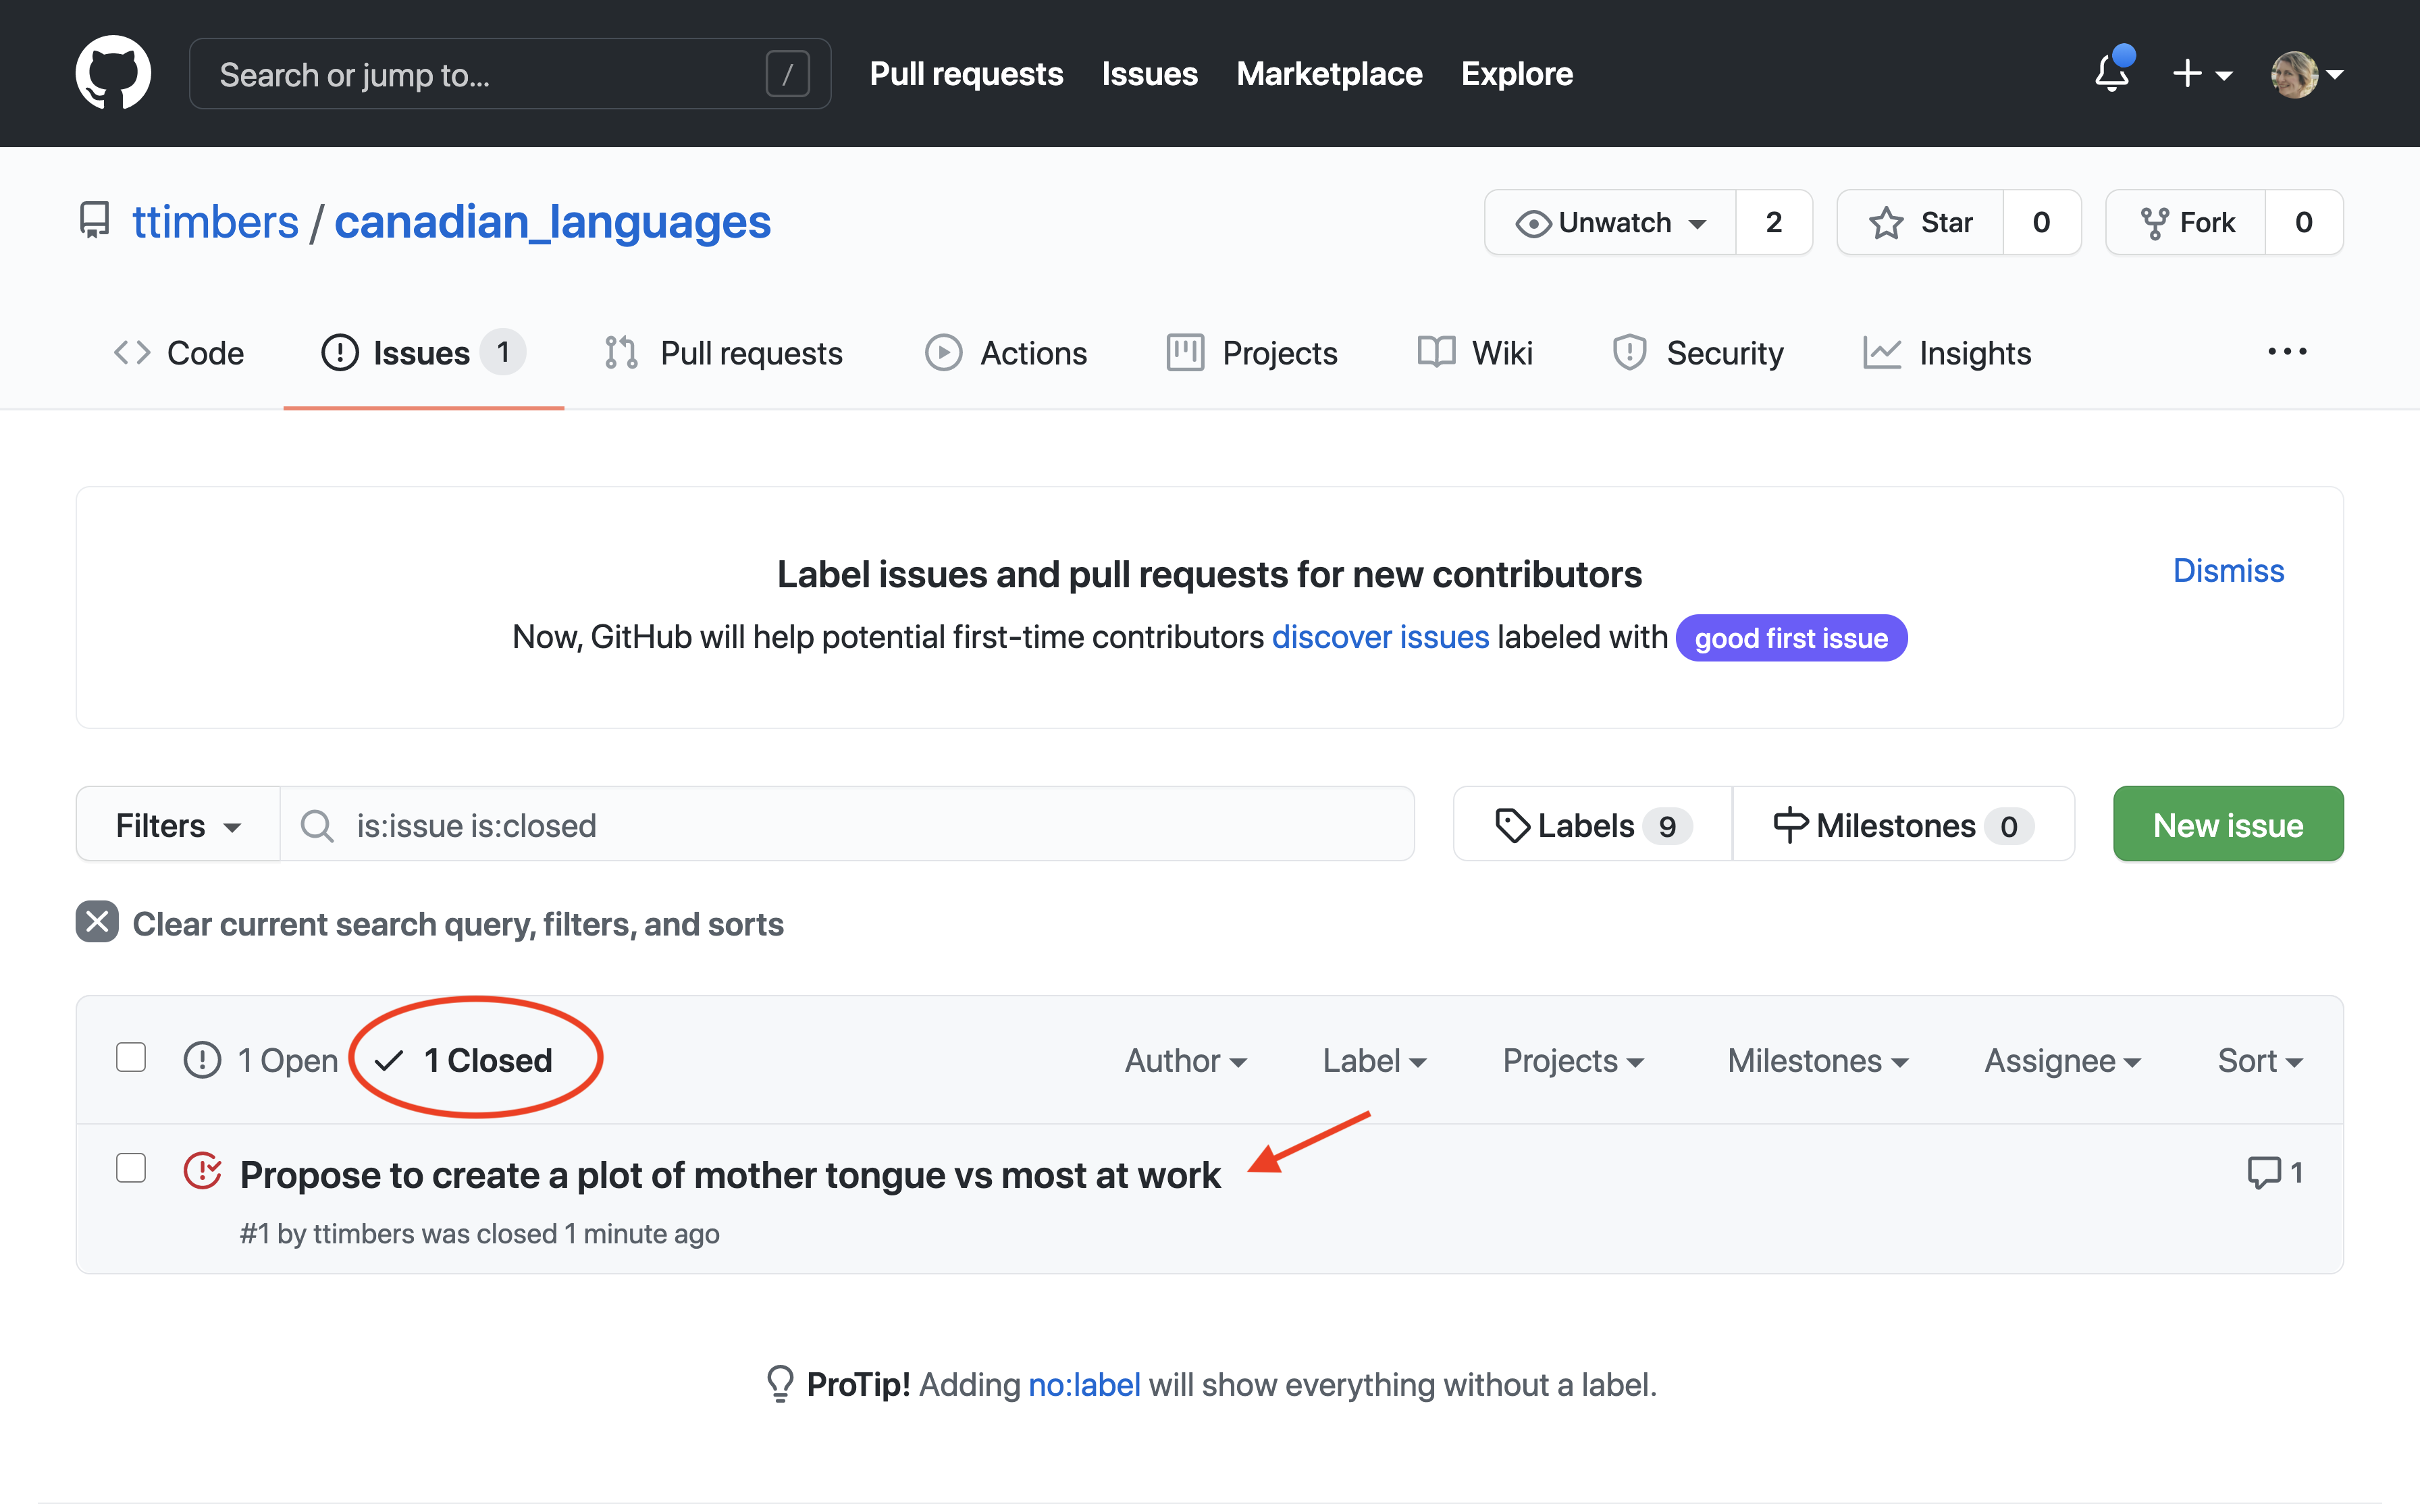
When a conversation is resolved, you can click "Close issue". The closed issue can be later viewed by clicking the "Closed" header link in the "Issue" tab (Figure 12.8.20).
Section 12.9 Exercises
Practice exercises for the material covered in this chapter can be found in the accompanying worksheets repository in the "Collaboration with version control" row. You can launch an interactive version of the worksheet in your browser by clicking the "launch binder" button. You can also preview a non-interactive version of the worksheet by clicking "view worksheet." If you instead decide to download the worksheet and run it on your own machine, make sure to follow the instructions for computer setup found in Chapter 13. This will ensure that the automated feedback and guidance that the worksheets provide will function as intended.
Section 12.10 Additional resources
Now that you’ve picked up the basics of version control with Git and GitHub, you can expand your knowledge through the resources listed below:
-
GitHub’s guides website and Happy Git and GitHub for the useR are great resources for learning more about Git and GitHub.
-
Good enough practices in scientific computing [55] provides more advice on useful workflows and "good enough" practices in data analysis projects.
-
In addition to GitHub, there are other popular Git repository hosting services such as GitLab and BitBucket. Comparing all of these options is beyond the scope of this book, and until you become a more advanced user, you are perfectly fine to just stick with GitHub. Just be aware that you have options!
-
GitHub’s documentation on creating a personal access token and the Happy Git and GitHub for the useR personal access tokens chapter are both excellent additional resources to consult if you need additional help generating and using personal access tokens.

