Chapter 19 Shiny Documents
We have briefly introduced Shiny documents in Subsection 2.8.2. Shiny is a very powerful framework for building web applications based on R. It is out of the scope of this book to make a comprehensive introduction to Shiny (which is too big a topic). We recommend that readers who are not familiar with Shiny learn more about it from the website https://shiny.rstudio.com before reading this chapter.
Unlike the more traditional workflow of creating static reports, you can create documents that allow your readers to change the parameters underlying your analysis and see the results immediately in Shiny R Markdown documents. In the example shown in Figure 2.8, the histogram will be automatically updated to reflect the number of bins selected by the reader.
A picture is worth a thousand words, and a Shiny document can potentially show you a thousand pictures as you interact with it. The readers are no longer tied to the fixed analysis and conclusions in the report. They may explore other possibilities by themselves, and possibly make new discoveries or draw different conclusions.
Section 19.1 Getting started
You can turn any HTML-oriented R Markdown documents to Shiny documents by adding
runtime: shiny to the YAML metadata as a top-level field, e.g.,
---
title: "Shiny Document"
output: html_document
runtime: shiny
---
Note that the output format of the R Markdown document must be an HTML format. That is, the document should generate a web page (a
*.html file). Non-HTML formats such as pdf_document and word_document will not work with the Shiny runtime. Please also note that some presentation formats are also HTML formats, such as ioslides_presentation and slidy_presentation.
You can also create a new Shiny document from the RStudio menu
File -> New File -> R Markdown, and choose the document type "Shiny" (see Figure 19.1).
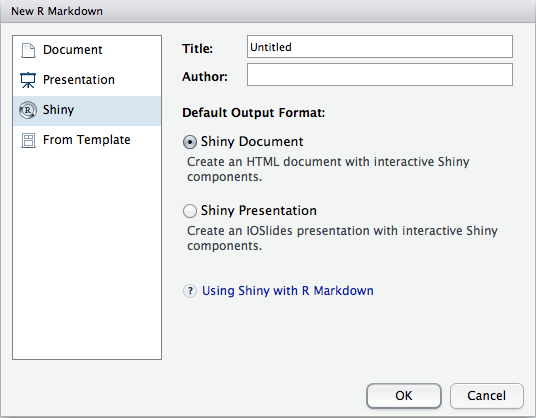
Create a new Shiny document in RStudio.
To run a Shiny document in RStudio, you need to click the button "Run Document" on the editor toolbar (RStudio will automatically replace the "Knit" button with "Run Document" when it detects a Shiny document). If you do not use RStudio, or want to run the document in the R console for troubleshooting, you can call the function
rmarkdown::run() and pass the filename to it.
You can embed Shiny inputs and outputs in your document. Outputs are automatically updated whenever inputs change. In the following example, we create a numeric input (
numericInput) with the name rows, and then refer to its value via input$rows when generating output:
```{r, echo=FALSE}
numericInput("rows", "How many cars?", 5)

renderTable({
  head(cars, input$rows)
})
```
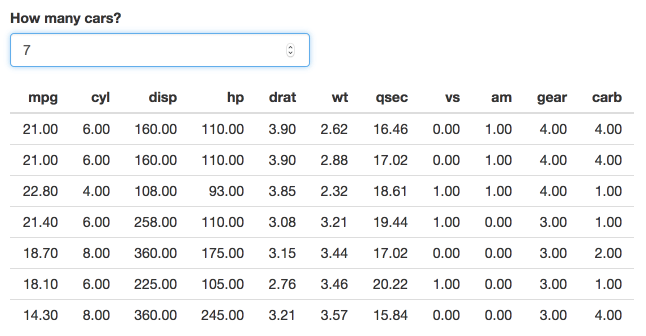
Increase the number of rows in the table in a Shiny document.
In the above example, the output code was wrapped in a call to
renderTable(). There are many other render functions in Shiny that can be used for plots, printed R output, and more. This example uses renderPlot() to create dynamic plot output:
```{r, echo=FALSE}
sliderInput("bins", "Number of bins:", 30, min = 1, max = 50)

renderPlot({
  x    = faithful[, 2]  # Old Faithful Geyser data
  bins = seq(min(x), max(x), length.out = input$bins + 1)

  # draw the histogram with the specified number of bins
  hist(x, breaks = bins, col = 'darkgray', border = 'white')
})
```
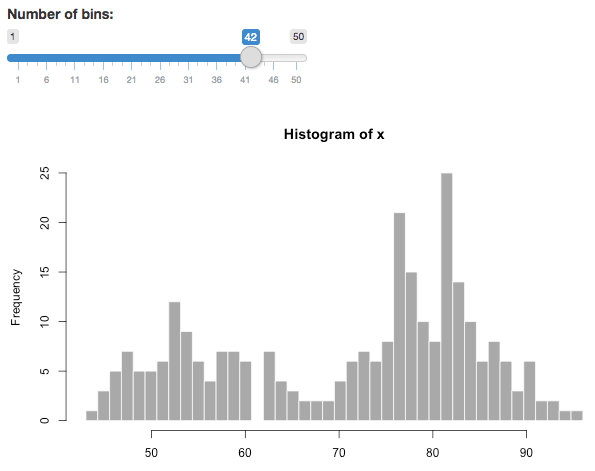
Change the number of bins of a histogram in a Shiny document.
Section 19.2 Deployment
Shiny documents must be supported by a live R session running behind the scenes. When you run a Shiny document locally, it uses your local R session. Usually only you can see and interact with the document. If you want to share the document with people who do not have R installed, or do not want to run the document locally, you will have to deploy the document on a server, and share the URL of the document. Then other people only need a web browser to visit your document.
There are two ways to deploy a Shiny document. You can either use a hosted service provided by RStudio, or set up your own server. The first way is technically easier, but sometimes you may not be allowed to use an external hosted service, so you have to install the required software (Shiny Server or RStudio Connect) on your own server to deploy the Shiny documents.
Subsection 19.2.1 ShinyApps.io
You can publish Shiny documents to the ShinyApps (https://shinyapps.io) hosted service. To do this you, should ensure that you have:
-
An account on ShinyApps (use the signup form to request an account).
-
A latest version of the
rsconnectR package. You can install this as follows:
install.packages("rsconnect")
You can then deploy an interactive Shiny document in the same way that you currently deploy normal Shiny applications. From the working directory containing the document(s), just execute:
rsconnect::deployApp()
If you are using RStudio, you can also use the
Publish button available at the top-right of the window when running a Shiny document (see Figure 19.4).
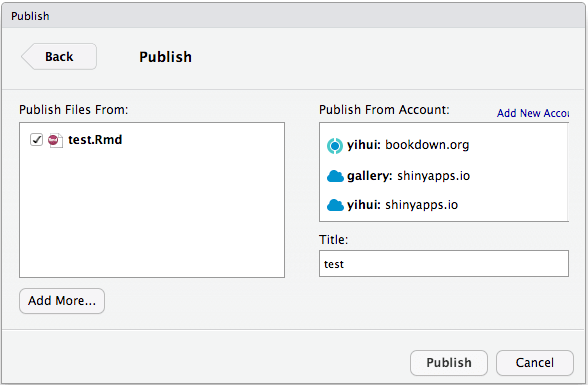
Deploy a Shiny document to ShinyApps.io.
If there is a file named
index.Rmd in the directory, it will be served as the default document for that directory, otherwise an explicit path to the Rmd file should be specified in the URL if you want to visit this Rmd document. For example, the URL for index.Rmd deployed to ShinyApps may be of the form https://example.shinyapps.io/appName/, and the URL for test.Rmd may be of the form https://example.shinyapps.io/appName/test.Rmd.
Subsection 19.2.2 Shiny Server / RStudio Connect
Both Shiny Server (https://www.rstudio.com/products/shiny/shiny-server/) and RStudio Connect (https://www.rstudio.com/products/connect/) can be used to publish Shiny documents. They require knowledge about Linux. Installing and configuring them should normally be a task for your system administrator if you are not familiar with Linux or do not have the privilege.
Section 19.3 Embedded Shiny apps
Besides embedding individual Shiny inputs and outputs in R Markdown, it is also possible to embed a standalone Shiny application within a document. There are two ways to do this:
-
Defining the application inline using the
shinyApp()function; or -
Referring to an external application directory using the
shinyAppDir()function.
Both functions are available in the
shiny package (not rmarkdown), which will be automatically loaded when runtime: shiny is specified in the YAML metadata of the document, so you do not have to call library(shiny) to load shiny (although it does not hurt if you load a package twice).
Subsection 19.3.1 Inline applications
This example uses an inline definition:
```{r, echo=FALSE}
shinyApp(

  ui = fluidPage(
    selectInput("region", "Region:",
                choices = colnames(WorldPhones)),
    plotOutput("phonePlot")
  ),

  server = function(input, output) {
    output$phonePlot = renderPlot({
      barplot(WorldPhones[,input$region]*1000,
              ylab = "Number of Telephones", xlab = "Year")
    })
  },

  options = list(height = 500)
)
```
Note the use of the
height parameter to determine how much vertical space the embedded application should occupy.
Subsection 19.3.2 External applications
This example embeds a Shiny application defined in another directory:
```{r, echo = FALSE}
shinyAppDir(
  system.file("examples/06_tabsets", package="shiny"),
  options = list(width = "100%", height = 700)
)
```
Note that in all of R code chunks above, the chunk option
echo = FALSE is used. This is to prevent the R code within the chunk from rendering to the output document alongside the Shiny components.
Section 19.4 Shiny widgets
Shiny widgets enable you to create re-usable Shiny components that are included within an R Markdown document using a single function call. Shiny widgets can also be invoked directly from the console (useful during authoring) and show their output within the RStudio Viewer pane or an external web browser.
Subsection 19.4.1 The shinyApp() function
At their core, Shiny widgets are mini-applications created using the
shinyApp() function. Rather than creating a ui.R and server.R (or app.R) as you would for a typical Shiny application, you pass the UI and server definitions to the shinyApp() function as arguments. We have given an example in Subsection 19.3.1.
The simplest type of Shiny widget is just an R function that returns a
shinyApp().
Subsection 19.4.2 Example: k-Means clustering
The
rmdexamples package (https://github.com/rstudio/rmdexamples) includes an example of a Shiny widget implemented in this fashion. The kmeans_cluster() function takes a single dataset argument and returns a Shiny widget to show the result of k-Means clustering. You can use it within an R Markdown document like this:
```{r, echo = FALSE}
library(rmdexamples)
kmeans_cluster(iris)
```
Figure 19.5 shows what the widget looks like inside a running document.
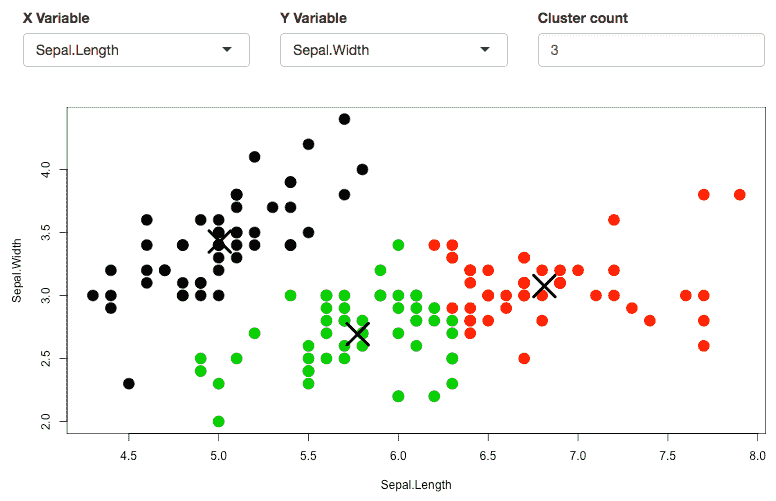
A Shiny widget to apply k-Means clustering on a dataset.
Below is the source code of the
kmeans_cluster() function:
kmeans_cluster = function(dataset) {

  library(shiny)
  vars = names(dataset)

  shinyApp(
    ui = fluidPage(
      fluidRow(style = "padding-bottom: 20px;",
        column(4, selectInput('xcol', 'X Variable', vars)),
        column(4, selectInput('ycol', 'Y Variable', vars,
                              selected = vars[2])),
        column(4, numericInput('clusters', 'Cluster count', 3,
                               min = 1, max = 9))
      ),
      fluidRow(
        plotOutput('kmeans', height = "400px")
      )
    ),

    server = function(input, output, session) {

      # Combine the selected variables into a new data frame
      selectedData = reactive({
        dataset[, c(input$xcol, input$ycol)]
      })

      clusters = reactive({
        kmeans(selectedData(), input$clusters)
      })

      output$kmeans = renderPlot(height = 400, {
        res = clusters()
        par(mar = c(5.1, 4.1, 0, 1))
        plot(selectedData(),
             col = res$cluster, pch = 20, cex = 3)
        points(res$centers, pch = 4, cex = 4, lwd = 4)
      })
    },

    options = list(height = 500)
  )
}
Subsection 19.4.3 Widget size and layout
Shiny widgets may be embedded in various places including standard full width pages, smaller columns within pages, and even HTML5 presentations. For the widget size and layout to work well in all of these contexts, we recommend that the total height of the widget is no larger than 500 pixels. This is not a hard and fast rule, but HTML5 slides can typically only display content less than 500px in height, so if you want your widget to be usable within presentations, this is a good guideline to follow.
You can also add an explicit
height argument to the function that creates the widget (default to 500 so it works well within slides).
Section 19.5 Multiple pages
You can link to other Shiny documents by using the Markdown link syntax and specifying the relative path to the document, e.g.,
[Another Shiny Document](another.Rmd). If you click the link to another Rmd document on one page, that Rmd document will be launched as the current interactive Shiny document.
Currently, only one document can be active at a time, so documents cannot easily share state, although some primitive global sharing is possible via the R script
global.R (see the help page ?rmarkdown::run).
By default, it is only possible to link to R Markdown files in the same directory subtree as the file on which
rmarkdown::run() was invoked (e.g., you cannot link to ../foo.Rmd). You can use the dir argument of rmarkdown::run() to indicate the directory to be treated as the root.
Section 19.6 Delayed rendering
A Shiny document is typically rendered every time it is shown, and is not shown to the user until the rendering is complete. Consequently, a document that is large or contains expensive computations may take some time to load.
If your document contains interactive Shiny components that do not need to be rendered right away, you can wrap Shiny code in the
rmarkdown::render_delayed() function. This function saves its argument until the document’s rendering is done and has been shown to the user, then evaluates it and injects it into the output document when the computation is finished.
Here is an example that demonstrates how
render_delayed() works. The code enclosed within the render_delayed() call will execute only after the document has been loaded and displayed to the user:
```{r, echo = FALSE}
numericInput("rows", "How many cars?", 5)

rmarkdown::render_delayed({
  renderTable({
    head(cars, input$rows)
  })
})
```
Section 19.7 Output arguments for render functions
In a typical Shiny application, you specify an output element in the UI using functions like
plotOutput() and verbatimTextOutput(), and render its content using functions like renderPlot() and renderPrint().
By comparison, in a Shiny document, the UI elements are often implicitly and automatically created when you call the
renderXXX() functions. For example, you may want to use a renderPlot() function without having to create a plotOutput() slot beforehand. In this case, Shiny helpfully associates the corresponding output object to each renderXXX() function, letting you use Shiny code outside of a full Shiny app. However, some functionality can be lost in this process. In particular, plotOutput() can take in some optional arguments to set things like width and height, or allow you to click or brush over the plot (and store that information).
To pass options from
renderXXX() to xxxOutput(), you can use the outputArgs argument, if it is available to specific renderXXX() functions. For example, suppose that you want to render a plot and specify its width to be 200px and height to be 100px. Then you should use:
```{r, echo = FALSE}
renderPlot({
  plot(yourData)
}, outputArgs = list(width = "200px", height = "100px")
)
```
No matter how many output arguments you want to set (all the way from zero to all possible ones),
outputArgs always takes in a list (the default is an empty list, which sets no output arguments). If you try to pass in a non-existent argument, you will get an error like the following message (in this example, you tried to set an argument named not_an_argument):
**Error**: Unused argument: in `outputArgs`, `not_an_argument`
is not an valid argument for the output function
To see
outputArgs in action, run the R Markdown document below or visit https://gallery.shinyapps.io/output-args/ for the live version online. The document is interactive: brush over the image and see the xmin, xmax, ymin, and ymax values change (printed right under the image).
---
title: Setting output args via render functions
runtime: shiny
output: html_document
---

This interactive Rmd document makes use of the `outputArgs`
argument now available to all Shiny `render` functions. To
give an example, this allows you to set arguments to
`imageOutput` through `renderImage`. This means that you
don't have to create a `ui` object just to be able to brush
over an image. Note that this only applies to snippets of
Shiny code during an interactive Rmd (and not to embedded
full apps -- the ones you need to call `shinyApp` to run).

## Brushing over an image (and storing the data)

```{r setup, echo=FALSE}
library(datasets)

generateImage = function() {
  outfile = tempfile(fileext = '.png')
  png(outfile)
  par(mar = c(0,0,0,0))
  image(volcano, axes = FALSE)
  contour(volcano, add = TRUE)
  dev.off()
  list(src = outfile)
}
```

```{r image}
renderImage({
  generateImage()
}, deleteFile = TRUE,
   outputArgs = list(brush = brushOpts(id = "plot_brush"),
                     width = "250",
                     height = "250px")
)
```

Here is some of the brushing info sent to the server:
(brush over the image to change the data)

```{r brush info}
renderText({
  print(input$plot_brush)
  brush = input$plot_brush
  paste0("xmin: ", brush$xmin, "; ",
         "xmax: ", brush$xmax, "; ",
         "ymin: ", brush$ymin, "; ",
         "ymax: ", brush$ymax)
})
```

---

### Resizing a plot

```{r plot}
renderPlot({
  plot(cars)
}, outputArgs = list(width = "75%",
                     height = "250px")
)
```
Subsection 19.7.1 A caveat
We want to emphasize that you can only use this functionality within a Shiny R Markdown document (i.e., you must set
runtime: shiny in the YAML metadata). But even if that is the case, this is only applicable to pieces of Shiny code that render output without the corresponding explicit output elements in the UI. If you embed a full Shiny application in your document and try to use outputArgs, it will be ignored and print the following warning to the R Markdown console (in this case, your ui function would be something like ui = plotOutput("plot")):
Warning in `output$plot`(...) :
Unused argument: outputArgs. The argument outputArgs is only
meant to be used when embedding snippets of Shiny code in an
R Markdown code chunk (using runtime: shiny). When running a
full Shiny app, please set the output arguments directly in
the corresponding output function of your UI code.
The same will happen if you try to use
outputArgs in any other context, such as inside a regular (i.e., not embedded) Shiny app. The rationale is that if you are already specifying a ui function with all the output objects made explicit, you should set their arguments directly there instead of going through this round-about way.
