Section 1.6 Data Science Project Organization
Data science projects vary quite a lot so it can be difficult to give universal rules for how they should be organized. However, there are a few ways to organize projects that are commonly useful. In particular, almost all projects have to deal with files of various sorts---data files, code files, output files, etc. This section talks about how files work and how projects can be organized and customized.
Subsection 1.6.1 RStudio Projects
Creating RStudio projects can be very helpful for organizing your code and any other files that you may want to use in one location together.
New projects can be created by clicking on the RStudio Projects button in RStudio:
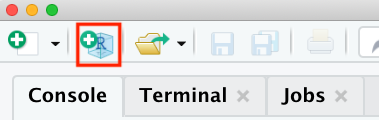
This will create a special file with the .Rproj extension. This file tells RStudio to identify the directory containing the .Rproj file as the main directory for that R Project. A new session of RStudio will be started when a user opens an R project from this main directory. The previous state including settings of that project will be maintained from one time to the next. The files that were open the last time the user worked on the project will automatically be opened again. Other packages like the
here package will also recognize the .Rproj file to make analyses easier for the user. We will explain how this package works in the next section.
Subsection 1.6.2 File Paths
Since we’re assuming R knowledge in this course, you’re likely familiar with file paths. However, this information will be critical at a number of points throughout this course, so we want to quickly review relative and absolute file paths briefly before moving on.
In future courses, whenever you write code and run commands within R to work with data, or whenever you use Git commands to document updates to your files, you will be working in a particular location. To know your location within a file system is to know exactly what folder you are in right now. The folder that you are in right now is called the working directory. Your current working directory in the Terminal may be different from your current working directory in R and may yet even be different from the folder shown in the Files pane of RStudio. The focus of this lesson is on the Terminal, so we will not discuss working directories within R until the next lesson.
Knowing your working directory is important because if you want to tell Terminal to perform some actions on files in other folders, you will need to be able to tell the Terminal where that folder is. That is, you will need to be able to specify a path to that folder. A path is a string that specifies a sequence of folders to traverse in order to end up at a final destination. The end of a path string may be a file name if you are creating a path to a file. If you are creating a path to a folder, the path string will end with the destination folder. In a path, folder names are separated by forward slashes
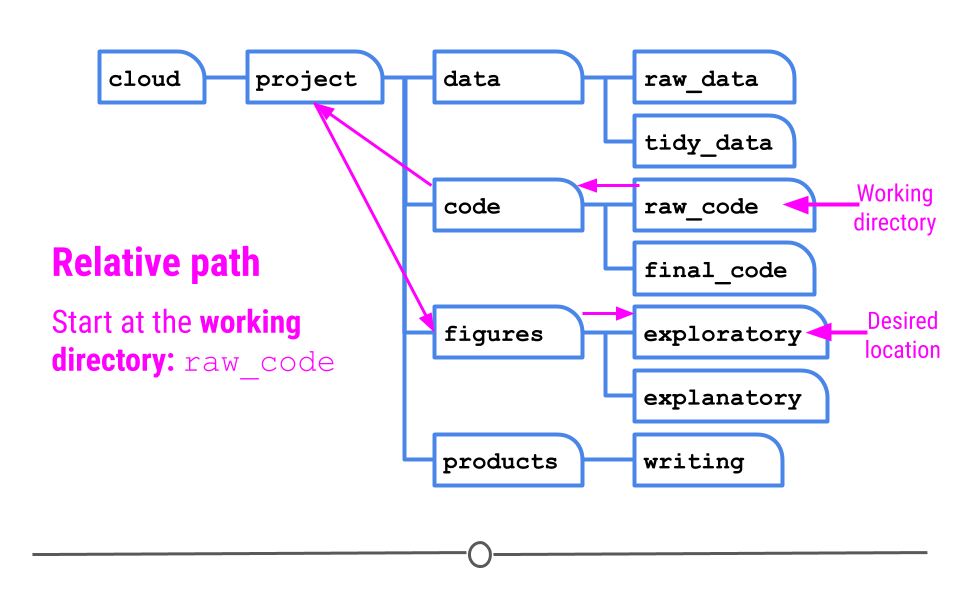
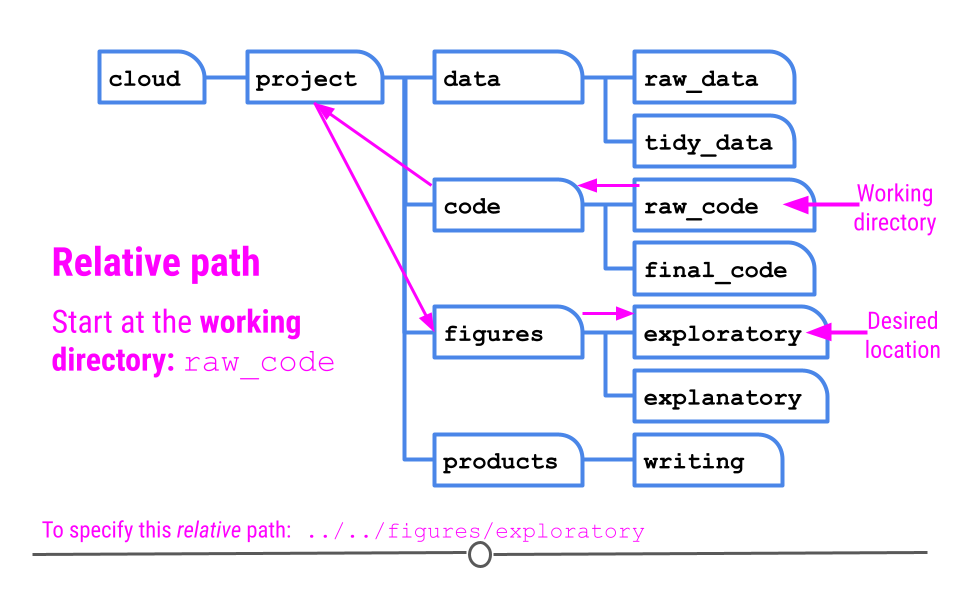
/. For example, let’s say that your current working directory in the Terminal is the raw_code directory, and you wish to navigate to the exploratory subfolder within the figures folder to see the graphics you’ve created.
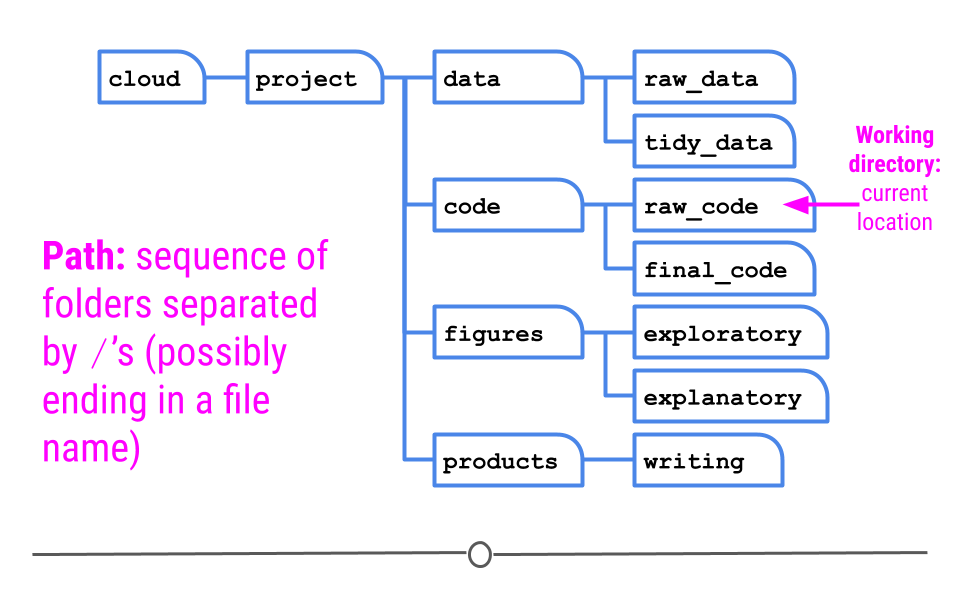
There are two types of paths that can lead to that location: relative and absolute.
Subsubsection 1.6.2.1 Relative Paths
The first is called a relative path which gives a path to the destination folder based on where you are right now (in
raw_code). ]
Subsubsection 1.6.2.2 Absolute Paths
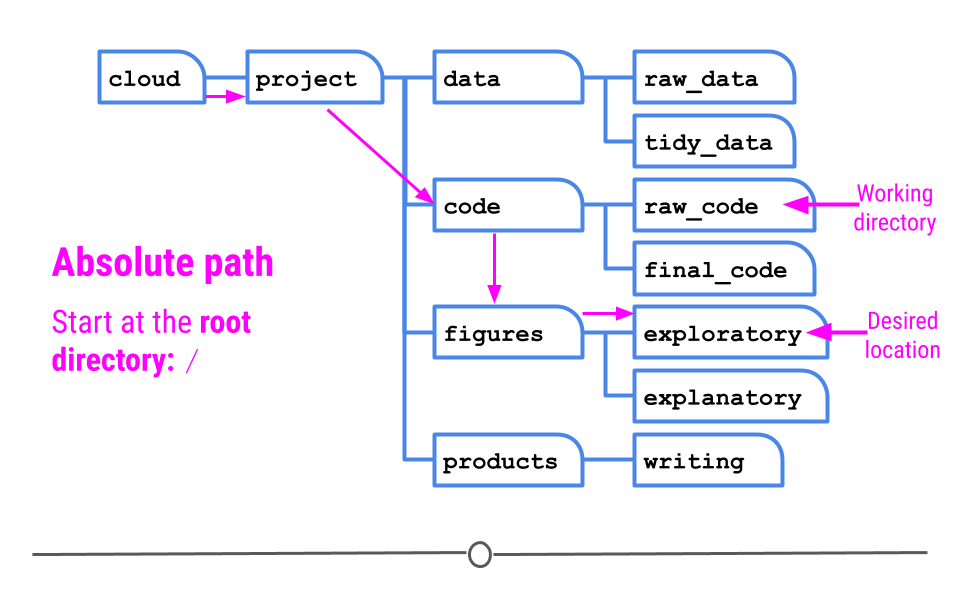
Alternatively, you can specify an absolute path. An absolute path starts at the root directory of a file system. The root directory does not have a name like other folders do. It is specified with a single forward slash
/ and is special in that it cannot be contained within other folders. In the current file system, the root directory contains a folder called cloud, which contains a folder called project.
Subsubsection 1.6.2.3 Path Summary
Analogy: The root directory is analogous to a town square, a universal starting location. The desired destination location might be the baker. An absolute path specifies how to reach the bakery starting from this universal starting location of the town square. However, if we are in the library right now, a relative path would specify how to reach the bakery from our current location in the library. This could be pretty different than the path from the town square.
Imagine that your friend plans to go from the town square, then to the library, and finally to the bakery. In this analogy, the town square represents the root directory, a universal starting location. If your friend is currently at the library and asks you for directions, you would likely tell them how to go from the library (where they are) to the bakery (where they want to go). This represents a relative path -- taking you from where you are currently to where you want to be. Alternatively, you could give them directions from the Town square, to the library, and then to the bakery. This represents an absolute path, directions that will always work in this town, no matter where you are currently, but that contain extra information given where your friend is currently.
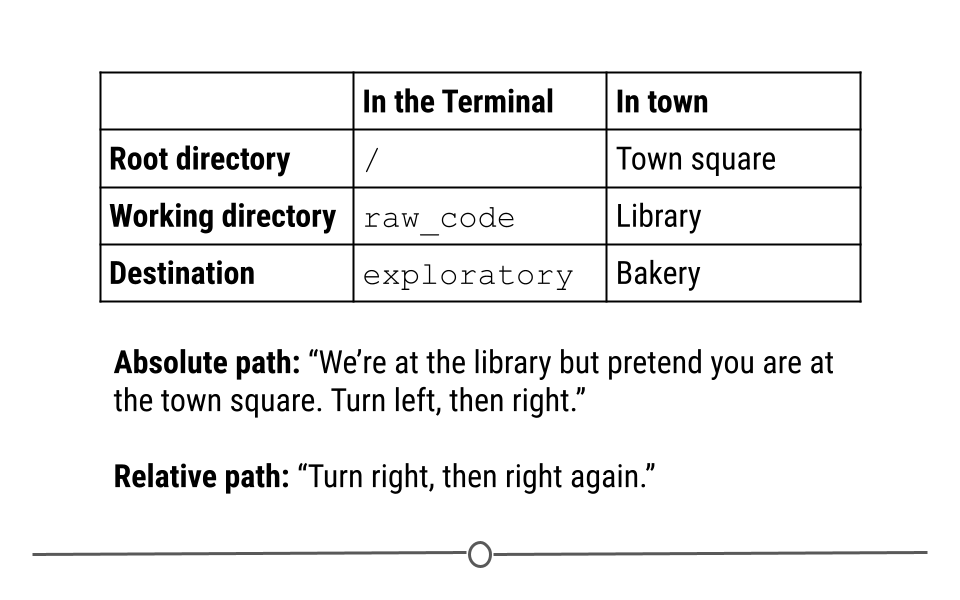
To summarize once more, relative paths give a path to the destination folder based on where you are right now (your current working directory) while absolute paths give a path to the destination folder based on the root directory of a file system.
Subsection 1.6.3 The here package
With most things in R, there’s a package to help minimize the pain of working with and setting file paths within an R Project - the
here package.
As a reminder, to get started using the
here package (or any R package!), it first has to be installed (using the install.packages() function) and then loaded in (using the library() function). Note that the package name in the install.packages() function has to be in quotes but for library() it doesn’t have to. The code to copy and paste into your R console is below:
install.packages("here")
library(here)
here is a package specifically designed to help you deal with file organization when you’re coding. This package allows you to define in which folder all your relative paths should begin within a project. The path of this folder will be displayed after typing library(here) or here().
Subsubsection 1.6.3.1 Setting your project directory
After installing and loading the
here package, to set your project directory using here(), you’ll simply type the command here(). You’ll notice that the output of here() and getwd() in this case is the same; however, what they’re doing behind the scenes is different.
-
getwd()- shows the directory you are in currently -
here()- sets the directory to use for all future relative paths
The
here() function is what you want to use to set your project directory so that you can use it for future relative paths in your code. While in this case it also happened to be in the same directory you were in, it doesn’t have to be this way. The here() function looks to see if you have a .Rproj file in your project. It then sets your base directory to whichever directory that file is located.
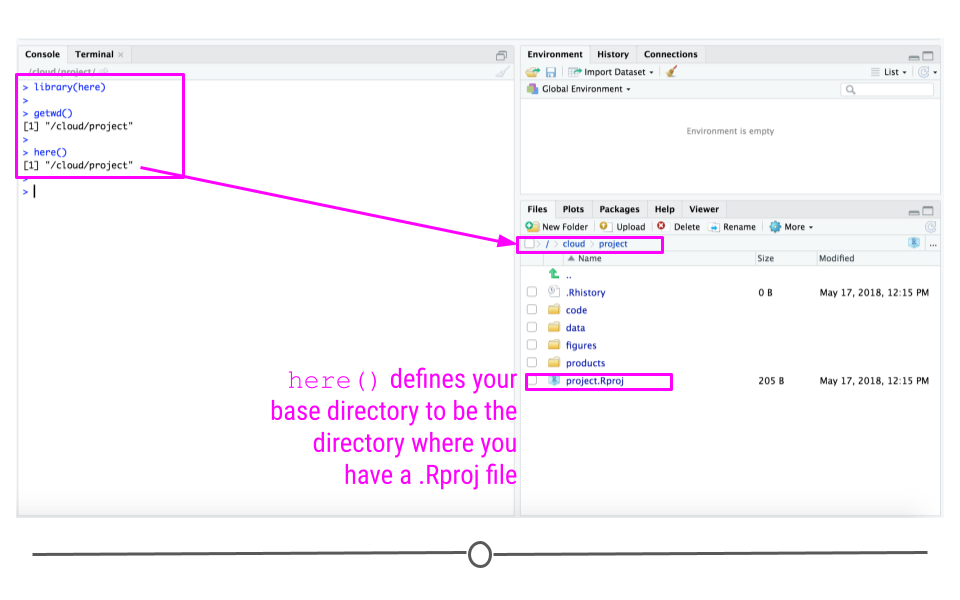
So, if we were to change our current directory and re-type
here() in the Console, you’ll note that the output from here() does not change because it’s still looking for the directory where .Rproj is.
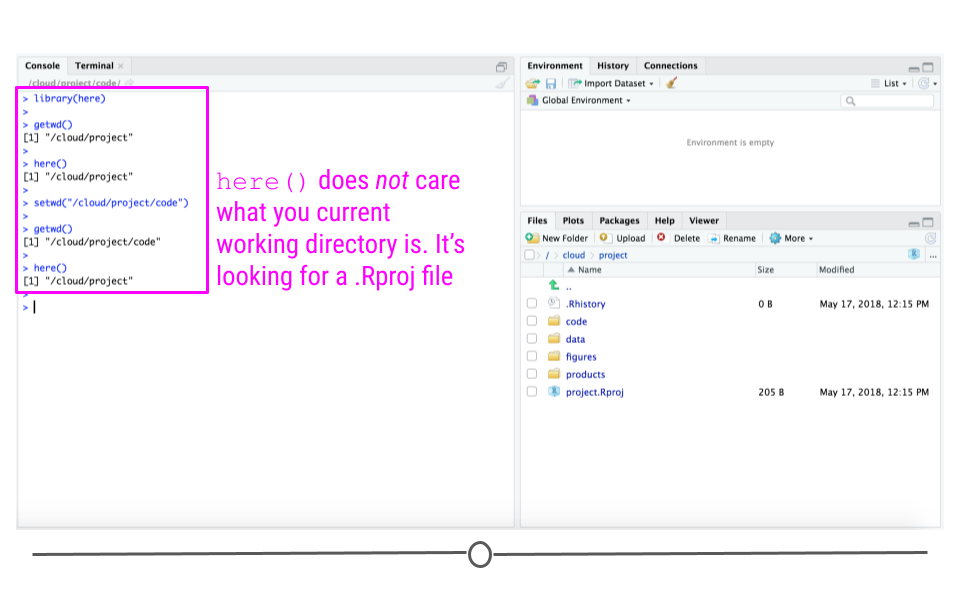
Note: In cases where there is no .Rproj file,
here() will look for files other than a .Rproj file. You can read about those cases in the fine print here. But for most of your purposes, here() will behave as we just discussed.
Subsubsection 1.6.3.2 Get files paths using here()
After setting your project folder using
here(), R will then know what folder to use to define any and all other paths within this project.
For example, if you wanted to include a path to a file named "intro_code.R" in your
raw_code directory (which is in your code directory), you would simply specify that in your code like this:
here("code", "raw_code", "intro_code.R")
This code says start from where I’ve already defined the project starts (
here()), then look in the folders code and then raw_code, for the file "intro_code.R."
The syntax is simplified when using
here(). Each subdirectory or file in the path is in quotes and simply separated by commas within the here() function, and voila you have the relative path you’re looking for relative to here().
The output from this code includes the correct file path to this file, just as you wanted!
Subsubsection 1.6.3.3 Save and load files using here()
Using the
here package, files within the project can be saved or loaded by simply typing here (to replace the path to the project directory) and typing any subdirectories like in this example, where we want to save data to the raw_data directory within the data directory of the project:
save(introcode_data_object, file = here::here("data", "raw_data", "intro_code_object.rda"))
Or if we want to load this data:
load(here::here("data", "raw_data", "intro_code_object.rda"))
Remember that the
:: notation indicates that we are using a function of a particular package. So the here package is indicated on the left of the :: and the here() function is indicated on the right.
Subsubsection 1.6.3.4 Where you should use this
You should use
here() to set the base project directory for each data science project you do. And, you should use relative paths using here() throughout your code any time you want to refer to a different directory or sub-directory within your project using the syntax we just discussed.
Subsubsection 1.6.3.5 The utility of the here package
You may be asking, "Why do I need the
here package?", and you may be thinking, "I can just write the paths myself or use the setwd() function".
In our own words:
1) It makes your project work more easily on someone else’s machine - there is no need to change the working directory path with the
setwd() function. Everything will be relative to the .Rproj containing directory. 2) It allows for your project to work more easily for you on your own machine - say your working directory was set to "/Users/somebody/2019_data_projects/that_big_project" and you decide you want to copy your scripts to be in "/Users/somebody/2020_data_projects/that_big_project_again" to update a project for the next year with new data. You would need to update all of your scripts each time you set your working directory or load or save files. In some cases that will happen many times in a single project! 3) It saves time. Sometimes our directory structures are complicated and we can easily make a typo. The here package makes writing paths easier!
Subsection 1.6.4 File Naming
Having discussed the overall file structure and the
here package, it’s now important to spend a bit of time talking about file naming. It may not be the most interesting topic on its surface, but naming files well can save future you a lot of time and make collaboration with others a lot easier on everyone involved. By having descriptive and consistent file names, you’ll save yourself a lot of headaches.
Subsubsection 1.6.4.1 Good File Names
One of the most frustrating things when looking at someone’s data science project is to see a set of files that are completely scattered with names that don’t make any sense. It also makes it harder to search for files if they don’t have a consistent naming scheme.
One of the best organized file naming systems is due to Jenny Bryan who gives three key principles of file naming for data science projects. Files should be:
-
Machine readable
-
Human readable
-
Nicely ordered
If your files have these three characteristics, then it will be easy for you to search for them (machine readable), easy for you to understand what is in the files (human readable), and easy for you to glance at a whole folder and understand the organization (be nicely ordered). We’ll now discuss some concrete rules that will help you achieve these goals.
Subsubsection 1.6.4.2 Machine readable files
The machine we are talking about when we say "machine readable" is a computer. To make a file machine readable means to make it easy for you to use the machine to search for it. Let’s see which one of the following examples are good example of machine readable files and which are not.
-
Avoid spaces: 2013 my report.md is a not good name but 2013_my_report.md is.
-
Avoid punctuation: malik’s_report.md is not a good name but maliks_report.md is.
-
Avoid accented characters: 01_zoë_report.md is not a good name but 01_zoe_report.md is.
-
Avoid case sensitivity: AdamHooverReport.md is not a good name but adam-hoover-report.md is.
-
Use delimiters: executivereportpepsiv1.md is not a good name but executive_report_pepsi_v1.md is.
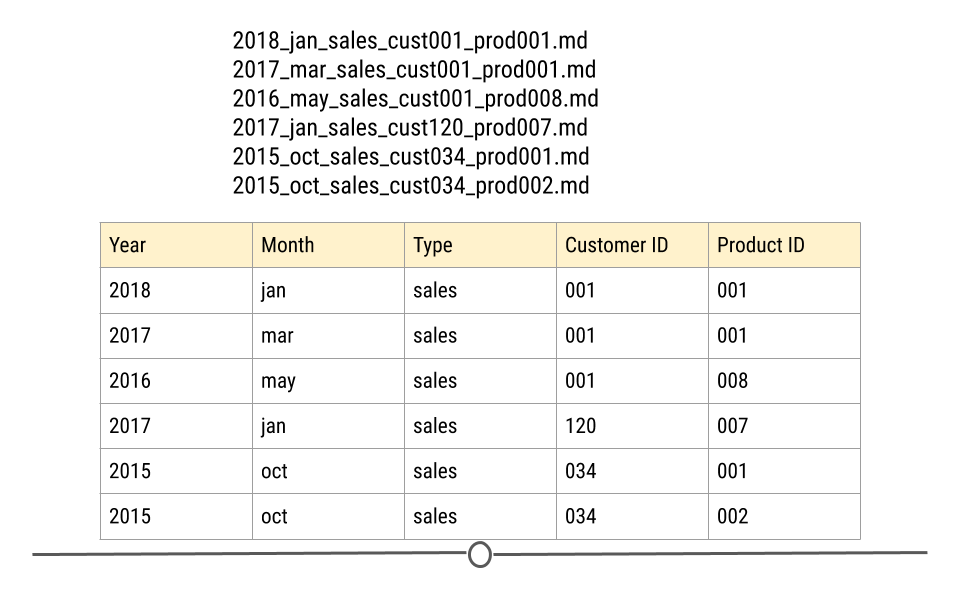
So to wrap up, spaces, punctuations, and periods should be avoided but underscores and dashes are recommended. You should always use lowercase since you don’t have to later remember if the name of the file contained lowercase or uppercase letters. Another suggestion is the use of delimiters (hyphens or underscores) instead of combining all the words together. The use of delimiters makes it easier to look for files on your computer or in R and to extract information from the file names like the image below.
Subsubsection 1.6.4.3 Human readable files
What does it mean for a file to be human readable? A file name is human readable if the name tells you something informative about the content of the file. For instance, the name
analysis.R does not tell you what is in the file especially if you do multiple analyses at the same time. Is this analysis about the project you did for your client X or your client Y? Is it preliminary analysis or your final analysis? A better name maybe would be 2017-exploratory_analysis_crime.R. The ordering of the information is mostly up to you but make sure the ordering makes sense. For better browsing of your files, it is better to use the dates and numbers in the beginning of the file name.
Subsubsection 1.6.4.4 Be nicely ordered
By using dates, you can sort your files based on chronological order. Dates are preferred to be in the ISO8601 format. In the United States we mainly use the mm-dd-yyyy format. If we use this format for naming files, files will be first sorted based on month, then day, then year. However for browsing purposes it is better to sort files based on year, then month, and then day and, therefore, the yyyy-mm-dd format, also known as the ISO8601 format, is better. Therefore,
2017-05-21-analysis-cust001.R is preferred to 05-21-2017-analysis-cust001.R.
If dates are not relevant for your file naming, put something numeric first. For instance if you’re dealing with multiple reports, you can add a reportxxx to the beginning of the file name so you can easily sort files by the report number.
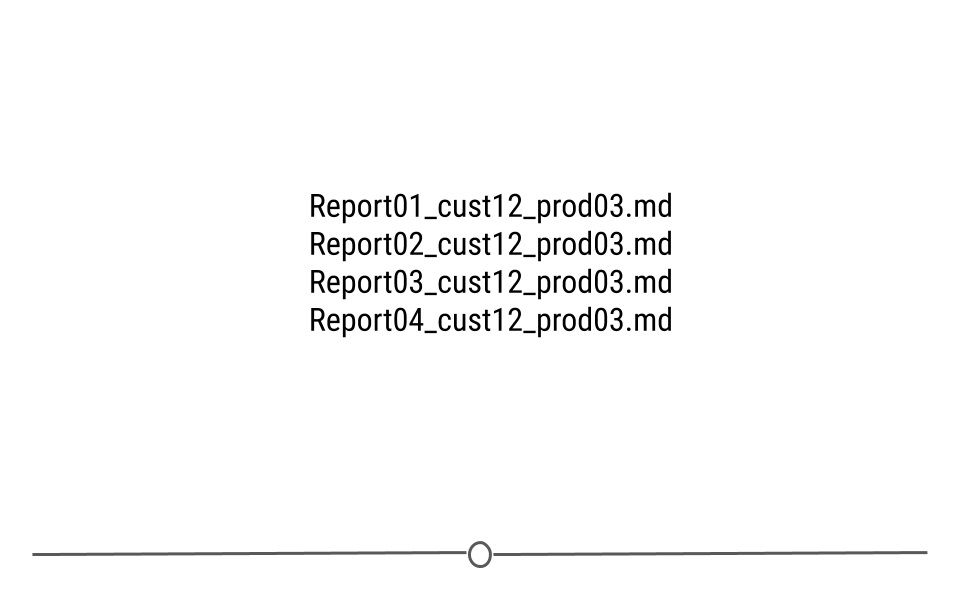
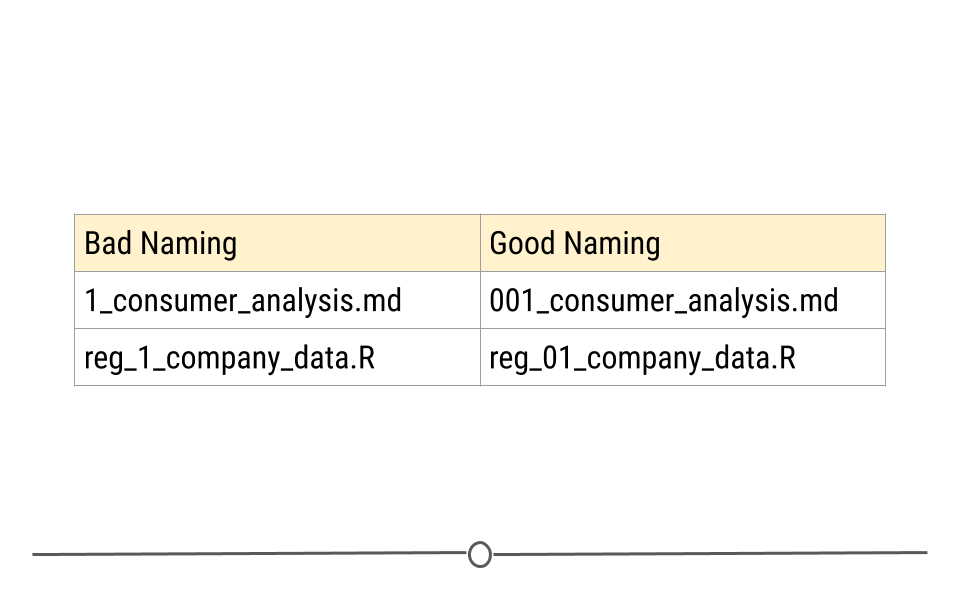
In addition to making sure your files can be nicely ordered, always left-pad numbers with zeros. That is first set a max number of digits for your numbers determined by how many files you will potentially have. So if you may not have more than 1000 files you can choose three digits. If not more than a hundred you can choose two digits and so on. Once you know the number of digits, left-pad numbers with zeros to satisfy the number of digits you determined in the first step. In other words, if you’re using three digits, instead of writing 1 write 001 and instead of writing 17 write 017.
Subsection 1.6.5 Project Template: Everything In Its Place
When organizing a data science project all of your files need to be placed somewhere on your computer. While there is no universal layout for how to do this, most projects have some aspects in common. The
ProjectTemplate package codifies some of these defaults into a usable file hierarchy so that you can immediately start placing files in the right place.
Here, we load the
ProjectTemplate package and create a new project called data_analysis under the current working directory using the minimal template.
library(ProjectTemplate)
create.project(project.name = "data_analysis",
               template = "minimal")
The
create.project() function creates a directory called data_analysis for this project. Inside that directory are the following sub-directories (which we can view in the RStudio File browser):
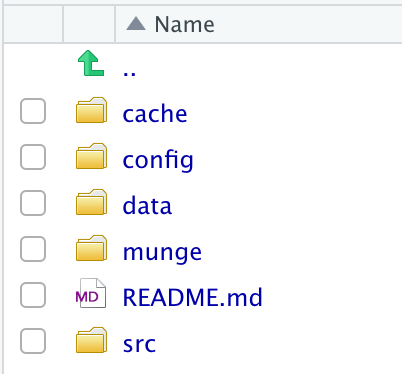
Inside each directory is a README file that contains a brief description of what kinds of files should go in this directory. If you do not need all of these directories, it is okay to leave them empty for now.
The
data directory is most straightforward as it holds any data files (in any variety of formats) that will be needed for the project. The munge directory contains R code files that pre-process the data you will eventually use an any analysis. Any results from pre-processing can be stored in the cache directory if needed (for example, if the pre-processing takes a long time). Finally, the src directory contains R code for data analysis, such as fitting statistical models, computing summary statistics, or creating plots.
A benefit of the
ProjectTemplate package is that it allows for a lot of customization. So if there is file/directory structure that you commonly use for your projects, then you can create a custom template that can be called everytime you call create.project(). Custom templates can be created with the create.template() function. For example, you might always want to have a directory called plots for saving plots made as part of the data analysis.
The
config directory can contain configuration information for your project, such as any packages that need to be loaded for your code to work. We will not go into the details of this directory for now, but suffice it to say that there are many ways to customize your project. Lastly, the load.project() function can be used to "setup" your project each time you open it. For example, if you always need to execute some code or load some packages, calling load.project() with the right config settings will allow you to automate this process.

